
Cherry-picking season is long gone, and yet I was surprised to see nice fresh cherries in Safeway today, and I couldn’t help pick up a bag. I mean, how can you pass on some Cherries?! they are a family-favorite, and though pitting them is a pain, the flavor of cherries in baked goodies is a treat we did not want to miss. So off I went, with a plan to bake one of my favorite cherry treats – Cherry Blondies with browned butter, and a layer of chocolate shavings on the top, because chocolate makes everything taste better!
Brown Butter is nothing but plain old butter, cooked until it turns light brown in color, and starts radiating a lovely nutty flavor that it acquires during the cooking process. To make browned butter, simply melt some white unsalted butter in a small saucepan on the stove. Continue cooking it on medium-high heat until the butter boils and begins to brown, attaining a deep honey-brown color. You can skimp the foam that forms on the top, but watch your butter, don’t turn on the stove and go talk on a phone, because your butter can turn from brown to black in no time!
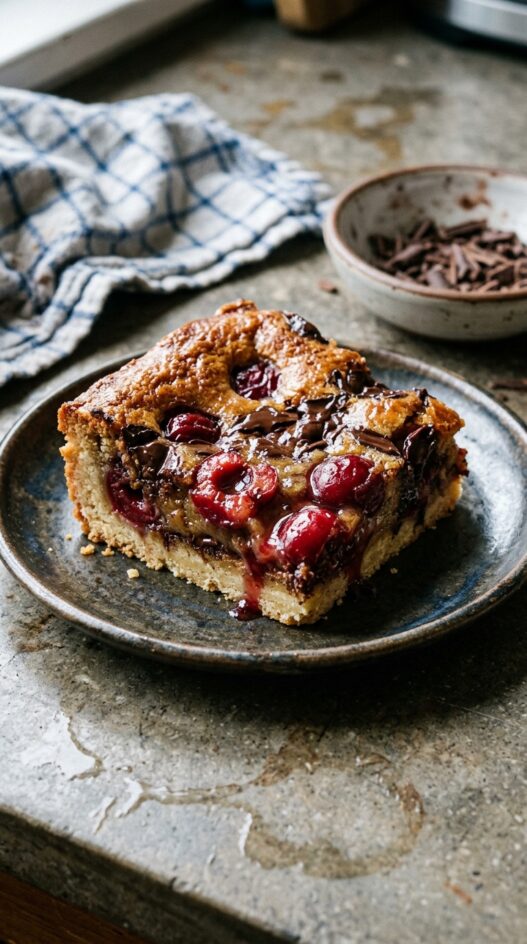
The cherries paired beautifully with the sweet, nutty, buttery flavor of the browned butter. And the chocolate shavings on the top gave it a serrated partially melted topping that was delicious to eat. Just cut them up into cute bite-sized pieces so the cherries remain intact, and you get petit-fours that you can share and enjoy, without feeling overly-guilty.
Print
Brown-Butter Chocolate Cherry Blondies
- Total Time: 70 minutes
- Yield: 16 small squares
Description
These Brown-Butter Chocolate Cherry Bars combine the nutty flavor of browned butter with fresh cherries and a chocolate topping for a delightful treat.
Ingredients
For the Crust
- 7 tbsp (105 ml) unsalted butter, melted
- 1/3 cup (65 g) sugar
- 1/4 tsp vanilla extract
- 1 cup plus 1 tbsp (255 ml) all purpose flour
- Pinch of salt
For the Filling
- 1/2 cup (100 g) sugar
- 2 large eggs
- Pinch of salt
- 1/4 cup (60 ml) all purpose flour
- 1 tsp vanilla extract
- 1/2 cup (1 stick) unsalted butter, diced
- 1 lb (450 g) sweet cherries (12 oz (340 g) of pitted cherries)
- 1 bar of semi-sweet chocolate - shaved
Instructions
- Preheat the oven to 375°F (190°C). Cut two 12-inch lengths of parchment paper and trim each to fit the 8-inch width of an 8×8-inch square baking pan. Press it into the bottom and sides of your pan in a crisscross pattern.
- To make the crust, combine 7 tbsp melted butter, 1/3 cup sugar, 1/4 tsp vanilla extract, 1 cup plus 1 tbsp all-purpose flour, and a pinch of salt in a bowl. Mix until the dough comes together.
- Press the dough evenly into the prepared baking pan. Bake for 15 minutes, or until the edges are lightly golden. Remove from the oven and set aside to cool.
- For the filling, melt 1/2 cup of unsalted butter in a small saucepan over medium-high heat. Continue cooking until the butter turns a deep honey-brown color and emits a nutty aroma. Be careful not to burn it. Remove from heat and let cool slightly.
- In a mixing bowl, whisk together 1/2 cup sugar and 2 large eggs until well combined. Stir in the browned butter, then add 1/2 cup all-purpose flour and 1/4 tsp salt. Mix until smooth.
- Fold in the pitted and halved cherries, then pour the filling over the pre-baked crust, spreading it evenly.
- Sprinkle chocolate shavings over the top of the filling.
- Bake for 25 minutes, or until the filling is set and the top is golden brown. A toothpick inserted into the center should come out clean.
- Allow the bars to cool completely in the pan before lifting them out using the parchment paper. Cut into 16 small squares and serve.
Notes
- If you taste them immediately, you will get an eggy taste and smell; but don’t worry, this will go away as the bars cool down.
- In fact, they taste much better the next day!
- Store in an airtight container at room temperature for up to 3 days.
- Use fresh cherries for the best flavor, but frozen can be substituted if necessary.
- Prep Time: 30 minutes
- Cook Time: 40 minutes
- Category: Dessert
- Cuisine: American
Nutrition
- Serving Size: 1 square
- Calories: 180
- Sugar: 13
- Sodium: 75
- Fat: 10
- Carbohydrates: 22
- Fiber: 1
- Protein: 2
- Cholesterol: 45
If You Liked This Recipe, You’ll Love These
- Chocolate Dipped Chili and Lime Shortbread Cookies
- Oatmeal Peanut Butter Brookie Bars
- A Cozy Night in with Chocolate
- Almond Butter, Maple and Chocolate Chunk Cookies
Frequently Asked Questions
How do I know when the brown butter has reached the right color?
The article says to cook the 1/2 cup of unsalted butter over medium-high heat until it turns “a deep honey-brown color” and gives off a nutty aroma. The recipe warns not to leave the stove during this process since butter can go from brown to black quickly; once it reaches honey-brown, remove from heat immediately.
Why do the bars smell eggy right after baking, and will that go away?
The notes acknowledge that “if you taste them immediately, you will get an eggy taste and smell” — but it will go away as the bars cool down. In fact, they taste noticeably better the next day once the flavors have had time to meld.
Why does the recipe call for parchment paper in a crisscross pattern?
Two 12-inch lengths of parchment are trimmed to fit the 8-inch width of the pan and pressed in a crisscross pattern so all four sides are covered. This makes lifting the cooled bars out of the pan easy — you can pull up both strips and transfer the whole slab to a cutting board before slicing into 16 squares.
Can I use frozen cherries instead of fresh?
The notes say fresh cherries give the best flavor, but frozen can be substituted if necessary. If using frozen, thaw and pat them dry before folding into the batter to avoid adding excess moisture that could prevent the filling from setting.