Description
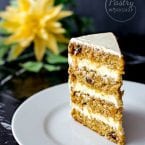
A dense, moist carrot cake is studded with coconut, dried cranberries, raisins, coconut and even grated parsnip for the perfect flavor and amazing texture.
Ingredients
Units
Carrot parsnip sponge
- 4 eggs
- 150 g butter, melted
- 90 ml vegetable oil
- 250 g white sugar
- 100 g brown sugar
- 280 g all-purpose flour
- 1 teaspoon cinnamon powder
- 1 teaspoon ground ginger
- 8 g baking powder
- 4 g baking soda
- 4 g salt
- 300 g carrots, grated (use large holes; squeeze out excess liquid)
- 100 g parsnip, peeled and grated (use large holes; squeeze out excess liquid)
- 40 g dried cranberries
- 40 g raisins
- 50 g shredded coconut
- 30 g rolled oats
Cream cheese buttercream
- 250 g (2 sticks / 1 cup) unsalted butter, at room temperature
- 250 g (about 9 oz) full-fat cream cheese, at room temperature
- 500 g (about 4 cups) powdered sugar, sifted
- 1 1/2 teaspoons vanilla extract
- Pinch of salt
Instructions
Carrot parsnip sponge
- Preheat the oven to 170°C (340°F). Line two 18 cm (7-inch) round cake pans with baking paper.
- In a large bowl, beat the eggs, melted butter, oil, and both sugars until pale and fluffy, about 3–5 minutes.
- Sift in the flour, cinnamon, ginger, baking powder, baking soda, and salt. Mix just until smooth.
- Fold in the grated carrots, grated parsnip, cranberries, raisins, shredded coconut, and rolled oats.
- Divide the batter equally between the two prepared pans. Bake for 45–50 minutes, until a toothpick inserted in the center comes out clean.
- Cool completely in the pans. Once cool, level the tops if needed. Slice each cake in half horizontally to get 4 sponge discs. Set aside.
Cream cheese buttercream
- Let the butter and cream cheese sit at room temperature for at least 30 minutes before starting — cold cream cheese leaves lumps no matter how long you beat it.
- Beat the butter in a stand mixer until light and smooth. Add the cream cheese and beat until fully combined and fluffy.
- Add the sifted powdered sugar gradually, about 60 g (½ cup) at a time, mixing on low after each addition to prevent a sugar cloud. Once all the sugar is in, increase speed and beat until smooth. Add the vanilla and salt and mix to combine. The buttercream should be thick enough to hold its shape on the cake without sliding.
- Place the buttercream in a pastry bag fitted with a round nozzle.
Assemble
- Place one sponge disc on a cake board. Pipe a layer of cream cheese buttercream on top. Repeat with the remaining discs, finishing with a disc of cake on top.
- Refrigerate for 30 minutes to firm up.
- Apply a thin crumb coat of buttercream all over the cake. Refrigerate for another 30 minutes.
- Apply a final, thicker layer of buttercream and smooth until the sides are straight and the top is level. Decorate as you wish.
Notes
Grate the parsnip on the large holes of a box grater — too fine and the parsnip releases too much water and the center of the cake can stay gummy. Squeeze out any extra liquid before folding it in. The finished cake improves overnight — bake it the day before, wrap without frosting, and frost the morning you plan to serve it.
- Category: Baking, Cake
- Cuisine: American