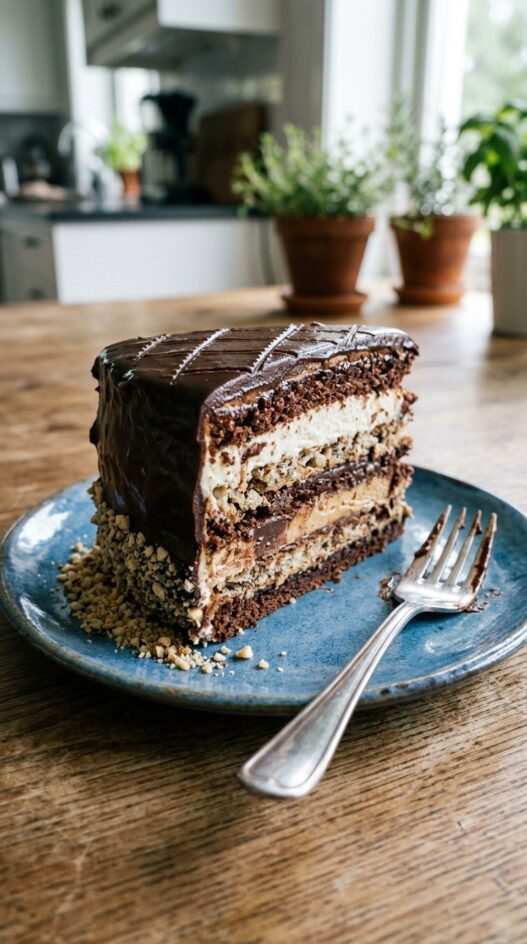

To call something the world’s greatest cake is a pretty lofty statement, but I stand by it. I had my first marjolaine while traveling through Lyon, and have never forgotten that very first bite. I have since had my fair share of marjolaines and few have ever disappointed me. The contrast between smooth and chewy, soft and crunchy is a play of textures you get all in one bite.
While the possibilities for making marjolaine are endless, my favourite is still the original. Delicious layers of chocolate sponge, chewy almond dacquoise, praline buttercream, ganache and flavoured cream all work perfectly to balance and compliment eachother.s The flavoured cream works to balance the richness of the ganache, the praline balances out the chocolate and the chewy dacquoise contrasts with the soft chocolate sponge and smooth buttercream.
While this cake is a test in time and patience, it is well worth the effort in its simplicity and flavour. Like I said this is quite possibly the world’s greatest cake after all. With fall here and winter on the way, this is the perfect reason to spend some time in the kitchen and cheer your soul for the impending cold.
Print
Making Marjolaine: The Greatest Almond Dacquoise Cake
- Yield: 2 cakes
Description
Marjolaine is a cake with beautiful play of textures between smooth and chewy, soft and crunchy that you get all in one bite.
Ingredients
Chocolate Cake (one half sheet pan)
- 110g all purpose flour
- 200g granulated sugar
- 33g cocoa powder
- 1 tsp baking soda
- 1/2 tsp baking powder
- 1/2 tsp salt
- 125g buttermilk
- 55g vegetable oil
- 1 egg
- 1/2 tsp vanilla extract
- 120g fresh brewed coffee
Almond Dacquoise
- 300g egg whites
- 300g granulated sugar
- 300g almond flour
Praline Buttercream
- 150g egg whites
- 300g granulated sugar
- 150ml water
- 75g granulated sugar
- 450g butter, softened
- 150g praline paste
Ganache
- 125 g chopped chocolate
- 125 ml heavy cream
Creme d’Or (prepare this right before you are ready to assemble as it will seize upon standing)
- 200g chocolate, chopped
- 200 ml heavy cream
Stabilized Whipped Cream
- 300 ml heavy Cream
- 75g powdered sugar
- 100g devonshire cream
- 2 tbsp frangelico (or to taste)
Instructions
Chocolate Cake (one half sheet pan)
- Preheat oven to 350F
- Sift all your dry ingredients and place in a mixer with the paddle attachment
- Combine all your wet ingredients and mix well. Turn mixer on medium low speed and add your wet ingredients to your dry slowly to avoid any lumps
- Prepare your half sheet pan. Spray with nonstick cooking spray and line with parchment paper. Pour your cake batter into the sheetpan and spread into a thin layer with an offset spatula
- Bake for 8-10 minutes, rotating half way through. Set aside and let cool to room temperature.
Almond Dacquoise
- Spray two half sheet pans with nonstick cooking spray
- Draw eight 4 x 12 inch rectangles (4 per half sheet pan) and turn parchment paper over and place on the greased sheet pan
- In a mixer with a whip attachment, whip egg whites until frothy. Add sugar and whip to stiff peaks
- Gently fold in almond flour, being careful not to deflate the meringue
- Immediately pipe batter onto the parchment lined baking sheets using the rectangles as a guideline. The batter spreads slightly so keep inside the lines
- Bake at 225F until slightly brown and completely dry. Let cool to room temperature
Praline Buttercream
- Combine 300g sugar and water in a saucepan and gently stir to dissolve, clean the sides of the pan with a wet brush to make sure there is no sugar that may crystallize
- When sugar starts to bubble, combine the egg whites and remaining sugar in a mixer and mix on medium low speed. Once sugar reaches 235F take it off the heat and add slowly to the side of the mixer avoiding the whisk. Turn speed to high until meringue is stiff and glossy.
- Add softened butter and whisk until smooth. At first the buttercream will look broken. Keep whipping, it will come together evenutally. Don’t be worried and do not throw it away.
- Add praline paste. Refrigerate until ready to use. To soften to room temperature again use paddle attachment to re-whip. If it is breaking use a blowtorch along the underside of the bowl to re-emulsify. If you don’t have a blowtorch, just keep paddling. It will come together again
Ganache
- Heat heavy cream and bring to boil.
- Put chopped chocolate into a bowl and pour heavy cream over the chocolate. Let sit for a minute and gently whisk to incorporate. Set aside for a few hours to thicken
Creme d’Or (prepare this right before you are ready to assemble as it will seize upon standing)
- Whip cream to medium peak and let sit at room temperature for a few minutes
- Bring water to a simmer in small pot. Put chopped chocolate in a small bowl, turn heat off and place bowl on top of the pot to melt the chocolate.
- Combine into whipped cream
Stabilized Whipped Cream
- Whip cream and sugar to soft peak and add devonshire cream. Whip to stiff peak and add frangelico.
Assembly
- Put buttercream, ganache, creme d’or and stabilized whip cream into piping bags. (no particular tips needed, just cut an opening to pipe)
- Cut strips of cake the into 4×12 inch slices. You will have 2 extra slices. Pick the slices that are most even
- Pipe the ganache on top of the cakes
- Place one piece of dacquoise on top of each cake
- Pipe the creme d’or on top of the dacquoise layer
- Place another piece of dacquoise on top of the creme d’or
- Pipe praline buttercream on top of the dacquoise
- Layer another strip of dacquoise on top of the buttercream
- Pipe stabilized whipped cream over dacquoise and top with final piece of dacquoise
- Trim sides of cake to make them even
- Use remaining praline buttercream to ice the cake.
- Pipe remaining ganache into a bowl and melt ganache so that it is pourable. Take care not to burn the ganache. 30 seconds should do it
- Pour ganache over cake taking care to cover the sides.
- Let set a couple minutes then using a serrated knife make an imprint of a crosshatch pattern on top of the cake
- Place ground hazelnuts around the edges
- Let cake sit in the refrigerator for a couple hours to allow the dacquoise to soften and become chewy
- Cut thin slices using a serrated knife to allow for easy cutting through dacquoise layers. Note Keep layers thin so your cake doesn’t end up being too tall. Unglazed marjolaines can be assembled and frozen to be glazed at a later date.
Frequently Asked Questions
My dacquoise turned out chewy and sticky, not crispy, what went wrong?
It wasn’t dry enough coming out of the oven. Dacquoise bakes low and slow at 225°F specifically to drive out moisture, it should come out completely dry to the touch, with only the lightest golden color. If it’s still tacky in the center, give it more time. Humidity in your kitchen can also be a factor; on a wet day, budget an extra 20–30 minutes. The chewy texture you want happens later, after the assembled cake rests in the refrigerator and the layers absorb moisture from the creams.
My Italian meringue buttercream looks broken and curdled. Is it ruined?
No, keep whipping. This is the most common point of panic with marjolaine and it resolves almost every time. The buttercream breaks because the butter is slightly too cold when it meets the meringue. Just keep the mixer running on high. If it stays broken after several minutes, run a kitchen torch or a warm cloth briefly along the outside of the bowl to raise the temperature slightly, then continue whipping. It will come together into a smooth, glossy cream. Don’t throw it out.
Can I make marjolaine ahead and how should I store it?
Yes, this is actually one of the advantages of marjolaine. Assemble the cake without the ganache glaze, wrap tightly, and freeze it. Glaze it from frozen on the day you plan to serve. The instructions note this explicitly. Once glazed and refrigerated, the cake needs at least 2 hours for the dacquoise layers to soften to that signature chewy texture. Slice with a serrated knife in a single smooth stroke, it cuts through the dacquoise cleanly without cracking the ganache.


The greatest INDEED.
Great recipe, thank you so much!
how long does the Dacquoise take to bake?
I too remember my first experience with marjolane cake; it was in the culinary course and I swear time stood still for a moment. It truly is the (or at least top 2!) cakes I’ve ever had in my entire life. And I’ve had a lot of cake :p There is just no comparison – this cake has it all; the different textures & flavours – cannot be beat. I highly recommend trying this recipe; yes it’s involved but honestly the best things in life require some effort :) The payoff won’t disappoint! Thanks so much for this recipe!
Do you have the measurements in cups and spoons? For the marjolanie.
What a recipe! I loved it. I’ll try it and get back to you on how it came out.
wow. What a recipe. Yes, this recipe makes TWO cakes, so be aware of that. I made this recipe with two ‘back up’ recipes for marjolaines to refer to. I have never made italian buttercream, praline paste, or dacquoise. I did not have a good candy thermometer or a stand mixer. For my pointers, read on:
I made a separate recipe for praline paste. Just google ‘praline paste recipe’ and I believe it was the first result. You caramelize nuts in a sugarwater blend on the stove. Mine crystalized and I PANICKED. Not to worry. Just keep cooking it, it will eventually caramelize. I felt the paste had a SLIGHT burnt taste because nuts are so easy to burn and it takes at least 10 minutes on the stove in the sugar syrup for it to caramelize. Had I used raw nuts instead of pre skinned and roasted perhaps that would’ve helped. You will need a food processer for the praline paste.
I soon found out every recipe for gateau marjolaine is different. Some include two flavors of buttercream; some don’t even have a chocolate cake layer. I’m very glad I did the chocolate cake layer as it was SO yummy.
The italian buttercream was the hardest part. I had to make it twice as I think I overheated the sugar syrup the first go round. You really need a good candy thermometer, but if you don’t have one, here’s a tip I couldn’t find in ANY of the marjolaine instructions out there: you’re heating it to ‘soft ball’ stage. Have a cup of cold water nearby as you test the sugar syrup.
When you pour it into the beating meringue mixture, it wants to harden and glug up at the bottom of the bowl. KEEP MIXING. I almost gave up the second time because I think it was starting to harden. The first time it literally turned to hard candy at the bottom of my bowl, though. It also is not clear how long to beat the egg whites before adding the syrup; I believe it should be to stiff peaks or very near stiff peaks. After I added sugar and butter, it was so soupy and runny. I was certain I had ruined it for a second time. It did not looke/feel “broken” as the recipe says and I didn’t really know what they meant. It tasted divine, it was just extremely runny. Don’t give up until you’ve chilled in the fridge for an hour; Mine firmed up hugely to the consistency of a thin cookie dough after refrigerating.
The cake recipe was simple. Creme d’or and ganache too. For stabilized whipped cream, I googled ‘stabilized whipped cream’ recipe, and used unflavored gelatin because I do not have access to devonshire cream.
The dacquoise: I split off and followed mary berry’s dacquoise recipe from her marjolaine recipe. She has you grind the nuts yourself and toast the powder. Then you add QUITE A LOT of cornstarch, and you use powdered sugar instead of regular. I was anxious about these deviations but followed it closely and the dacquois turned out alright. IMPORTANT NOTE: Mary Berry’s proportions for the dacquoise are all the same, but yet she only has you make 4 rectangles. This recipe calls for 8 (in order to make 2 cakes). I accidentally only did 4 as per Berry’s recipe. I remade a half-recipe of dacquoise today so I could complete the second cake and spread it thin over 4 rectangles again. MY CONCLUSION: YOU SHOULD DOUBLE THE DACQUOISE RECIPE. Spreading this recipe’s proportions over 8 rectangles is much too thin and difficult. The thickness from makeing 4 rectangles was just right. ALMOND FLOUR VS. GROUND NUTS: They are essentially the same thing. But I used almond flour instead of freshly ground and toasted nuts the second time I make the dacquoise. The consistency does not look good and I’m concerned it soaks up too much moisture with the finely ground almond flour. Do freshly ground nuts if you can.
THE GANACHE is not nearly enough to do 2 cakes. I had to make extra. I almost wonder if the ganache/creme d’or proportions are swapped as you do NOT need that much creme d’or.
FREEZING: You CAN freeze this fully assembled cake! While the recipe says to freeze ‘unglazed’ (which I assume means without ganache??) but I took a risk and chucked the whole thing in the freezer overnight. Took out, put in a hard cooler with lots of ice packs, and traveled 2 hours in the heat to our picnic destination. It further sat in the cooler for 2 hours before we ate it and it was just right. It is very difficult to cut/trim the edges even with a sharp knife.
OVERALL, I will probably never make this again because it was so complicated. It was a fun adventure and I made it for myself for a birthday cake. It is a piece de resistance. I will certainly make praline paste and the praline icing again now that I know how to do it; it was probably the best icing i’ve ever had and I am NOT an icing person. Just the chocolate cake layered with ganache and praline buttercream would be just right.
This recipe yields two separate finished cakes, correct?
Thanks for your time. Great recipe.
Spectacular Michelle! No easy feat and you did an amazing job! Thank you so much for sharing…
Why don’t you do things in American measurement? It is very frustrating.
Hi Nancy,
Thank you for frequenting Honest Cooking! We appreciate your feedback. One of our favorite things about our contributors and readers is that they come from all over the world. This also means that they all have different backgrounds when it comes to measurements.
When working with grams measurements I either use a digital scale or quickly convert the recipe using a website such as this: http://www.metric-conversions.org/weight/grams-to-ounces.htm
I hope this helps, happy baking!
-Annelise