If you have ever been to Italy, you know that breakfast is done a little differently. No scrambled eggs or pancakes, instead there are cookies like these gluten free ritornelli cookies.
By Ambra Torelli

“Latte and Biscotti” (cookies and milk) is the most common meal every child starts their day with. In particular, Ritornelli, rustic cookies that are very dear to any Italian kid, grown up kid or childhood nostalgic… are the perfect kind of breakfast cookies!
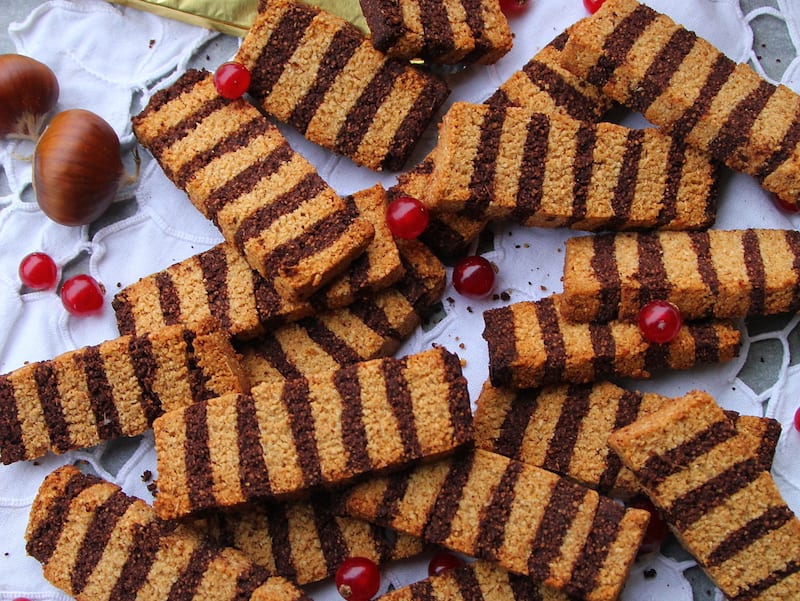
They are delicious striped biscuits made with cocoa powder and almond flour according to an old recipe. Each color has its own delicious flavor: the rich, chocolaty one an the sweet nutty taste with a tinge of vanilla. And thanks to this new version I created, you’ll be able to enjoy Ritornelli with no guilt!

In fact, as always, I recreated a healthy gluten free recipe for my beloved Italian cookies: they are fragrant, delicious and melt in your mouth. And what makes them even better is that these cookies are perfect for anybody with food allergies, as they are completely grain free and can be made nut free as well simply by replacing rice flour with cassava flour and substituting almond meal with tigernut flour. The ones here in the photos were made following the allergy friendly version and, as you can see, they came out perfect!
And did I mention these healthy Italian cookies are dairy free and egg free as well?!?
Rest assured: what they are not lacking is flavor! They are deliciously addictive and I am sure they will enhance your breakfast and give it an exotic, Italian twist.
Pour yourself a mug of hot plant based milk and start dipping!! That’ s how we do breakfast in Italy… and it’s a lot of fun!
Print
Gluten Free Ritornelli Cookies
- Total Time: 40 minutes
- Yield: 5
Description
Layered cookies with a rich cocoa base and delicate white top. A fun, impressive dessert perfect for any occasion.
Ingredients
For the Brown Layer:
- 35 gr 1.2 ounces Cocoa Powder
- 35 gr 1.2 ounces Coconut Milk
- 35 gr 1.2 ounces Agave Syrup
- 10 gr 0.35 ounces Coconut Oil (melted)
- 10 gr 0.35 ounces 99% Dark Chocolate (melted)
- 60 gr 2.1 ounces Rice Fluor (OR Cassava Flour if you can’t tolerate grains)
For the White Layer:
- 100 gr 3.5 ounces Rice Fluor (OR Cassava Flour if you can’t tolerate grains)
- 30 gr 1 ounce Almond Flour (OR Tigernut Flour if you can’t tolerate nuts)
- 40 gr 1.4 ounces Coconut Milk
- 10 gr 0.35 ounces Coconut Oil (melted)
- 35 gr 1.2 ounces Agave Syrup
- 1/8 tsp Vanilla Extract
Instructions
- Preheat the oven to 350 F.
- Combine cocoa, coconut milk and agave in a bowl and mix well until you get a very smooth cream.
- Add in the melted coconut oil and melted chocolate, mix well and lastly add in the cassava flour.
- Knead the dark dough by hand for a few minutes, then transfer it on a wooden board and roll it down with a rolling pin until 1/4 of an inch thick.
- Prepare the white dough by mixing cassava and tigernut flour in a bowl.
- Add in the melted coconut oil, the coconut milk, agave and vanilla extract.
- Knead well for a few minutes then transfer the white dough on top of the flattened dark dough and roll it down with a rolling pin until it covers completely the dark layer on the bottom. Make sure the 2 layers have the same thickness, then cut away the rims that are only one color (if any).
- Once you have two layers of dough (the white atop the black), cut away a stripe of dough and place it neatly on top of another stripe so that it’s completely flush, creating a sandwich. You should now have four layers total.
- After each new layer, press down the tower lightly with the rolling pin to make it stick together, careful not to press to hard to compress the tower.
- Move the 4 layer wall and place it on top of the remaining dough. Cut away the flush stripe, creating a 6 layer wall. Continue this process, moving the new stack of layers on top of the remaining dough, until you run out of dough and you created a very tall tower of layers. You should have 6 layers, 12 stripes in total.
- Flip the tall multilayered dough carefully onto the cutting board, cut it in stripes 1/4 of an inch thick and make rectangular cookies.
- Place your Ritornelli cookies on a baking pan lined with parchment paper. Bake for 20 minutes and let them cool down completely before serving.
- Prep Time: 20 minutes
- Cook Time: 20 minutes
- Category: Dessert
- Cuisine: Italian
I hope you enjoyed this healthy gluten free recipe and if you want to make each bite even more indulgent, place a piece of 99% dark chocolate on top of your gluten free Ritornelli and you’ll have the best texture sensation ever!!

If you had fun baking these healthy Italian cookies, and for more sweet, healthy recipes, check out my recipe book “How To Indulge While Eating Clean” that collects over 75 amazing treats that you can enjoy with no guilt!!
Ciao and happy breakfast!!
Ambra

Frequently Asked Questions
Can I substitute almond flour with another type of flour?
Yes, you can replace almond flour with tigernut flour to make the cookies nut-free.
What is the purpose of using cocoa powder in the Ritornelli cookies?
Cocoa powder adds a rich chocolaty flavor to half of the cookies, complementing the sweet nutty taste of the almond flour in the other half.
Are these cookies suitable for someone with dairy allergies?
Yes, the recipe is dairy free, making it suitable for individuals with dairy allergies.