
I am a firm believer that homemade is always better than store bought, and this Hawaiian bread is no different. Once you try it, you will never go back.
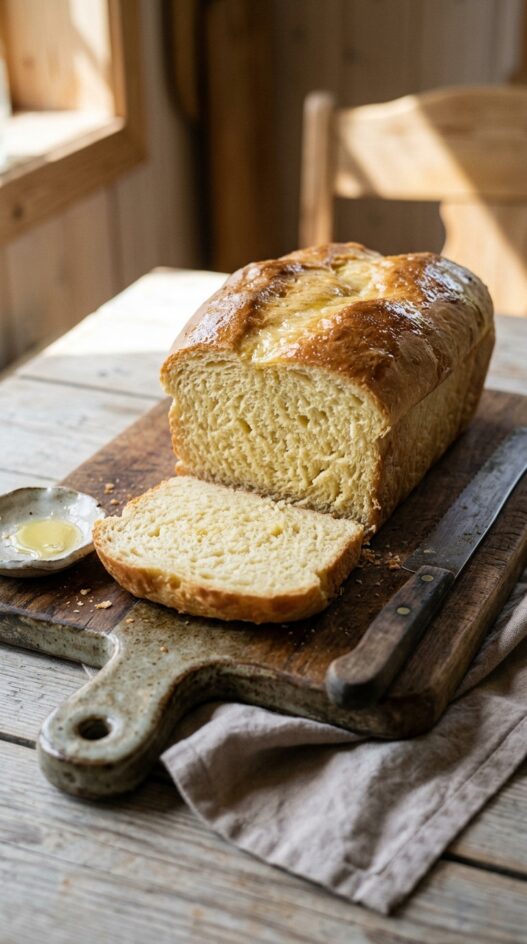
Bread baking has become a Sunday ritual for me. I bake a few loves each weekend to get us through the week, and this Hawaiian bread is the kids’ favorite. Infused with pineapple juice and a hint of vanilla, this bread has a soft, fluffy texture perfect for breakfast, sandwiches, or as a side to your favorite meals.
How to Make Homemade Hawaiian Bread
Preparing the Dough
- Mix Wet Ingredients: In a large mixing bowl, combine the pineapple juice, warm milk, melted butter, egg, sugar, vanilla, and salt. Mix until well incorporated.
- Activate Yeast: Sprinkle the yeast over the mixture, stirring gently to ensure it’s fully dissolved.
- Add Flour: Begin by adding 3 cups of flour to the wet mixture. Stir using a sturdy spoon or a dough hook attachment on a stand mixer until a dough starts to form.
Kneading the Dough
- Knead the Dough: Continue kneading the dough, adding additional flour a little at a time if the dough is too sticky. Knead until the dough is soft and smooth but still slightly tacky, about 5-7 minutes with a mixer or 10 minutes by hand.
First Rise
- Let it Rise: Place the dough in a lightly oiled bowl, turning it to coat all sides in oil. Cover with a damp cloth and set aside in a warm, draft-free area. Let the dough rise until doubled in size, about 1 hour.
Shaping and Second Rise
- Shape the Dough: Once risen, punch down the dough to release any air bubbles. Transfer the dough to a lightly floured surface and shape it into a rectangle. Fold the dough into thirds, like folding a letter, and place it seam side down in a greased standard loaf pan.
- Second Rise: Cover the loaf pan with a damp cloth and let the dough rise for another 45 minutes, or until it has nearly doubled in size.
Baking
- Preheat and Bake: Preheat your oven to 350°F (175°C). Once the dough has risen, place the pan in the oven and bake for 20-25 minutes, or until the top is a dark golden brown and the loaf sounds hollow when tapped.
Cooling
- Cool: Allow the bread to cool in the pan for 5 minutes, then turn out onto a wire rack to cool completely before slicing.
Recipe Notes
- Pineapple Juice: Ensure the pineapple juice is at room temperature to best activate the yeast.
- Proofing: Ensure your milk is warm but not hot; too high a temperature can kill the yeast.
- Checking for Doneness: If you’re unsure if the bread is fully baked, an instant-read thermometer should read 190°F when inserted into the center of the loaf.
- This Hawaiian bread can also easily be made into rolls – after the first rising, simply divide the dough into 16 pieces, roll, and place in a greased baking dish, cover and rise 45 minutes, and then bake @350 for 15-20 minutes.
- You can use bread flour, but you will get a chewier consistency – which is why I use all purpose for this recipe.
Homemade Hawaiian Bread
- Total Time: 45 mins
- Yield: 1 loaf
Description
Soft, slightly sweet homemade Hawaiian bread is a treat to eat, perfect for sandwiches or toast, and so easy to make in your own oven.
Ingredients
- 1 cup pineapple juice
- 1/4 cup milk (warm)
- 1/4 cup butter (melted)
- 1 egg
- 2 Tbsp sugar
- 1/2 tsp vanilla
- 1 tsp salt
- 1 envelope active dry yeast (I prefer Red Star Platinum yeast)
- 3 - 3 1/2 cups all purpose flour
Instructions
Preparing the Dough
- Mix Wet Ingredients: In a large mixing bowl, combine the pineapple juice, warm milk, melted butter, egg, sugar, vanilla, and salt. Mix until well incorporated.
- Activate Yeast: Sprinkle the yeast over the mixture, stirring gently to ensure it’s fully dissolved.
- Add Flour: Begin by adding 3 cups of flour to the wet mixture. Stir using a sturdy spoon or a dough hook attachment on a stand mixer until a dough starts to form.
Kneading the Dough
- Knead the Dough: Continue kneading the dough, adding additional flour a little at a time if the dough is too sticky. Knead until the dough is soft and smooth but still slightly tacky, about 5-7 minutes with a mixer or 10 minutes by hand.
First Rise
- Let it Rise: Place the dough in a lightly oiled bowl, turning it to coat all sides in oil. Cover with a damp cloth and set aside in a warm, draft-free area. Let the dough rise until doubled in size, about 1 hour.
Shaping and Second Rise
- Shape the Dough: Once risen, punch down the dough to release any air bubbles. Transfer the dough to a lightly floured surface and shape it into a rectangle. Fold the dough into thirds, like folding a letter, and place it seam side down in a greased standard loaf pan.
- Second Rise: Cover the loaf pan with a damp cloth and let the dough rise for another 45 minutes, or until it has nearly doubled in size.
Baking
- Preheat and Bake: Preheat your oven to 350°F (175°C). Once the dough has risen, place the pan in the oven and bake for 20-25 minutes, or until the top is a dark golden brown and the loaf sounds hollow when tapped.
Cooling
- Cool: Allow the bread to cool in the pan for 5 minutes, then turn out onto a wire rack to cool completely before slicing.
Notes
- This Hawaiian bread can also easily be made into rolls – after the first rising, simply divide the dough into 16 pieces, roll, and place in a greased baking dish, cover and rise 45 minutes, and then bake @350 for 15-20 minutes.
- Pineapple Juice: Ensure the pineapple juice is at room temperature to best activate the yeast.
- Proofing: Ensure your milk is warm but not hot; too high a temperature can kill the yeast.
- Checking for Doneness: If you’re unsure if the bread is fully baked, an instant-read thermometer should read 190°F when inserted into the center of the loaf.
- Prep Time: 20 mins
- Rising Time: 105 mins
- Cook Time: 25 mins
Frequently Asked Questions
What type of flour should I use for the Hawaiian bread?
For this Hawaiian bread recipe, all-purpose flour works best. You can also use bread flour for a slightly chewier texture.
How do I know if my yeast is activated properly?
To ensure your yeast is activated, look for bubbles or foam forming in the mixture after you sprinkle it over the wet ingredients. This usually takes about 5-10 minutes.
Can I substitute the pineapple juice with something else?
While pineapple juice is key for the flavor profile, you can use other fruit juices like orange juice, but the taste will differ from traditional Hawaiian bread.


We really liked the recipe as a whole. We made it into dinner rolls, but wouldn’t call it Sweet at all.
So glad you liked it!!
Absolutely AMAZING!!!! Thanks so much for sharing this great recipe!
So happy you liked it Brenda!!
Help! My dough was super super sticky I used my stand mixer and I couldn’t get it to not be so sticky! What can I do differently
Hi Liv! Yes, this dough is definitely on the sticky side—totally normal for enriched breads like this. Try adding flour just a tablespoon at a time during mixing after the wet ingredients are incorporated, until the dough pulls away from the sides of the bowl but still feels soft and slightly tacky (not dry). Also, let it rest for 10–15 minutes before kneading. Hope that helps! Let us know if you try it again.
What if my dough was NOT sticky???? What did I do wrong?
Most likely, too much flour was added. It’s very easy to over-measure flour (especially if scooping directly from the bag), which can make the dough firm instead of tacky. I’ve made that mistake myself with this one.
Another possibility is under-hydration. If the pineapple juice or eggs were slightly smaller than expected, the dough can tighten up. Your kitchen could also be very dry.
If you try again, hold back a few tablespoons of flour at first and only add more if the dough is truly unworkable. The finished dough should feel soft and supple, not dry or stiff.
You didn’t necessarily do anything “wrong”. Enriched doughs just require a light hand with flour, and sometimes these things happen. Hope you try it again!
Hawaiian bread is supposed to be sticky — that’s the enriched dough doing its thing. Resist adding more flour. Oil your hands instead when you shape it. The stickiness mostly goes away after the first proof anyway.
I just made this, no changes and it’s perfect!! I must say it’s one of my best loaves yet! My daughter only eats Hawaiian bread and rolls, so will definitely be putting this recipe to heavy use . Thank you for sharing ?
Julie, really glad to hear!!
Ohhhh, I had no idea you could make Hawaiian bread at home to be honest. This was even better than store bought!!
I have been looking for the best Hawaiian bread recipe for a while, and I have to say that this one leads the pack for sure. Perfect consistency, sweetness was just right!
I was not able to get the perfect rise out of this, but I think it was because I overworked the dough. Classic mistake. Flavor was ON POINT, so I am sure next time it will be a five star!
Overworking is the number one killer for enriched doughs like this. Once it passes the windowpane test, stop. Any extra mixing breaks down the gluten you just built and you lose the rise. Counterintuitive after being told ‘knead longer’ for lean breads.
Humanahumana —- this is fantastic!
This bread turned out AMAZING. Adding it to my favorites!
This brought back childhood memories! So glad I found this recipe. Thank you!
All I can say is YES, this is the perfect homemade Hawaiian bread!
I must have made this five times in the past couple of months, and every time it turns out absolutely perfectly. My favorite bread recipe, by far.
Great recipe, mine didn’t look as pretty but the taste was really good!
I make this bread once a week – fantastic!
Loved this bread, fluffy, delicious!
Turned out a little sweet for my taste, but very good anyway!