
Since I started teaching myself how to bake breads, it just amazes me each and every time, that you can go from a lumpy, gloppy, mass of very few ingredients to a beautiful, crusty, golden loaf of delicious bread. One huge favorite of mine is the trusty ciabatta.
Ciabatta is a relatively modern Italian bread, first developed in the 1980s as a response to the French baguette, it is perfect for sandwiches, dipping in olive oil – or enjoying on its own. The high hydration dough and long fermentation gives it its signature holes and deep flavor, and it is a great home-baking project.
The Story Behind Ciabatta: A 1982 Italian Invention
Ciabatta is younger than most people assume. It was invented in 1982 by Arnaldo Cavallari, a baker in Adria, a town in Italy’s Veneto region. Cavallari spent weeks testing variations on traditional Italian doughs before landing on the high-hydration, long-fermented loaf we now recognize. He named it ciabatta polesana after Polesine, the area where he lived — and the word ciabatta itself means “slipper” in Italian, a nod to the bread’s flat, oval shape.
It spread fast. By 1985 Marks & Spencer was selling it across the UK. By 1987 Orlando Bakery in Cleveland had brought it to American shelves. Cavallari’s company, Molini Adriesi, eventually licensed the recipe to bakers in eleven countries. For a bread that didn’t exist before 1982, ciabatta’s takeover of the global sandwich aisle is one of the fastest culinary expansions in modern food history.
Real Ciabatta vs. Mass-Market Imitation
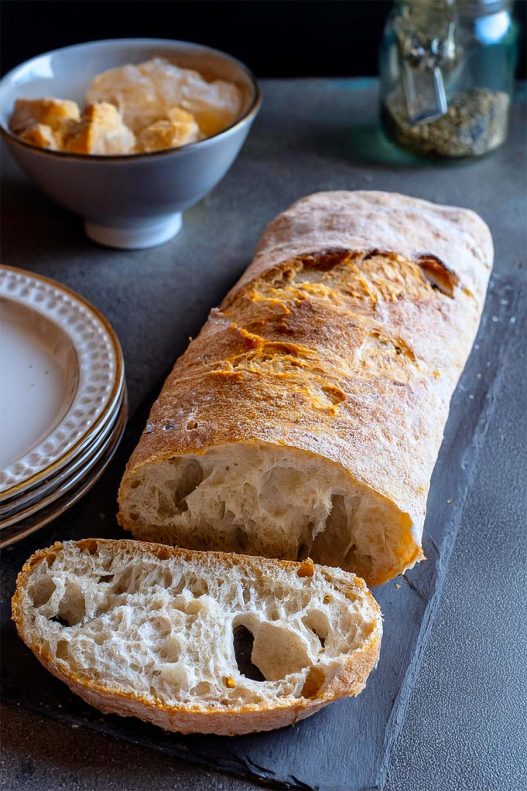
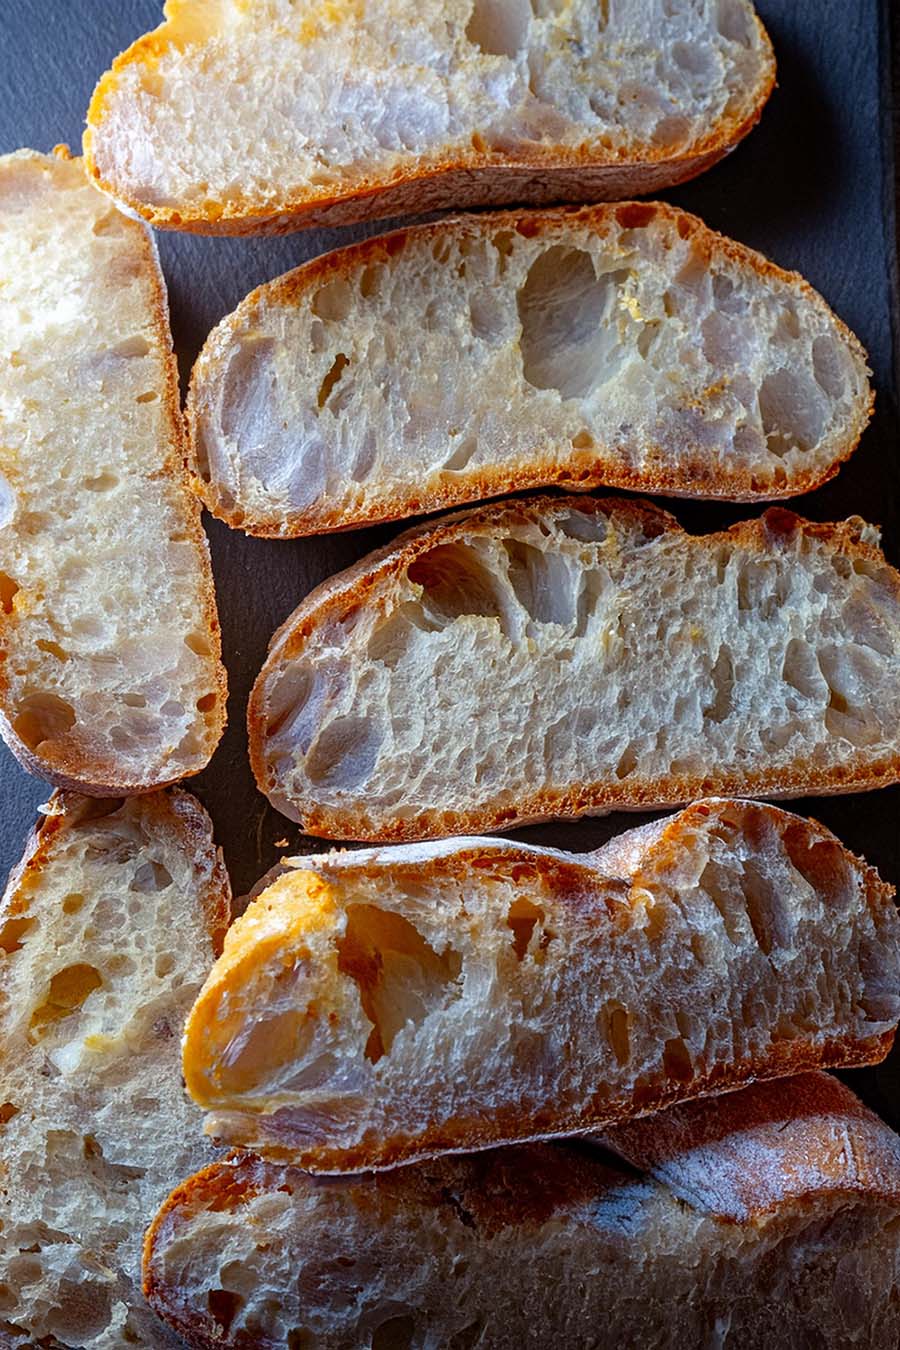
The supermarket version and the real thing share a name and not much else. Authentic ciabatta has an irregular open crumb — large, asymmetric holes, not the uniform bubble structure of mass-bakery loaves. The crust is thin and crackly, dusted with flour, and shatters slightly when cut. The shape is asymmetric and softly slumped — closer to its namesake slipper than to a perfect rectangle. It should pull apart with an elastic chew, never a dense bite.
If you slice into a loaf and find a tight, even crumb, you’re holding a Pan di Casa or a baguette dough that’s been shaped like a ciabatta. The high-hydration dough and long cold fermentation are what produce the signature texture, and they’re the slow steps you can’t shortcut.
Regional Variations of Ciabatta in Italy
Cavallari’s original recipe was just the starting point. Italian bakers across the country adapted it to local flours, climates, and tastes:
- Ciabatta polesana (Veneto) — the original. Large, soft, with a markedly open crumb.
- Ciabatta di Como (Lombardy) — crisp crust, somewhat soft and porous interior, lighter to the touch than the Veneto loaf.
- Ciabatta toscana / umbra / marchigiana (central Italy) — variants range from a firm crust with denser crumb to a crisper shell with open texture.
- Ciabatta romana (Lazio) — flatter and often seasoned with marjoram, blurring the line between ciabatta and Roman schiacciata.
- Ciabatta integrale — whole-wheat, with a nuttier, denser bite.
- Ciabatta al latte — milk added to the dough, producing a softer, slightly sweeter loaf often used for sandwiches.
The recipe below produces something closest to the Veneto original — the open-crumb baseline. For a flatter, herb-scented cousin, see our rosemary focaccia or schiacciata; for a softer enriched Italian loaf, our crescia sits in similar territory.
How Ciabatta Compares to Baguette and Focaccia
Ciabatta sits between two more famous European breads and shares DNA with both. The baguette uses lower hydration (around 65%) and is shaped long and lean, producing a fine elongated crumb and a crackling shatter-crust. Focaccia runs even wetter than ciabatta — often 80–90% hydration — but is pressed flat into a pan, dimpled, and topped with olive oil. Ciabatta lands in the middle: the same wet, slack dough as focaccia but shaped into a free-form loaf and baked on a stone for the open crumb. Cavallari designed it specifically to give Italian panini a wider, airier alternative to the baguette structure that was creeping into Italian bars in the early 1980s.
Why You’ll Love This Recipe:
- Authentic Italian Flavor: A traditional ciabatta, this recipe creates a beautifully rustic loaf with a crisp crust and airy interior.
- Perfect for Sandwiches & Dipping: The open crumb structure makes it great for panini, bruschetta, or simply dipping in olive oil.
- Simple Ingredients, Big Flavor: With just a handful of pantry staples, long fermentation develops deep, rich flavor.
- No Kneading Required: Stretch-and-fold technique replaces traditional kneading, which makes it approachable for beginners.
- Flexible Fermentation: The dough can be refrigerated for up to four days, allowing you to bake fresh bread when it suits your schedule.
Ingredients You’ll Need:
- Unbleached Bread Flour
- Salt
- Instant Yeast
- Chilled Water
- Olive Oil
Equipment You’ll Need:
- Mixing Bowl: Large enough to allow the dough to expand during fermentation.
- Stand Mixer (Optional): Useful for initial mixing, but not required.
- Bowl Scraper or Spatula: Helps handle the sticky dough with minimal mess.
- Pastry Scraper: For shaping the dough without deflating it.
- Baking Stone or Sheet Pan: A baking stone produces a crisper crust, but a sheet pan works as well.
- Parchment Paper: Prevents sticking and makes transferring the dough easier.
- Oven-Safe Shallow Pan: Creates steam, which is crucial for achieving a crisp crust.
Important Cooking Tips:
- Expect a Sticky Dough: Ciabatta dough has high hydration and will feel wet—resist the urge to add extra flour.
- Use Wet Hands: To prevent sticking while handling the dough, dampen your hands before stretching and folding.
- Let the Dough Rest Properly: Resting periods allow gluten to develop naturally, improving texture and structure.
- Don’t Overwork the Dough: Handling it too much will deflate the air pockets, leading to a denser loaf.
- Steam for a Crisp Crust: Pouring hot water into a pan in the oven helps create a crisp, crackly exterior.
Bakers’ Troubleshooting: Why Your Ciabatta Didn’t Work
Most ciabatta problems trace back to one of five root causes. Here’s the diagnostic guide.
“My crumb is dense and uniform, not open and irregular.”
The most common failure. Causes: you over-mixed the dough (deflating air pockets), under-hydrated (added flour when the recipe wanted wet dough), or degassed during the stretch-and-fold (handled too aggressively). Fix: trust the wet dough, use a scraper instead of your hands, and treat the stretch-and-folds as gentle reshapings rather than kneading.
“My crust is pale and soft instead of crackly.”
Causes: insufficient steam in the first phase of baking, oven not hot enough, or no preheated baking stone. Fix: preheat the stone (or a heavy sheet pan) at 550°F for at least 45 minutes. Pour 1 cup of hot water onto a separate pan at the bottom of the oven the moment the bread goes in. Don’t open the oven for the first 12 minutes.
“My ciabatta is gummy inside.”
Two causes: under-baking (most common) or slicing too soon. Fix: bake until the internal temperature reaches 200–205°F. Even if it smells incredible, let the loaf cool on a wire rack for at least 30 minutes before slicing — the crumb is still setting.
“My dough is too sticky to handle.”
This isn’t a problem — it’s the point. Ciabatta is supposed to be wet and slack. Use wet hands, a bench scraper, and a generously floured work surface. Reflexively adding flour to make the dough easier to manage will ruin the crumb.
“My ciabatta is flat and didn’t rise.”
Causes: over-fermented dough (gluten broke down), under-proofed dough (didn’t rise enough), shaped too tightly (squeezed out the air), or expired yeast. Fix: respect the fermentation timing — by the end of the cold ferment, the dough should be visibly active and jiggly but still elastic. If you press a finger gently into it and the indentation springs back slowly, it’s ready. If it stays flat, it’s over-proofed.
For a deeper dive into the dough-handling side, see our guide to basic bread dough and our sourdough bread notes, which use many of the same principles at slower speeds.
Professional Techniques That Make the Difference
- Biga preferment — Italian bakeries often build a stiff preferment (biga) the night before and incorporate it the next day. This adds depth of flavor and improves crumb structure. The long cold fermentation in this recipe gets a home baker to a similar place without the extra step.
- Autolyse — letting the flour and water rest together (without salt or yeast) for 20–60 minutes before mixing in everything else creates a stronger gluten network with less work.
- Steam timing — the steam matters in the first 5–10 minutes only. After that, the oven needs to dry out so the crust can crisp.
- Internal temperature, not time — ovens vary, hydration varies, but 200–205°F internal temperature is universal for a finished ciabatta. A probe thermometer is the single biggest upgrade a home baker can make.
Planning Ahead:
- Refrigerate the Dough for Better Flavor: While an overnight rest is ideal, you can refrigerate the dough for up to four days for a deeper, more complex taste.
- Prepare Steam Setup in Advance: Having your baking stone and steam pan preheated ensures the best oven conditions for baking.
- Shaping Takes Practice: Handle the dough gently when forming the loaf to maintain its airy texture.
Storing, Freezing, Reheating:
- Room Temperature: Store in a paper bag or bread box for up to 2 days. Avoid plastic bags, which soften the crust.
- Freezing: Wrap in plastic wrap and freeze for up to 3 months. Thaw at room temperature before reheating.
- Reheating: To restore crispness, warm in a 375°F (190°C) oven for 5-10 minutes.
FAQ:
Q: Why is my ciabatta dough so wet and sticky?
A: High hydration is key to ciabatta’s airy texture. Use a scraper or wet hands to handle the dough instead of adding extra flour.
Q: How can I make ciabatta without a baking stone?
A: A preheated sheet pan works as an alternative. The key is to bake with steam for a crisp crust.
Q: My ciabatta didn’t rise much—what went wrong?
A: Make sure your yeast is fresh, and allow the dough to ferment long enough at room temperature before refrigerating.
Q: Can I make ciabatta with all-purpose flour?
A: Yes, but bread flour is recommended for its higher protein content, which helps create the open crumb structure.
Q: How do I know when my ciabatta is done baking?
A: Tap the bottom—if it sounds hollow, it’s done! The crust should be deep golden brown.
Q: What’s the difference between biga and poolish, and which is better for ciabatta?
A: Both are preferments. Biga is stiff (around 50% hydration) and Italian; poolish is liquid (100% hydration) and French. Ciabatta is traditionally made with a biga, but the long cold fermentation in this recipe achieves similar flavor depth without the extra step. For a first ciabatta, the cold-ferment method is the simpler path; for a more traditional flavor, build a biga the night before and add it at the mix stage.
Q: Can I use a sourdough starter instead of commercial yeast?
A: Yes, and many traditional Italian bakeries do. Substitute around 100 g of active starter for the instant yeast, and add roughly 20 g extra flour and water to compensate. Expect a longer rise (8–12 hours at room temperature instead of overnight in the fridge) and a slightly tangier flavor.
Q: How long can ciabatta dough rest in the fridge?
A: Up to 4 days. Beyond that the gluten begins to break down and the dough loses its rise. For flavor, days 2 and 3 are the peak — the dough develops a complex, slightly sour note from the slow fermentation.
Q: What’s the ideal internal temperature for finished ciabatta?
A: 200–205°F (93–96°C). Use a probe thermometer inserted into the thickest part of the loaf. Visual cues like a deep golden crust and a hollow sound when tapped are useful but not foolproof — temperature is the only reliable measure.
Q: Can I bake ciabatta in a Dutch oven instead of on a baking stone?
A: You can, and the enclosed environment helps with steam — but ciabatta’s flat shape doesn’t suit a round Dutch oven well. A long oval Le Creuset or a rectangular bread cloche works better. For most home bakers, a preheated baking stone or sheet pan with a separate water pan for steam is the simplest setup.
Substitutions and Allergies:
- Gluten-Free Alternative: A high-hydration gluten-free flour blend is required, but results will vary.
- Oil-Free Version: Omit olive oil; the bread will still develop a good texture but may be slightly chewier.
- Whole Wheat Variation: Substitute up to 30% whole wheat flour for a nuttier, denser ciabatta.
Beverage Pairings:
- Chianti or Sangiovese: A bold Italian red wine that complements the rustic flavor.
- Espresso or Cappuccino: Classic pairings, perfect for an Italian-style breakfast with ciabatta and jam.
Step-by-Step Guide to Making Ciabatta at Home
Step 1: Prepare the Dough
- In a large mixing bowl, combine the bread flour, salt, yeast, and water.
- If using a stand mixer, mix on low speed with the paddle attachment for 1 minute. If mixing by hand, use a large spoon and stir until just combined. The dough will be very sticky and wet.
- Let the dough rest for 5 minutes to allow the flour to fully absorb the water.
Step 2: Strengthen the Dough
- Drizzle the olive oil over the dough and mix again for about 1 minute on medium-low speed (or stir with a wet spoon if mixing by hand). The dough should become slightly smoother but remain soft and sticky.
- Transfer the dough to a lightly oiled bowl using a wet spatula or bowl scraper. Cover with plastic wrap and let rest for 10 minutes.
Step 3: Stretch and Fold the Dough
- Lightly oil a work surface and place the dough onto it.
- Using wet or oiled hands, gently stretch the front end of the dough outward and fold it back over the center. Repeat this process from the back and both sides.
- Flip the dough over and form it into a soft ball.
- Place it back in the bowl, cover, and let sit for 10 minutes.
- Repeat this stretch-and-fold process three more times at 10-minute intervals.
Step 4: Overnight Fermentation
- Cover the bowl tightly and refrigerate overnight, or for up to 4 days.
- The dough will rise significantly in the fridge, developing flavor and texture.
Step 5: Preparing for Baking
- Remove the dough from the refrigerator 3 hours before baking to allow it to reach room temperature.
- After about 1 hour, line a baking sheet with parchment paper and dust it generously with flour.
- Transfer the dough gently onto a floured work surface, avoiding deflating it.
- Using a pastry scraper or hands, gently shape the dough into a rough 9-inch square while handling it as little as possible.
Step 6: Preheat the Oven
- 45 minutes before baking, preheat the oven to 550°F (288°C) or as high as it will go.
- If using a baking stone, place it inside the oven to heat up.
- Prepare a shallow pan for steaming by placing it in the bottom rack of the oven.
Step 7: Baking the Ciabatta
- Slide the parchment paper and dough onto the hot baking stone (or place the baking sheet directly into the oven).
- Pour 1 cup of hot water into the steam pan below to create steam.
- Lower the oven temperature to 450°F (232°C) and bake for 12 minutes.
- Rotate the bread and continue baking for 15-20 minutes, or until the crust is deeply golden brown.
- Remove from the oven and let cool on a wire rack before slicing.
Love Baking? Check Out These Wonderful Recipes:
Rieska – Finnish Potato Flatbread
How to Make Pita Bread at Home
Jalapeño-Cheddar Sourdough Bread
Cinnamon-Sugar Churro Banana Bread
How to Make Ciabatta Bread: Authentic Italian Recipe
- Total Time: 60 mins plus overnight fermentation
- Yield: 1 large or 2 smaller loaves
Description
Originating in the 1980s as an Italian response to French baguettes, this rustic loaf is perfect for sandwiches, dipping in olive oil, or enjoying on its own.
Ingredients
Instructions
Step 1: Prepare the Dough
- In a large mixing bowl, combine the bread flour, salt, yeast, and water.
- If using a stand mixer, mix on low speed with the paddle attachment for 1 minute. If mixing by hand, use a large spoon and stir until just combined. The dough will be very sticky and wet.
- Let the dough rest for 5 minutes to allow the flour to fully absorb the water.
Step 2: Strengthen the Dough
- Drizzle the olive oil over the dough and mix again for about 1 minute on medium-low speed (or stir with a wet spoon if mixing by hand). The dough should become slightly smoother but remain soft and sticky.
- Transfer the dough to a lightly oiled bowl using a wet spatula or bowl scraper. Cover with plastic wrap and let rest for 10 minutes.
Step 3: Stretch and Fold the Dough
- Lightly oil a work surface and place the dough onto it.
- Using wet or oiled hands, gently stretch the front end of the dough outward and fold it back over the center. Repeat this process from the back and both sides.
- Flip the dough over and form it into a soft ball.
- Place it back in the bowl, cover, and let sit for 10 minutes.
- Repeat this stretch-and-fold process three more times at 10-minute intervals.
Step 4: Overnight Fermentation
- Cover the bowl tightly and refrigerate overnight, or for up to 4 days.
- The dough will rise significantly in the fridge, developing flavor and texture.
Step 5: Preparing for Baking
- Remove the dough from the refrigerator 3 hours before baking to allow it to reach room temperature.
- After about 1 hour, line a baking sheet with parchment paper and dust it generously with flour.
- Transfer the dough gently onto a floured work surface, avoiding deflating it.
- Using a pastry scraper or hands, gently shape the dough into a rough 9-inch square while handling it as little as possible.
Step 6: Preheat the Oven
- 45 minutes before baking, preheat the oven to 550°F (288°C) or as high as it will go.
- If using a baking stone, place it inside the oven to heat up.
- Prepare a shallow pan for steaming by placing it in the bottom rack of the oven.
Step 7: Baking the Ciabatta
- Slide the parchment paper and dough onto the hot baking stone (or place the baking sheet directly into the oven).
- Pour 1 cup of hot water into the steam pan below to create steam.
- Lower the oven temperature to 450°F (232°C) and bake for 12 minutes.
- Rotate the bread and continue baking for 15-20 minutes, or until the crust is deeply golden brown.
- Remove from the oven and let cool on a wire rack before slicing.
Notes
Flour Choice: Bread flour is recommended for its higher protein content, which improves the structure of the ciabatta.
Hydration: The dough is very wet—this is normal. Avoid adding more flour as it affects the texture.
Shaping: Handle the dough gently to preserve the airy texture.
Steam for Crust: Using a pan of water in the oven creates the signature crisp crust.
Long Fermentation: Refrigerating overnight enhances the flavor and allows flexibility in baking time.
- Prep Time: 30 mins
- Fermentation Time: Overnight
- Cook Time: 30 mins
- Category: Bread
- Method: Baking
- Cuisine: Italian
Nutrition
- Serving Size: 1 slice
- Calories: 180
- Sugar: 1g
- Sodium: 290mg
- Fat: 2g
- Saturated Fat: 0.5g
- Unsaturated Fat: 1g
- Trans Fat: 0g
- Carbohydrates: 35g
- Fiber: 3g
- Protein: 6g
- Cholesterol: 0g
Frequently Asked Questions
What kind of flour should I use for this ciabatta recipe?
You should use unbleached bread flour, as it provides the necessary protein content for structure and texture.
How does the stretch-and-fold technique work for this dough?
The stretch-and-fold technique involves gently pulling the dough up and folding it over itself during fermentation, which helps develop gluten without traditional kneading.
Can I use regular water instead of chilled water in this recipe?
It’s best to use chilled water, as it helps control the fermentation process, keeping the dough from becoming too warm and over-proofing.


Crusty outside, big open holes inside, just what a ciabatta should be. My sandwich game has never been better!
I let mine sit in the fridge for three days instead of overnight and the flavor was noticeably deeper. almost sourdough-like. the recipe says up to four days and I believe it now.
the stretch-and-fold thing was new to me and I was skeptical but by the fourth round the dough felt completely different. smooth and strong even though it’s still super wet.
I had never tried ciabatta before, the many steps made me a little nervous but honestly it was very easy and the bread turned out gorgeous. So much fun!!
Huge ciabatta fan here, this is a great recipe. Came out with the exact right crunch of the crust, and a lovely interior.
I let mine ferment for two days, and the flavor was amazing!
Bread came out perfectly, I used bread flour and it was just great. Thanks!
This was surprisingly easy actually, so glad I tried it. Will make again!
My favorite ciabatta recipe of all times!
Ciabatta is one of my favorite breads! But never made it at home – I was wondering if it would work with all purpose flour?
Hi Kulsum. Yes, I used all purpose flour and it worked out just fine!
This ciabatta looks great and tasted just perfectly. Thank you for a great recipe!
Thank you Tamara!
Your Ciabatta turned out lovely. To me there is nothing like homemade bread.
I agree! About the homemade bread and there being nothing like it… especially brioche!