


Macarons are delicate, finicky, and absolutely worth the effort. These classic French almond meringue cookies are made with just ground almonds, egg whites, and sugar, yet achieving the perfect texture and presentation can feel like an impossible challenge.
I had my first taste of macarons in Paris, at the original Ladurée store—where they claim to sell 12,000 macarons a day—and I was instantly hooked. Naturally, I had to try making them myself.
It took seventeen failed attempts and countless hours of research before I finally produced a batch I was happy with. They always tasted great, but macarons are 50% flavor and 50% presentation (as many French desserts seem to be). 
So, what did I learn from all those failed batches?
- Macarons are not impossible—despite what some recipes insist, not every step has to be followed perfectly to get great results.
- Success depends on macaronage (the folding technique) and oven temperature accuracy—these two factors make or break a batch.
- Practice is essential—every oven is different, humidity plays a role, and no two kitchens are the same.
There are many macaron recipes online, all claiming to be the best. Some recommend different methods, baking temperatures, or resting times. The only way to master macarons is through trial and error. Fortunately, they are fun, challenging, and incredibly satisfying to make (not to mention, absolutely adorable).
I can be impatient in the kitchen and always look for shortcuts or tricks to simplify baking, especially when it comes to macarons. Over the past year, I’ve made more than ten variations, refining my process each time. Hopefully, my top tips will help make your macaron journey a little easier!
Note: A kitchen scale is extremely useful for macarons since precise ingredient ratios produce the best results. However, I’ve successfully made macarons using cup measurements, so a scale is not a deal-breaker. That said, I highly recommend a silicone baking mat—it’s reusable, easy to clean, and helps ensure evenly shaped macarons.
This guide provides 10 essential tips for getting your macarons right every time, plus troubleshooting advice and answers to common reader questions.
1. Age Your Egg Whites for Better Stability
- Separate your egg whites at least 24 hours before baking and let them sit in the fridge uncovered.
- This removes excess moisture and helps create a stronger, more stable meringue.
- Bring them to room temperature before using for the best results.
2. Weigh Your Ingredients – No Guesswork
- Macarons require precise ratios, so always use a kitchen scale instead of measuring cups.
- A small difference in almond flour or sugar can throw off the entire texture.
3. Sift Your Dry Ingredients Twice
- Almond flour and powdered sugar should be sifted at least twice to ensure a smooth, lump-free batter.
- This step prevents grainy or lumpy shells and ensures a delicate, melt-in-your-mouth texture.
4. Master the Macaronage (Mixing Technique)
- Under-mixing = grainy, lumpy macarons that don’t bake evenly.
- Over-mixing = flat, cracked shells with no feet.
- The batter should be flowy but not runny, forming a ribbon-like consistency when lifted with a spatula.
5. Pipe with Precision
- Use a round piping tip and hold the piping bag vertically to ensure even circles.
- Pipe onto a silicone baking mat or parchment paper for best results.
- Tap the baking sheet firmly on the counter a few times to remove air bubbles.
6. Let the Shells Rest Before Baking
- After piping, let the macarons sit for 30-60 minutes until they form a slight skin on top.
- This is crucial for forming feet—skipping this step often leads to cracked or uneven macarons.
7. Bake at the Right Temperature
- Too hot? Macarons will crack and brown unevenly.
- Too cool? They’ll be undercooked and won’t develop feet.
- Ideal temperature: 300-325°F (150-160°C).
- Use an oven thermometer—many home ovens aren’t accurate.
8. Avoid Humid Conditions
- Humidity is the enemy of macarons! If your kitchen is too humid, the shells won’t dry properly.
- If needed, place them near a fan or in an air-conditioned room to help them set before baking.
9. Cool Completely Before Removing
- Macarons should be completely cool before attempting to remove them from the mat or parchment.
- If they stick, they may need a few more minutes of baking.
10. Match Shells Before Filling
- Before adding fillings, pair up shells of similar size for the best presentation.
- Let filled macarons rest in the fridge for 24 hours—this enhances flavor and texture.
Common Macaron Mistakes & How to Fix Them
Q: Why are my macarons cracked?
A: Either the oven temperature is too high, or they weren’t rested long enough before baking.
Q: Why don’t my macarons have feet?
A: Under-mixed batter, humid conditions, or skipping the resting step could be the cause.
Q: Why are my macarons hollow?
A: Over-mixed batter or an oven temperature that’s too high can create hollow centers. Try reducing mixing time or lowering the oven temp slightly.
Q: Why are my macarons sticky and soft?
A: They are undercooked or need more drying time before baking. Try baking for a few extra minutes.
Final Tips for Success
- Be patient—macarons improve with practice.
- Keep detailed notes of what works for your kitchen and oven.
- If a batch fails, don’t throw it out! Crushed macarons make a great topping for ice cream or yogurt.
More Must-Try Baking Recipes for Your Kitchen Adventures
Sea Salt Peanut Butter Cookies
Maritozzi con la Panna: Cream Filled Italian Buns
Nutella Cinnamon Buns and White Chocolate Sauce
10 Cookie Baking Tips to Make you a Master Cookie Maker

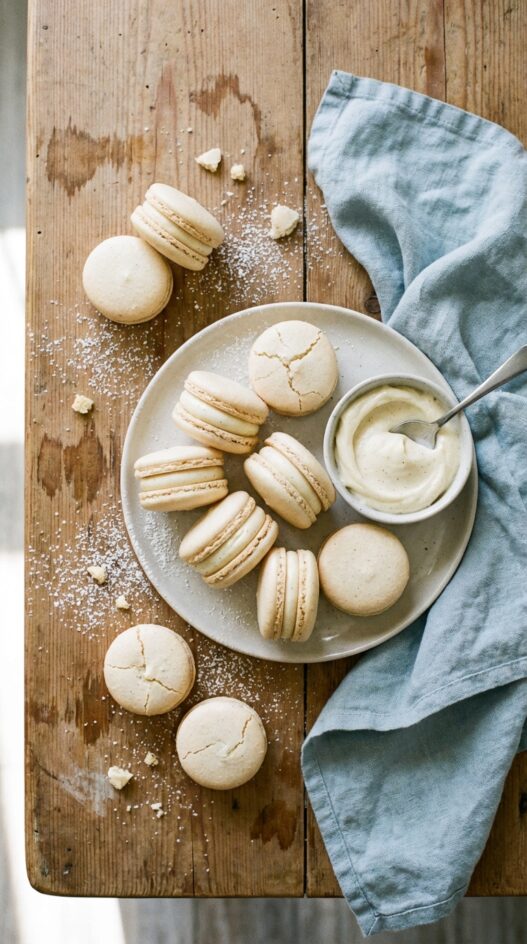
Classic Vanilla Macaron with Buttercream Filling
- Total Time: 48 minutes
- Yield: Makes 24 1x
- Diet: Omnivore
Description
Delicate vanilla macarons, perfectly crisp and chewy, filled with a luscious vanilla buttercream. A truly irresistible treat!
Ingredients
- 1 cups (237 ml) powdered sugar
- 1/2 cups (118 ml) almond flour
- 1 teaspoon vanilla bean powder
- 2 large egg whites
- 5 tablespoons (65 g) granulated sugar
- 1/2 cups (118 ml) unsalted butter
- 1 1/2 cups (355 ml) powdered sugar
- 1 teaspoon vanilla extract
- 1-2 tablespoons (15-30 ml) heavy cream
Instructions
- Preheat the oven to 300°F (150°C).
- Line two baking sheets with parchment paper.
- Prepare a pastry bag fitted with a plain round tip (about 1/2-inch or 2 cm wide).
- For the Soup:
- In a food processor, grind together the powdered sugar and almond flour until super fine.
- Sift the mixture through a fine-mesh sieve into a bowl to remove any large bits.
- In the bowl of a stand mixer (or using a hand mixer), beat the egg whites until soft peaks form.
- Gradually add granulated sugar and continue beating for 2 minutes, until stiff, glossy peaks form.
- Mix in the vanilla extract or vanilla bean powder.
- Gently fold the sifted almond flour mixture into the beaten egg whites using a rubber spatula.
- Fold until the batter is smooth, shiny, and flows off the spatula in thick ribbons (about 40-50 folds).
- Transfer the batter into the piping bag.
- Pipe 1-inch (3 cm) circles, spaced 1 inch apart onto the lined baking sheets.
- Tap the baking sheet firmly on the counter a few times to release air bubbles.
- Let the piped macarons rest at room temperature for 30 minutes until a thin skin forms on top.
- Bake in the preheated 300°F (150°C) oven for 15-18 minutes until the macarons develop feet and are set.
- Let them cool completely before removing from the baking sheets.
- For the Vanilla Buttercream Filling:
- In a bowl, beat the softened butter until smooth and fluffy (about 2 minutes).
- Gradually add the powdered sugar, continuing to beat.
- Mix in the vanilla extract and 1 tablespoon of heavy cream/milk.
- Beat until the frosting is smooth and creamy.
- If needed, add an extra tablespoon of heavy cream/milk to adjust consistency.
- Match similarly sized macaron shells into pairs.
- Pipe or spread a small amount of vanilla buttercream onto one macaron half.
- Gently press another macaron shell on top to form a sandwich.
- Refrigerate for 24 hours to allow flavors to meld (optional, but recommended).
Notes
- For perfectly smooth macarons, ensure your almond flour and powdered sugar are finely ground and sifted. A food processor is key!
- Age your egg whites for 24-48 hours in the refrigerator before making meringue for a stronger, more stable meringue. This is important for the macaron’s shape.
- If your buttercream is too thick, add heavy cream, one tablespoon at a time, until you reach desired consistency. If it’s too thin, add more powdered sugar.
- Prep Time: 30 minutes
- Resting Time: 30 min
- Cook Time: 18 minutes
- Category: Dessert
- Method: Baking
- Cuisine: French
Nutrition
- Serving Size: 2 macarons
- Calories: 150
- Sugar: 20
- Sodium: 25
- Fat: 8
- Saturated Fat: 5
- Unsaturated Fat: 2
- Carbohydrates: 20
- Fiber: 1
- Protein: 2
- Cholesterol: 20
Frequently Asked Questions
Why do my macarons come out without feet?
Flat macarons without feet usually mean the batter was overmixed or the meringue was not stiff enough. Also make sure you let the piped shells rest until they form a dry skin on top before baking.
How long should I let macaron shells rest before baking?
Let them sit at room temperature for 30 to 60 minutes, or until the surface feels dry and not sticky when you lightly touch it. This step is essential for getting those signature ruffled feet.
Do I need to use aged egg whites for macarons?
Aged egg whites, separated and left uncovered in the fridge for 24 to 48 hours, tend to whip up more easily and produce a more stable meringue. It is not mandatory, but it does improve consistency.


Great tips! Wish I read this before I baked my first attempt of French macarons. They turned out flat with no feet. Thanks for sharing. I won’t stop til I’ve perfected them :)
In rainy weather, I use a dehydrator in the room where macarons dries before baking
In rainy weather, I use a dehydrator in the room where makarons dries before baking
I make these in humid weather often. If raining or humid, try adding a little Just Whites powdered egg whites (about 1/4 tsp) it drys the egg whites a bit to compensate for the increased humidity in the air. I sometimes do this with very fresh or runny whites as well.
@Carly,
You actually don’t need to use room temperature egg whites. It increases volume by about 20% which is negligible and doesn’t affect how the macarons will turn out or taste, just barely increases the volume and makes beating it a little quicker. I promise it’ll still turn out great with cold egg whites!
You should also add the top to use room temperature eggs.
@Sonny,
Just wait them out!
Thanks for the great tips Amrita! I really wish though I came across these tips before I made my very first attempt to make macarons on this very rainy day… It’s been a couple of hours since I piped them, and they just won’t dry enough. Do you have any tips for saving this situation?
Awesome! I gave them a shot two weeks ago and they were a complete failure. They stuck to the baking paper (I’m going to invest in a silicone mat for all my baking!) and were far too delicate and just a real goopy mess by the end of trying to scrape them off.
I see a couple of places at least where I made mistakes that probably cost me the chance at success on my first attempt (one of which was that I rushed through everything). I intend to follow all of this and try again. If they aren’t perfect then, I’ll try again.
Thanks for the great tips. :)
@Corinna,
You can even let it sit out overnight to great results, but a couple of hours should be more than enough (just until the tops are dry to your touch). I also recommend baking them on the middle shelf for even baking. When they’re on too high of a rack or too low, they turn out slightly wet and underbaked and stuck to the sheet.
As for lopsidedness, that’s probably just your oven not heating one side properly. Just remember to rotate the sheets once in the middle of baking!
@Rein,
I’ve used powder and although the color is great, it adds a strange aftertaste if you add too much. If you can get your hands on ground up freeze dried fruit powder that’s best because at least it adds an extra flavor of the fruit.
I don’t know much about rainbow dust but you should experiment and send links to pics here.
Lastly, that sounds delicious! I’d like to see a photo if you have one :)
Hey,
In Europe, we bake macarons all the time and i must say, the liquid food colour doesn’t ruin it so long as you don’t add any to get real dark colours. SO if you want them to be dark red, you’re better of to buy powder indeed. I was wondering however what was best, either the powder or the gel because i use both of them and i’m not quite sure. I read some people use rainbow dust as colouring, i have my own brand which is slightly pricy so i wonder if rainbow dust is good, do you have any idea? If anyone wants a tip for a marvelous macaron, you can make red macarons, put a mixture of crème patissière and whipped cream in the middle, some raspberry jam on top of that and right next to the edge, you put some macarons.Then put the seccond macaron on top and finish with some raftisnow. It looks like a tower of macarons and raspberry and when you cut it open, some delicious jam runs out! You can do the same with strawberry and pistache macarons, i swear, it’ll be the best macarons you’ve ever tasted :)
Does it matter if we let it sit for too long before baking it? Or is there any difference placing it on the upper shelf when baking?
I used to pipe all out then take turns to bake them tray by tray. The outcome is lopsided, batter spurting out at one side & slightly wet inside even after 20 minutes in a 160 degree celcius oven.
Hey! Great tips.
Every time I try to bake the macarons, they end up lop-sided or they spew all the filling out (and the shell remains hollow). Would you happen to know what may be going on?
When I made them the first time, they came out perfectly, now when I do them again (doing nothing differently) this happens. :(
Let me know if you have a suggestion, or if anyone else has a tip.
Thanks
veru much thanks for the tip
Thanks very much for the tips. I tried this several times but could not get it. I will follow your tips and try it again.Will let you know.
s
Hi Josie,
If you pipe them on Silpat mats and rotate the trays halfway through baking time, that should help with the lopsided-ness.
The hollowness is also due to the mixing stage and not rapping the sheets after piping. You have to mix carefully and a bit forcefully to get all the air out. I’ve noticed it helps a bit if the batter is a bit loose and not too stiff.
Also, once you’ve piped them out, bang the sheets they’re on on your countertop a bit to “settle” them. This will help pop any air bubbles as well.
I stopped doing this so much because my sheets would get twisted and messed up, but rather, I try to keep the batter a bit loose (by adding in a couple drops of extract or even a tsp of unwhipped egg white).
Hope this helps! :)
So if I use liquid food coloring, it will basically ruin everything?
Thanks for the tips. How your macaron feel like after baking? Mine was crunchy like you eat cookies. It doesnt soggy/chewy inside. Some people said we need to let it rest for 24hours after we put filling, so that the inside will be chewy. Is your like that? Sorry for my english. Hope you understand what im asking
Mine was too, i let them be for a couple of days and it tasted wonderful after that!