
On cold, frigid days, like the ones my family has been experiencing lately, there is something about a slow cooked braise in the oven that brings warmth and comfort to a home.
Braising is one of my favorite methods of cooking. It’s a traditional cooking technique to make palatable the tougher, more affordable cuts of meat. In every braise, the meat is first browned, and then finished in a covered cast iron dutch oven, in just a bit of liquid, to cook at a low temperature. In the cooking process, the low heat and moisture breaks down the tough connective tissue called collagen. It literally melts the collagen into gelatin which then turns the tough piece of meat into tender, juicy strips that can be pulled apart with a fork. It’s magic, I tell you; however, it does call for time and patience.
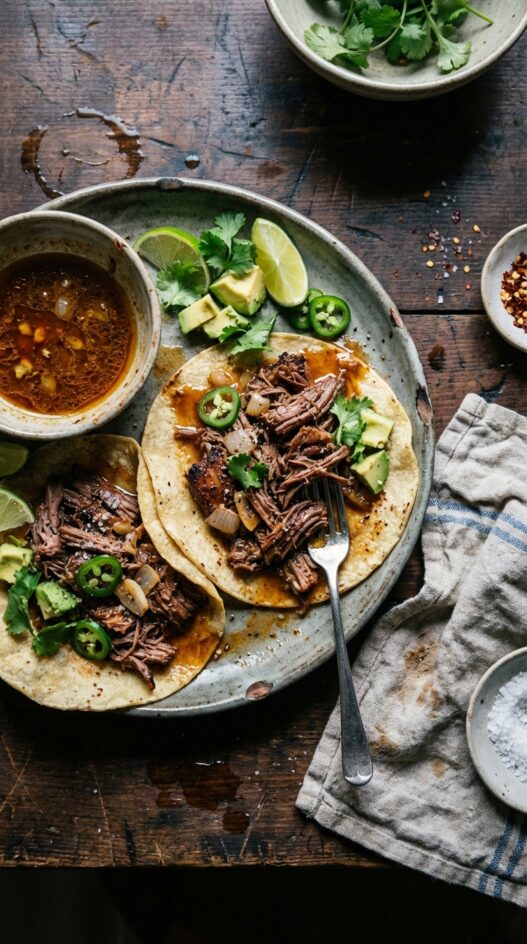
For this particular recipe, I wanted to make some braised, Mexican beef tacos so as Rick Bayless would do, I toasted some dried chili’s from my garden in a bit of oil to start the braise. Once the chili’s were fragrant and left the oil with a bit of spice, I removed them and browned the seasoned roast on both sides, making sure the oil was hot enough to ensure a good crust. 
Now, because this particular cow that my family had purchased was particularly tough, it took me 4 hours to braise this meat to become fork tender, but my oh my, the wait was worth it. These braised, Mexican beef tacos were rich, full of depth in flavor … simply sensational!
Crockpots are definitely little braising machines; however, the depth in flavor that you get from a braise cooked slow in a dutch oven just can’t be replicated in a crockpot. Also, if you happen to have a really tough grassfed cow (maybe it was a much older cow), using a crockpot even on low for 10 hours may not be enough to tenderize your beef. A crockpot retains much more water than braising in a cast iron dutch oven slowly in the oven.
Print
Mexican Braised Beef Tacos with Chilis
- Total Time: 255 minutes
- Yield: Serves 6
- Diet: Omnivore
Description
Succulent, rich, and flavorful braised beef tacos. Perfect for a cozy weeknight dinner.
Ingredients
- 3 lbs (1361 g) arm roast
- large granule (kosher) salt and pepper
- 2 tbsp extra virgin olive oil
- 3 dried chilis
- 1 large white onion, sliced
- 3 garlic cloves, smashed
- 1/2 tsp large granule salt
- 1 cups (237 ml) beer
- 2 tbsp tomato paste
- 1 cups (237 ml) beef broth
Instructions
- Preheat the oven to 300°F (149°C).
- Pat dry and generously season the arm roast with large granule salt and pepper on both sides.
- In a cast iron dutch oven, gently heat 2 tablespoons of olive oil and toast the chilis until fragrant (1-2 minutes). Remove the chilis and set aside.
- Brown the beef on both sides (5-8 minutes per side), ensuring not to disturb it while cooking.
- Remove the browned beef from the pot and set aside.
- Examine the drippings; remove any burnt pieces with a slotted spoon. If there is too much fat, remove the excess, leaving about 2 tablespoons. If not enough drippings remain, add 2 tablespoons of olive oil.
- Add the onion and garlic to the pot. Sprinkle with 1/2 teaspoon of large granule salt and sauté for 2-3 minutes.
- Add the beer, mixing and scraping up the browned bits from the bottom of the pot. Bring to a slow boil, reduce heat to a simmer, and cook until reduced by half (5-8 minutes).
- Mix in the tomato paste and beef broth; simmer for 2-3 minutes.
- Add the meat and reserved chilis to the braising liquid. Place a piece of parchment paper on top of the pot, pressing it down to about 1 inch above the meat. Cover and place in the 300°F (149°C) oven for 2-4 hours, depending on the toughness of the meat.
- After 2 hours, check the meat. Check every half hour until fork tender.
- Once fork tender, remove the meat from the pot and shred it with forks, placing it in a large bowl.
- Remove the chilis from the braising liquid and discard.
- Mix the remaining braising liquid into the shredded beef. If using a marrow bone, scoop out and add the marrow to the beef, or enjoy it separately.
- Serve as taco meat with tortillas, sliced chili, avocado, cilantro and lime.
Notes
- For deeper flavor, consider using ancho or chipotle chilis in addition to, or in place of, the dried chilis.
- To speed up the braising process, use a pressure cooker. Adjust cooking time according to manufacturer’s instructions.
- Leftover braised beef can be stored in the refrigerator for up to 4 days and frozen for up to 3 months.
- Prep Time: 15 minutes
- Cook Time: 240 minutes
- Category: Main Course
- Method: Braising
- Cuisine: Mexican
Nutrition
- Serving Size: 1.5 cups
- Calories: 450
- Sugar: 5
- Sodium: 700
- Fat: 25
- Saturated Fat: 10
- Unsaturated Fat: 12
- Carbohydrates: 20
- Fiber: 4
- Protein: 40
- Cholesterol: 100
Frequently Asked Questions
What cut of beef is best for these Mexican braised tacos?
Chuck roast is ideal because the connective tissue breaks down during braising, yielding tender, shreddable meat. Beef short ribs also work well.
Can I adjust the heat level from the chilis?
Remove the seeds and membranes from the chilis before adding them to reduce the heat significantly. You can also use milder dried chilis like ancho or guajillo instead of spicier varieties.
How long should the beef braise to get tender enough for tacos?
Plan for roughly 2.5 to 3 hours at a low simmer, either on the stovetop or in a 325F oven. The meat is ready when it shreds easily with two forks.