
Master the art of making authentic pork schnitzel, and learn to recreate this Austrian culinary classic at home, achieving a perfect balance of tender meat and crispy coating. The process is simpler than you think.
Schnitzel, the culinary classic with deep Austrian roots, is as beloved today as ever, with its crispy, breaded, pan-fried cutlet of pork. The name is a nod to its creation, stemming from the German “schnitz,” meaning “cut” or “slice.” And while the original Wiener Schnitzel used veal, the pork variant is a staple in our house.
Creating a perfectly tender pork schnitzel with a crispy, golden-brown crust isn’t as intimidating as it might seem. In fact, the home kitchen is an ideal setting for this classic dish, and you’ll definitely be able to recreate that perfect balance between crispy outside and juicy inside. 
The secret to achieving this balance? A beer brine. This not-so-secret-anymore trick helps to retain the juiciness of the pork, even when it’s pounded thin and fried. The result is a pork schnitzel that is succulent on the inside, gently hugged by an irresistibly crisp exterior.
After brining, we’ll thin out the pork. It’s simple really – by pounding the pork to a thin layer, it ensures even and quick cooking in the pan. Next, we take the pork through a straightforward three-step dredging process. It goes like this: first a dip into seasoned flour, then a bath in a beaten egg, and finally a roll in panko breadcrumbs. This doesn’t just add flavor, it also gives that essential crunchy crust to the schnitzel.
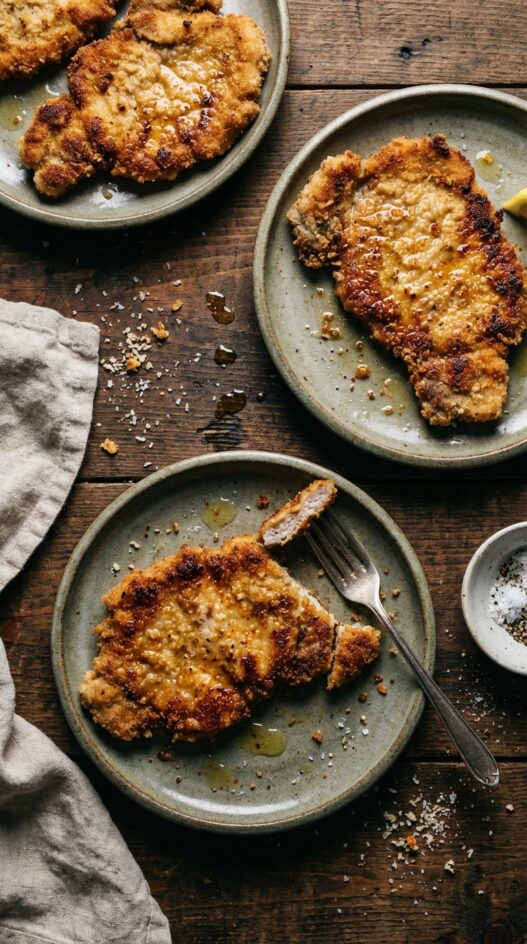
Frying the schnitzel is the crucial part, transforming it to a tempting golden brown. You’ll see firsthand how basic ingredients can turn into a classic dish. And to finish it off? A touch of salt, a squeeze of fresh lemon to cut through the richness, and a sprig of parsley for garnish. Served alongside a German lager, you’ve got a complete schnitzel meal, homemade and hearty.
Now, let’s get started!
STEP BY STEP GUIDE
Brine Preparation:
Start by preparing the brine. This process infuses your pork with extra flavor and tenderness. Combine the water, salt, brown sugar, quartered lemon, garlic, and thyme in a medium pot. Bring this mixture to a boil, then reduce the heat and let it simmer for 10 minutes. Allow the mixture to cool for 15 minutes before adding ice and dark lager beer. It’s crucial the brine is at or below 40°F before adding the pork, so pop it into the fridge if needed.
Pork Preparation:
While the brine is cooling, get your pork ready. Placing your pork chops between two sheets of plastic wrap, use a meat tenderizer, the back of a pan, or a rolling pin to flatten them to about ¼ inch thickness. This ensures even and fast cooking when frying. Once your brine is suitably chilled, add your pork chops to the mixture and refrigerate for 2 to 4 hours. This time in the brine ensures your meat absorbs those delicious flavors and stays tender.
Setting Up Your Dredging Station:
Dredging your pork chops in flour, egg, and breadcrumbs gives them their classic crispy exterior. Set up three shallow dishes – one with seasoned flour, another with a seasoned mixture of beaten eggs and milk, and a third with seasoned panko breadcrumbs. This assembly line setup makes the process quick and efficient.
Dredging the Pork:
Now take each pork chop and coat it in the flour, then the egg mixture, and finally the breadcrumbs. Each stage adds a layer to the final crust – the flour helps the egg stick, the egg helps the breadcrumbs stick, and the breadcrumbs give that crunch. After coating, place the pork chops on a plate lined with parchment paper and refrigerate for 10 minutes. This helps the coating adhere better to the meat.
Frying the Schnitzel:
Heat up your oil and butter in a large skillet over medium-high heat. Once it’s hot, add your pork chops, careful not to overcrowd the pan. Fry until each side is a golden brown – this usually takes about 2 to 3 minutes per side. Remember, the pork is thin, so it cooks quickly!
Finishing Up:
Transfer your cooked pork chops to a paper towel to drain and season with a little more salt. To serve, garnish with lemon wedges and parsley. The lemon provides a nice fresh contrast to the rich, crispy pork. Pair with a stein of German lager for a full schnitzel experience.
Print
Beer Brined Austrian Pork Schnitzel
- Total Time: 37 minutes
- Yield: Serves 4
- Diet: Omnivore
Description
Crispy, tender pork schnitzel. A classic Austrian recipe made easy at home.
Ingredients
- 0.25 cups (59 ml) kosher salt
- 0.25 cups (59 ml) brown sugar
- 1 lemon
- 4 cloves garlic
- 1 bunch fresh thyme
- 1 cups (237 ml) ice cubes
- 2 cups (473 ml) dark lager beer
- 4 boneless pork chops
- 1.5 cups (355 ml) all-purpose flour
- 2 large eggs
- 0.5 cups (118 ml) milk
- 4 cups (946 ml) panko bread crumbs
- 2 tbsp canola oil
- 2 tbsp butter
Instructions
- In a medium pot, combine 2 cups water, salt, brown sugar, lemon, garlic, and thyme. Bring to a boil over high heat, then simmer for 10 minutes.
- Once the salt and sugar have dissolved, remove from heat and set aside to cool for 15 minutes.
- Stir in the ice and beer. The brine should be 40°F (4°C). If warmer, place in the refrigerator to cool.
- While the brine cools, place pork chops between two sheets of plastic wrap on a large solid surface.
- If using thick pork chops, butterfly them first.
- Using the flat side of a meat tenderizer, the back of a large pan, or a rolling pin, firmly and carefully pound them to an even ¼-inch thickness.
- Place pork chops and brine in a 1-gallon bag and refrigerate for 2 to 4 hours.
- Arrange three shallow dishes on the countertop.
- Place the flour in one dish and season with salt and pepper.
- Whisk eggs and milk together in the second dish and season with salt and pepper.
- In the third dish, add the panko bread crumbs and season with salt and pepper.
- Dredge each piece of pork in flour, followed by the egg mixture, and then coat with bread crumbs.
- To ensure an even coating, hold the pork gently at one edge and allow any excess to fall back into the dish before moving to the next.
- Lay the coated pork on a plate lined with parchment paper and refrigerate for 10 minutes.
- Add oil and butter to a large skillet over medium-high heat (approximately 350°F – 400°F / 177°C – 204°C).
- Taking care not to overcrowd the pan, add the pork chops and cook until golden brown, about 2 to 3 minutes per side.
- Transfer to paper towels to drain and season with salt.
- Repeat with remaining pork chops.
Notes
- For even cooking, ensure your pork chops are uniformly pounded to 1/4-inch thickness. Thicker pieces will require longer cooking times.
- To make ahead, prepare the breaded schnitzel up to the point of cooking and refrigerate for up to 24 hours. This allows for better breading adhesion.
- Substitute Pilsner beer for dark lager if unavailable; a lighter beer will produce a slightly less flavorful, but still delicious, schnitzel.
- Prep Time: 25 minutes
- Brining: 4 hours
- Cook Time: 12 minutes
- Category: Main Course
- Method: Pan-Frying
- Cuisine: Austrian
Nutrition
- Serving Size: 1 pork chop
- Calories: 450
- Sugar: 5
- Sodium: 700
- Fat: 25
- Saturated Fat: 8
- Unsaturated Fat: 12
- Carbohydrates: 30
- Fiber: 2
- Protein: 35
- Cholesterol: 150
Frequently Asked Questions
What type of beer should I use for the brine?
A lager or a pilsner works best for the brine, as they provide a mild flavor that enhances the pork without overpowering it.
How thin should I pound the pork for schnitzel?
Aim for about 1/4 inch thickness when pounding the pork, which ensures even cooking and a tender texture.
Can I use regular breadcrumbs instead of panko for the coating?
While you can use regular breadcrumbs, panko is recommended for a lighter and crispier texture due to its larger flakes.


Too many ad pop ups 5-8, total crap. I don’t click on any so no benefit. The worse web site experienced for recipes. Sayonara Don’t bother contacting me. Didn’t copy the recipe, frustrating
Ok.