
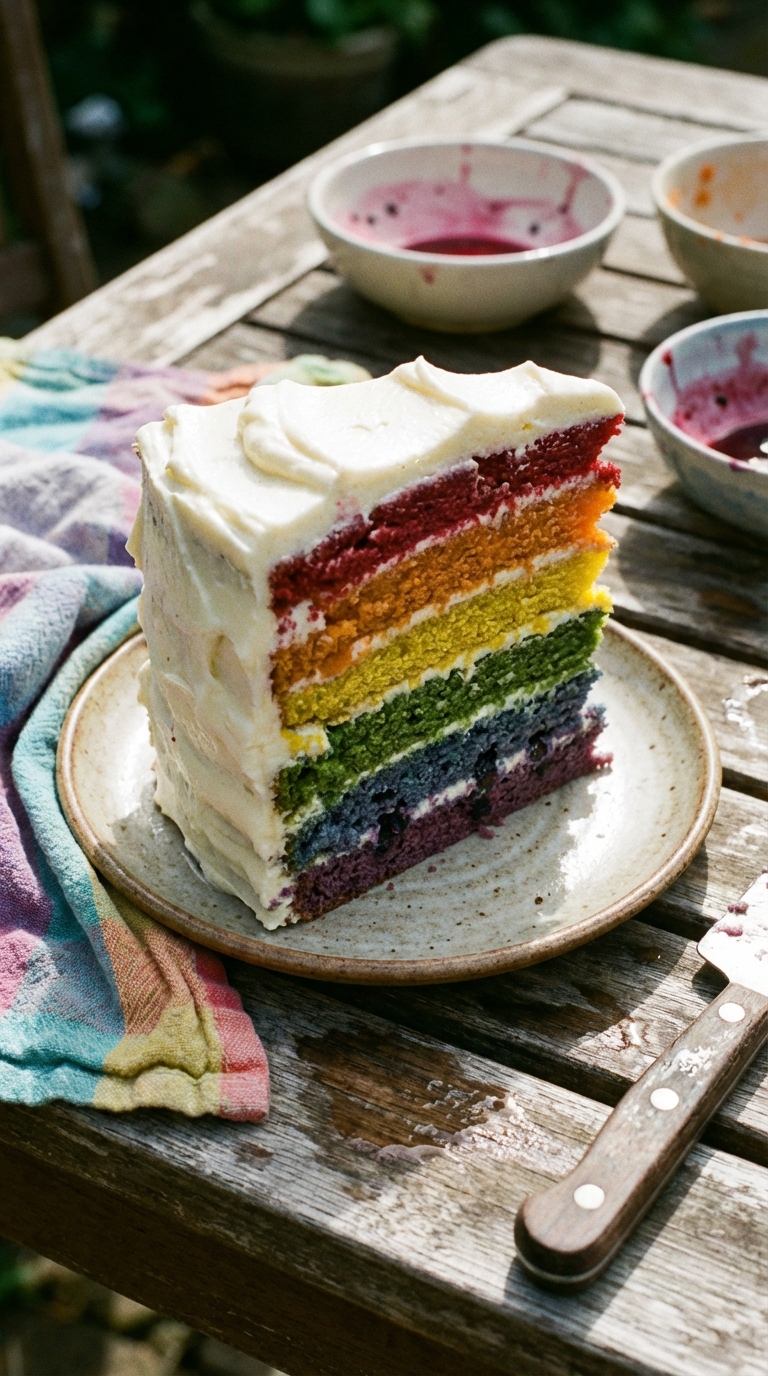
Rainbow cakes seem to be everywhere in my life these days. I made one last summer, and my family and guests loved the bright, vibrant colors. But in the back of my mind, I couldn’t ignore the ongoing conversation about artificial food coloring and its potential downsides. That’s when my husband challenged me to take on a new baking experiment: creating a rainbow cake using only natural food dyes.
My first experience with natural food dyes happened by accident when I was a child. While making blueberry muffins, I realized that the more I stirred the batter, the more the berry juice bled, turning the muffins a deep shade of blue. Fast forward to a couple of years ago, and I took on my first intentional experiment—dyeing Easter eggs with natural ingredients. I was fascinated by the beautiful colors that everyday fruits, vegetables, and spices could create. Since then, I’ve dabbled in all kinds of colorful cooking experiments, from using spinach to make Green Eggs and Ham to naturally tinting buttercream frosting.
I have to admit, coloring sweets with natural dyes can be tricky. Many ingredients that create stunning hues also come with strong flavors that don’t always play well with desserts. I know what you’re thinking—using spinach to dye eggs makes sense, but spinach juice in a cake?! 
Well, I can now confidently say: yes, it works! You end up using such a small amount of vegetable juice that the flavor is barely noticeable—especially once the cake is frosted. Even my toughest critic, my son, took a bite and exclaimed, “It’s beautiful, Mommy!” The rest of my family agreed that it tasted just like regular cake, and honestly, it felt more natural and enjoyable than the typical neon-colored rainbow cakes made with synthetic dyes. I considered that a baking success. Given the choice, I’d much rather serve my loved ones a cake colored with beets or carrots than one loaded with artificial ingredients.
Just like dyeing Easter eggs or other natural dye projects, making a rainbow cake with natural colors can be a fun and educational experience for kids. They can brainstorm different colorful foods and experiment with creating their own edible rainbow. Not only is it a great learning opportunity, but it also helps kids appreciate the natural beauty of food. Plus, the process can be applied to other creative projects, like homemade finger paints or playdough.
For this cake, I used a basic white cake recipe I’ve relied on for years and paired it with vanilla buttercream. I then coated the exterior with a layer of whipped cream frosting. Combining the rich, buttery buttercream with light, airy whipped cream is one of my new favorite techniques—it creates the perfect balance of sweetness and texture.
To test my natural dye options, I first made a batch of cupcakes, experimenting with different ingredients. From there, I narrowed it down to six finalists based on both color and flavor, resulting in a rainbow cake that was as beautiful as it was delicious.
Why You’ll Love This Recipe:
- All-Natural Colors: Ditch artificial food dyes and use fruit, vegetable, and plant-based ingredients to create a stunning rainbow effect.
- Fun & Educational: A great baking experiment for kids, teaching them how natural ingredients can be used to color food.
- Beautiful Yet Simple: The pastel hues make for an elegant, whimsical cake without overpowering flavors.
- Perfect for Special Occasions: A showstopping cake for birthdays, celebrations, and events.
Ingredients You’ll Need:
Natural Dyes:
- Red: beet juice
- Orange: carrot juice
- Yellow: egg yolk + milk
- Green: spinach juice
- Blue: blueberry juice
- Purple: blackberry juice
White Cake:
- Flour
- Baking Powder
- Sugar
- Butter & Oil
- Egg Whites
- Milk
- Plain, Fat-Free Yogurt
- Vanilla Extract
Buttercream Frosting:
- Powdered Sugar
- Butter
- Vanilla Extract
- Milk
Whipped Cream Frosting:
- Heavy Cream
- Powdered Sugar
- Salt
- Vanilla Extract
Equipment You’ll Need:
- 6 Cake Pans (5.5-inch) or Baking Sheets: For individual colored layers.
- Mixing Bowls: For preparing cake batter and natural dyes.
- Electric Mixer or Whisk: To cream butter, beat egg whites, and whip frosting.
- Juicer or Blender: To extract natural dyes from fruits and vegetables.
- Fine Mesh Strainer or Cheesecloth: For straining out juices.
- Cake Turntable & Offset Spatula: Helps with smooth frosting application.
Important Cooking Tips:
- Use Concentrated Juices: The more concentrated the natural dye, the richer the color. Simmer juices slightly to reduce moisture while intensifying pigment.
- Test Colors Before Baking: Natural colors can fade or change during baking—adjust by adding more dye if necessary.
- Layer Cakes Evenly: Weigh out batter portions to ensure equal-sized layers.
- Chill Before Frosting: A short chill helps set the cake, making it easier to frost.
Planning Ahead:
- Make Natural Dyes in Advance: Store extracted juices in airtight containers in the fridge for up to 2 days.
- Bake Layers Ahead of Time: Store cooled cake layers wrapped in plastic wrap for up to 24 hours before assembling.
- Frosting Prep: Buttercream can be made a day ahead and refrigerated; whip before using.
Storing, Freezing, Reheating:
- Refrigeration: Store in an airtight container for up to 3 days.
- Freezing Cake Layers: Wrap individual layers in plastic wrap and freeze for up to 2 months. Thaw before frosting.
- Freezing Assembled Cake: Store whole cake wrapped in plastic wrap for up to 1 month.
- Reheating: Bring to room temperature before serving.
FAQ:
Q: Will the cake taste like vegetables?
A: No! The amounts used are small enough that they won’t affect the cake’s flavor. The frosting also helps mask any subtle earthy notes.
Q: How can I make the colors more vibrant?
A: Use more concentrated juices by reducing them over low heat before adding to the batter.
Q: Can I use frozen fruit instead of fresh?
A: Yes! Thaw and strain berries to extract juice for coloring.
Q: Can I make this gluten-free?
A: Yes, substitute 1:1 gluten-free flour for the all-purpose flour.
Q: Why did my layers turn brown?
A: Natural colors can fade when exposed to too much heat—reduce oven temperature slightly and bake for a few minutes longer.
Substitutions and Allergies:
- Egg-Free: Replace egg whites with aquafaba (chickpea brine) or a commercial egg replacer.
- Dairy-Free: Use plant-based milk and butter substitutes for cake and frosting.
- Refined Sugar-Free: Swap granulated sugar for coconut sugar (though this may slightly alter the color).
Beverage Pairings:
- Berry-Infused Lemonade: Bright and fruity to complement the cake’s flavors.
- Vanilla Chai Latte: Spiced warmth works beautifully with the subtle sweetness of the cake.
- Sparkling Rosé: Make it celebratory!
Step-by-Step Guide for Making Rainbow Cake with Natural Dyes
1. Prepare the Natural Dyes
- Juice beets in a juicer or use the liquid from canned beets.
- Juice carrots in a juicer or use store-bought carrot juice.
- Juice spinach in a juicer.
- Microwave 1/4 cup (25 g) frozen blueberries in 30-second intervals until they burst, then strain out 1+ tablespoon (15+ mL) blueberry juice.
- Microwave 1/4 cup (25 g) frozen blackberries in 30-second intervals until they burst, then strain out 1+ tablespoon (15+ mL) blackberry juice.
2. Prepare the Cake Batter
- Preheat oven to 350°F (175°C).
- Cream the butter, oil, and sugar in a large mixing bowl until light and fluffy.
- Add the egg whites and beat well.
- Mix in vanilla, 1 cup (237 mL) milk, and yogurt.
- In a separate bowl, whisk together the flour, baking powder, and baking soda.
- Gradually add the dry ingredients to the wet ingredients, alternating with the remaining milk.
3. Color the Cake Batter
- Divide the cake batter into six equal portions (about 1/2 cup per bowl).
- Mix in the natural dye for each bowl:
- Red: 2 tablespoons (30 mL) beet juice
- Orange: 1 1/2 tablespoons (20 mL) carrot juice
- Yellow: 1 egg yolk + 1 tablespoon (15 mL) milk
- Green: 1 tablespoon (15 mL) spinach juice
- Blue: 1 tablespoon (15 mL) blueberry juice
- Purple: 1 tablespoon (15 mL) blackberry juice
- If needed, adjust the color intensity by adding more juice.
4. Bake the Cake Layers
- Grease and flour six 5.5-inch cake pans (or bake in batches).
- Pour each colored batter into a separate pan.
- Bake for 10-15 minutes, or until the cake springs back when touched and a toothpick inserted in the center comes out clean.
- Cool for 5 minutes in the pan, then invert onto wire racks to cool completely.
5. Make the Buttercream Frosting
- In a large bowl, beat butter, powdered sugar, vanilla, and milk until smooth.
- Adjust the consistency by adding more powdered sugar (for thickness) or milk (for softness).
6. Make the Whipped Cream Frosting
- Beat heavy cream, powdered sugar, and salt at medium speed until stiff peaks form.
- Fold in vanilla extract.
7. Assemble the Cake
- Place the purple layer on a serving platter.
- Spread 2 spoonfuls of buttercream frosting evenly on top.
- Repeat with the blue, green, yellow, orange, and red layers.
- Lightly freeze the cake for 5 minutes to set the frosting.
- Coat the entire cake with buttercream frosting using a knife or spatula.
- Apply whipped cream frosting for a smooth, soft finish.
- Serve immediately.
If You Liked This, You Are Going To Love These Cake Recipes:
Carrot Sheet Cake with Cream Cheese Frosting
Ciambellone: How to Make the Classic Italian Ring Cake
Blackberry and Honeycomb Brittle Cake
Rainbow Cake with Natural Dyes
- Total Time: 55 minutes
- Yield: Serves 6
- Diet: Omnivore, Vegetarian
Description
A vibrant, pastel rainbow cake made with all-natural food dyes.
Its as fun to make as it is to eat!
Ingredients
- 1-2 tablespoons (15-30 mL) beet juice
- 1 tablespoon (15 mL) carrot juice
- 1 egg yolk
- 1 tablespoon (15 mL) spinach juice
- 1+ tablespoon (15+ mL) blueberry juice
- 1+ tablespoon (15+ mL) blackberry juice
- 3 1/2 cups (348 g) flour
- 2 teaspoons (7.5 g) baking powder
- 1/2 teaspoon (2 g) baking soda
- 1 3/4 cups (335 g) sugar
- 1/4 cup (57 g) butter
- 1 1/2 tablespoons (20 g) oil
- 2 egg whites
- 1 2/3 cups (394 mL) milk
- 1/2 cup (60 g) plain, fat-free yogurt
- 2 1/2 teaspoons (12 mL) vanilla
- 3 3/4 cups (488 g) powdered sugar
- 1/2 cup (115 g) butter
- 1 teaspoon (5 mL) vanilla
- 3 tablespoons (45 mL) milk
- 2 cups (473 mL) heavy cream
- 1/4 cup (33 g) powdered sugar
- 1/8 teaspoon (0.5 g) salt
- 1 teaspoon (5 mL) vanilla extract
Instructions
- Prepare the Natural Dyes
- Juice beets in a juicer or use the liquid from canned beets.
- Juice carrots in a juicer or use store-bought carrot juice.
- Juice spinach in a juicer.
- Microwave 1/4 cup (25 g) frozen blueberries in 30-second intervals until they burst, then strain out 1+ tablespoon (15+ mL) blueberry juice.
- Microwave 1/4 cup (25 g) frozen blackberries in 30-second intervals until they burst, then strain out 1+ tablespoon (15+ mL) blackberry juice.
- Prepare the Cake Batter
- Preheat oven to 350°F (175°C).
- Cream the butter, oil, and sugar in a large mixing bowl until light and fluffy.
- Add the egg whites and beat well.
- Mix in vanilla, 1 cup (237 mL) milk, and yogurt.
- In a separate bowl, whisk together the flour, baking powder, and baking soda.
- Gradually add the dry ingredients to the wet ingredients, alternating with the remaining milk.
- Color the Cake Batter
- Divide the cake batter into six equal portions (about 1/2 cup per bowl).
- Mix in the natural dye for each bowl: Red: 2 tablespoons (30 mL) beet juice, Orange: 1 1/2 tablespoons (20 mL) carrot juice, Yellow: 1 egg yolk + 1 tablespoon (15 mL) milk, Green: 1 tablespoon (15 mL) spinach juice, Blue: 1 tablespoon (15 mL) blueberry juice, Purple: 1 tablespoon (15 mL) blackberry juice.
- If needed, adjust the color intensity by adding more juice.
- Bake the Cake Layers
- Grease and flour six 5.5-inch cake pans (or bake in batches).
- Pour each colored batter into a separate pan.
- Bake for 10-15 minutes, or until the cake springs back when touched and a toothpick inserted in the center comes out clean.
- Cool for 5 minutes in the pan, then invert onto wire racks to cool completely.
- Make the Buttercream Frosting
- In a large bowl, beat butter, powdered sugar, vanilla, and milk until smooth.
- Adjust the consistency by adding more powdered sugar (for thickness) or milk (for softness).
- Make the Whipped Cream Frosting
- Beat heavy cream, powdered sugar, and salt at medium speed until stiff peaks form.
- Fold in vanilla extract.
- Assemble the Cake
- Place the purple layer on a serving platter.
- Spread 2 spoonfuls of buttercream frosting evenly on top.
- Repeat with the blue, green, yellow, orange, and red layers.
- Lightly freeze the cake for 5 minutes to set the frosting.
- Coat the entire cake with buttercream frosting using a knife or spatula.
- Apply whipped cream frosting for a smooth, soft finish.
- Serve immediately.
Notes
- For even baking, use identical cake pans and rotate pans halfway through baking.
- To intensify colors, use more concentrated juices or add a small amount of gel food coloring.
- Store the assembled cake in the refrigerator for up to 3 days; the whipped cream frosting may soften.
- Prep Time: 30 minutes
- Cook Time: 25 minutes
- Category: Dessert
- Method: Baking
- Cuisine: American
Nutrition
- Serving Size: 1 slice
- Calories: 400
- Sugar: 50
- Sodium: 100
- Fat: 20
- Saturated Fat: 10
- Unsaturated Fat: 8
- Trans Fat: 0g
- Carbohydrates: 60
- Fiber: 3
- Protein: 4
- Cholesterol: 50
Frequently Asked Questions
What natural ingredients can I use to dye each layer of the cake?
Common options include beet juice for red and pink, turmeric for yellow, spinach or matcha for green, butterfly pea flower for blue, and purple sweet potato or blueberry juice for purple. Each one tints the batter without artificial coloring.
Will the natural dyes affect the taste of the cake?
Most natural dyes have a mild flavor that is undetectable once baked into the cake batter, especially when paired with vanilla. Turmeric can be slightly noticeable, so use it sparingly.
How do I get even, distinct layers in a rainbow cake?
Weigh or measure your batter evenly between the pans so each layer bakes to the same thickness. Let each layer cool completely before stacking and frosting to prevent the colors from bleeding together.


So awesome, thanks for this. Made it this past weekend!
I first made this for my son’s 3rd birthday cake and then again each year after for a few years. I have made it for a dear friend’s little girl a couple times. I decided to see if I could find the recipe again because my son has requested this as his cake for his 16th birthday. I’m so happy to find it is still here, thank you :)
Yay, happy you found it!!
I made this for my daughter’s birthday, and she was amazed!
What a fun way to bake with kids. Messy but totally worth it.