


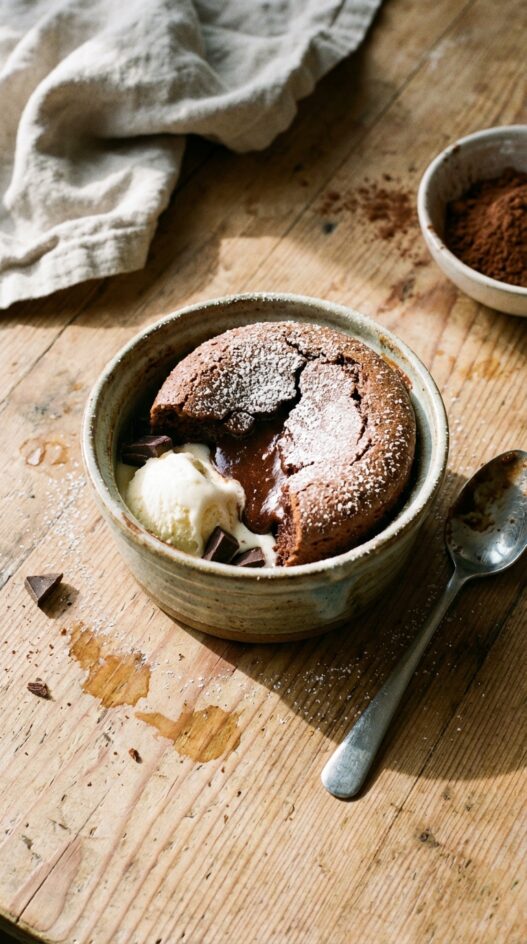

Drop a square of chocolate into the center of the batter and microwave for 60-90 seconds. That is the entire technique. The batter sets around the chocolate while the square melts into a pool in the middle, and you get a lava cake without preheating an oven, without eggs, without timing anything precisely.
I keep the dry mix measured out in jars so I can make this on any weeknight. Cocoa, flour, sugar, baking powder. Add milk and melted butter, stir, pour, drop the chocolate in, microwave. It is done before the kettle boils.
How to Make Microwave Lava Cake
Get the Chocolate Placement Right
Push the chocolate square into the center of the batter until it is fully submerged. If it sits on top, it just melts into the surface instead of forming a molten pocket inside. 
Use a chocolate that is at least 60% cacao. Milk chocolate melts too thin and disappears into the batter.
Watch the Timing
Every microwave is different. Start at 60 seconds on high. The top should look set but still slightly shiny. If it looks dry, you have gone too far and the center will be solid.
Let it sit for 30 seconds before eating. The center is extremely hot.

5 Minute Eggless Molten Lava Cake (In the Microwave)
- Total Time: 6 minutes
- Yield: Serves 4
- Diet: Omnivore
Description
Rich, chocolatey lava cake in minutes? Yes, please! This single-serve dessert is perfect for a quick chocolate fix.
Ingredients
- 1 cups (237 ml) all-purpose flour
- 1/2 cups (118 ml) unsweetened cocoa powder
- 3/4 cups (177 ml) granulated sugar
- 1 teaspoon baking powder
- 1/4 teaspoon salt
- 1 cups (240 ml) whole milk
- 6 tablespoons (85 g) melted butter
- 1 teaspoon vanilla extract
- 4 ounces (120 g) Semisweet or bittersweet baking chocolate
- Powdered sugar
- ice cream
Instructions
- Prepare the Molds: Use 4 microwave-safe ramekins (6-8 oz each) or small bowls. Lightly grease them with butter or oil to prevent sticking.
- Mix the Dry Ingredients: In a medium bowl, whisk together the flour, cocoa powder, sugar, baking powder, and salt.
- Add the Wet Ingredients: Stir in the milk, melted butter, and vanilla extract until just combined. Do not overmix.
- Fill the Molds: Divide the batter evenly among the 4 prepared ramekins. Place a piece of dark chocolate (or a truffle) in the center of each and let it sink slightly without pressing it all the way down.
- Microwave One at a Time: Microwave each ramekin individually on high for 45-60 seconds (based on an 800W microwave). Adjust for your microwave: Lower wattage (600W): 60-75 seconds; Higher wattage (1000W+): 35-45 seconds. The edges should look set, but the center should still appear slightly undercooked.
- Let It Rest and Serve: Allow each cake to rest for 30 seconds after microwaving. You can serve it in the ramekin for a more casual look or gently run a knife around the edges and invert it onto a plate for a plated dessert. Dust with powdered sugar or serve with ice cream.
Notes
- For a richer flavor, use dark chocolate instead of semisweet.
- If you don’t have ramekins, use oven-safe mugs instead.
- Leftover cakes can be stored in the refrigerator for up to 2 days; reheat in the microwave for 15-20 seconds.
- Prep Time: 5 minutes
- Cook Time: 1 minutes
- Category: Dessert
- Method: Microwaving
- Cuisine: American
Nutrition
- Serving Size: 1 ramekin
- Calories: 300
- Sugar: 25
- Sodium: 100
- Fat: 15
- Saturated Fat: 8
- Unsaturated Fat: 5
- Trans Fat: 0g
- Carbohydrates: 40
- Fiber: 2
- Protein: 4
- Cholesterol: 10
Frequently Asked Questions
Why is my lava cake rubbery?
Overcooked. Microwaves vary in power, so start at 60 seconds and add 10 seconds at a time. The top should look barely set. It continues cooking for another 30 seconds after you stop the microwave.
Can I use cocoa powder instead of baking chocolate for the center?
No. The center needs a solid piece of chocolate that melts during cooking. Cocoa powder is already in the batter. For the molten pocket, use a square or chunk of dark chocolate, about 30g (1 oz) per ramekin.
Can I make this in a mug instead of a ramekin?
Yes. A standard 350ml (12 oz) ceramic mug works. Grease it lightly with butter first. The cooking time may be slightly shorter since mugs are taller and narrower, so check at 50 seconds.


Hi, do u suppose I could get the recipe for convection (fan forced) oven as well pretty pls? Looks delish!
I tried it, it was really very tasty but the chocolate apparently did not melt at all. Instead of a choco lava cake I got choco centred cake. ( I too use morde chocolate) and I microwaved my cake for two and a half minutes. I followed your recipe dot to dot too . Help please.
try just 1 minute. 2.5 minutes is too much
is bourneville modelling chocolate
I’ve used it. It doesn’t melt a lot. But it still gives a nice chocolatey center. it is not however modelling chocolate
Fabulous recpie!
Great!
plzz tell me whether to put micro in convection mode or microwave mode??
MW mode
Wht is microwave on full power?
Hi RT,
some MW ovens have the option of reducing heat while microwaving..
can u use syrup instead of the chocolate peice
Hi Muskan. You cannot use chocolate syrup before baking coz it is already in liquid form & I’m not sure what would happen once microwaved. Only if you use a block of chocolate will it melt and you’ll get a gooey center
Perfect perfect perfect, so fun to make too!
Thank you!
Yes I do Donna! Could you send me an email at [email protected]? I shall mail you the recipe
Do you have a recipe for this but for a conventional oven
yummy
man this is so tasty…………….. yummy i luv it :)
What is the exact name of “Cooking chocolate”?
Looks great and I like the fact you can make just one at a time when you want one.
Thanks!
@ Nancy – In India we get different brands like Morde. You could get it in any bakery shops. It is also known as Modelling chocolate. Or just use some semi sweet choco chips
Hi, that’s probably because your didn’t use cooking chocolate
The molten lava caked came out just like the picture . Unfortnately there was no lava action after 1-2 min in the microwave. used 2 squares of dark chocolate.A good recipe to satisfy your chocolate craving