

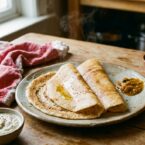
Dosas are fabulous thin, crispy crepes that originated in South India as contrast to North India’s wheat-based roti. These delicious fermented pancakes are made from a mixture of rice and lentils, and can serve as a vessel for almost any filling (Indian or not!). They are often served with sambar (a vegetable and lentil stew) and various chutneys, and enjoyed at breakfast, lunch, or dinner throughout South India and beyond.
Dosas are made by soaking rice and urad dal (split black lentils) overnight, then grinding them separately into a smooth batter. The two batters are combined with salt and sometimes semolina or poha, then left to ferment for 8-12 hours. To cook, the fermented batter is poured onto a hot griddle and quickly spread in a circular motion to form a thin crepe. It cooks until the bottom turns golden brown, while the top remains slightly softer. Did we mention they are delicious? Well, even if we did, it deserves to be repeated.
Some Notes on Making Dosas
Ingredients matter: Use parboiled rice and split urad dal (skinless) as your base ingredients. Adding a small amount of semolina or poha (flattened rice) creates crispier dosas. 
Soaking and grinding: Soak your rice and lentils overnight, then grind them separately for a lighter batter that ferments more efficiently.
Fermentation is key: Allow the mixed batter to ferment overnight. Use a container with a lid that allows some air circulation without being completely airtight.
Griddle temperature: Test your griddle by sprinkling water on it—if the water sizzles immediately, it’s ready for your batter.
Spreading technique: Pour the batter in the center of your hot griddle, then use a circular outward motion to create a thin, even crepe.
Cooking: After spreading, wait until the edges start to brown and lift from the surface before adding oil around the edges. This helps achieve that awesome dosa-signature crispy exterior.
Fillings: While dosas are delicious plain, they’re also excellent carriers of fillings like spiced potatoes (masala dosa), vegetables, or even cooked meat.
Step By Step Guide: How to Make Crispy Dosas – Indian Pancakes
Step 1: Soaking the Ingredients
Rinse rice and urad dal separately under running water until water runs clear.
Soak rice and dal in separate bowls, covering with plenty of water. Allow them to soak for at least 6 hours or preferably overnight (8-12 hours).
Step 2: Grinding the Batter
Drain water completely from soaked rice and dal.
Using a wet grinder (or blender), grind rice separately into a fine, smooth batter. Transfer rice batter to a large bowl.
Next, grind the urad dal separately until smooth and fluffy, adding a little water if needed.
Mix both rice and dal batter together thoroughly, adding semolina or poha and salt. Stir well to combine.
Step 3: Fermentation Process
Cover the bowl with a lid that allows slight airflow (not airtight).
Place the batter in a warm location (ideally around 80-85°F/27-29°C) overnight for fermentation. Batter will nearly double in volume and become bubbly after fermentation.
Step 4: Preparing the Griddle
Heat griddle or pan on medium-high heat. Sprinkle a few drops of water; if it immediately sizzles and evaporates, the pan is ready.
Prepare an oil-water mixture by combining ½ tablespoon of oil with 2 cups water in a small bowl. Use this mixture to grease and clean the griddle between dosas.
Step 5: Making the Dosa
Spray or lightly drizzle oil onto the hot griddle.
Dip a clean cloth lightly into the oil-water mixture, squeeze out excess liquid, and quickly wipe the griddle to evenly distribute the oil.
Pour about ½ cup of dosa batter onto the center of the griddle. Immediately swirl outward in circular motions using the back of the ladle, creating a thin, even crepe.
After approximately 8-10 seconds, drizzle or spray some oil around edges and on top of dosa.
Step 6: Cooking and Serving
Cook until the dosa turns golden brown and crispy around the edges (about 1-2 minutes).
Optionally, add your choice of filling (e.g., potato masala, cooked veggies, or meat) to the center.
Carefully fold the sides of dosa over the filling or serve plain.
Serve hot with coconut chutney, tomato chutney, or traditional sambar.
Indian Pancakes – Easy, Crispy Homemade Dosas
- Total Time: 40 minutes
- Yield: Serves 4
- Diet: Vegetarian
Description
These South Indian pancakes are surprisingly easy to make. Crispy, flavorful, and perfect with chutney!
Ingredients
- 1 1/2 cups (300 g) parboiled rice
- 1/2 cup (100 g) split urad dal
- 2 tablespoons semolina
- 1 tablespoon salt
- Oil
Instructions
- Rinse rice and urad dal separately under running water until water runs clear.
- Soak rice and dal in separate bowls, covering with plenty of water for at least 6 hours or preferably overnight (8-12 hours).
- Drain water completely from soaked rice and dal.
- Grind rice separately into a fine, smooth batter using a wet grinder (or blender). Transfer rice batter to a large bowl.
- Grind the urad dal separately until smooth and fluffy, adding a little water if needed.
- Mix both rice and dal batter together thoroughly, adding semolina or poha and salt. Stir well to combine.
- Cover the bowl with a lid that allows slight airflow.
- Place the batter in a warm location (ideally around 80-85°F/27-29°C) overnight for fermentation.
- Heat griddle or pan on medium-high heat. Sprinkle a few drops of water; if it immediately sizzles and evaporates, the pan is ready.
- Prepare an oil-water mixture by combining ½ tablespoon of oil with 2 cups water in a small bowl. Use this mixture to grease and clean the griddle between dosas.
- Spray or lightly drizzle oil onto the hot griddle.
- Dip a clean cloth lightly into the oil-water mixture, squeeze out excess liquid, and quickly wipe the griddle to evenly distribute the oil.
- Pour about ½ cup of dosa batter onto the center of the griddle. Immediately swirl outward in circular motions using the back of the ladle, creating a thin, even crepe.
- After approximately 8-10 seconds, drizzle or spray some oil around edges and on top of dosa.
- Cook until the dosa turns golden brown and crispy around the edges (about 1-2 minutes).
- Optionally, add your choice of filling (e.g., potato masala, cooked veggies, or meat) to the center.
- Carefully fold the sides of dosa over the filling or serve plain.
- Serve hot with coconut chutney, tomato chutney, or traditional sambar.
Notes
- For a crispier dosa, use a well-seasoned griddle or pan.
- If your batter is too thick, add a little water to achieve a pourable consistency.
- Leftover dosa batter can be stored in the refrigerator for up to 2 days; allow it to come to room temperature before cooking.
- Prep Time: 20 minutes
- Soaking and Fermenting: 10 hours
- Cook Time: 20 minutes
- Category: Breakfast
- Method: Griddling
- Cuisine: South Indian
Nutrition
- Serving Size: 2 dosas
- Calories: 200
- Sugar: 2
- Sodium: 200
- Fat: 8
- Saturated Fat: 2
- Unsaturated Fat: 6
- Trans Fat: 0g
- Carbohydrates: 35
- Fiber: 2
- Protein: 5
- Cholesterol: 0g
If you liked this, you are going to love these favorite Indian recipes:
How to Make Indian Curry Paste
Rava (Khara) Bath Recipe: Perfecting the South Indian Breakfast Classic
Bhindi Fry – Indian Okra Stir Fry
Kurumulaku – Kerala Style Pepper Chicken
Frequently Asked Questions
Why is it important to soak the rice and urad dal overnight?
Soaking the rice and urad dal overnight helps to soften them, making it easier to grind into a smooth batter and promoting better fermentation.
What type of rice and lentils should I use for the dosa batter?
Use parboiled rice and skinless split urad dal for the best texture and flavor in your dosas.
How do I know when my dosa is cooked properly?
Your dosa is cooked when the bottom turns golden brown and the top remains slightly softer; you can test this by gently lifting the edge with a spatula.


Very authentic, my mom makes them like this!!
I added green chilies to my dosa batter—great results! I fermented for 8 hours and it seems like it was almost perfect timing, even if my kitchen isn’t super hot.
First time making dosas—surprisingly easy, even with the slightly scary fermentation part (don’t worry, it’s easy!). Loved it!
Followed your instructions—best dosas I’ve made at home! Thanks!
Food processor will not work as you need a fine grind for the dal and rice. Blender with at least 450 watts works best.
Hi… I live outside India, I do not have a wet grinder and or a Mixer, I have the food processor, the kind that is mainly used to kneading dough n cutting vegetables, can I use that for making the dosa batter, will it damage the equipment? I don’t like the batter sold outisde, I am dying to make dosas at home.
I love dosas! Only tried making my own once and the batter didn’t turn out too great. Thanks for the tips and great recipe.
Nancy thank you! Dosa just takes a little getting used to :-)