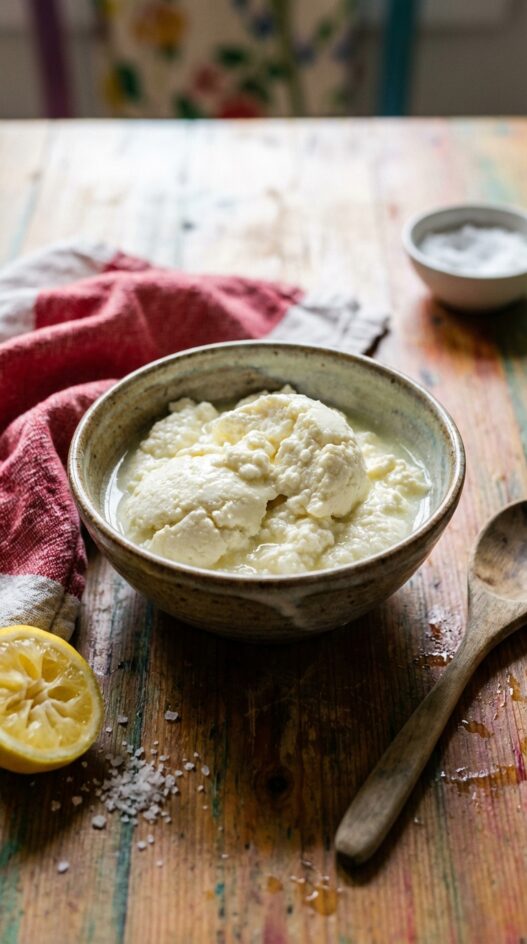

Living in Melbourne means that I have access to a good number of Greek cheeses; I can always buy Kaseri, Kefalograviera and, of course, feta. But what I really miss are the locally produced, soft, fresh cheeses that you buy by the scoop to spread on bread, or dollop into salads, or bake into pies. The most commonly known is mizithra, but there are different varieties made all over the country that use different combinations of cow, sheep and goat milk to achieve different levels of sharpness and a variety of textures. My favorite, xynomizithra, is a sour version of mizithra that tastes like a tangy incarnation of very fresh, rich ricotta. The best is thought to be produced on the island of Crete, where they use sheep and/or goat milk to make the cheese.
It’s going to be a little while before I can get back there to eat some, so I decided to make my own. I ate this first batch on grilled ciabatta, sprinkled with smoked sea salt, cracked black pepper and olive oil from the mother country – and it was almost as if I were back there in my grandmother’s kitchen on a warm summer morning, eating a little something at her insistence before heading to the beach. It was magic.
I’m thinking that the next lot (draining right now) might get folded into a filling for honey and cinnamon pastries, but I can’t wait to try this on pizza or as a filling for pasta. This is if I can get past the luxury of eating it on toast, perhaps topped with something sweet and sticky, like rose petal jam or a fresh fig. No matter how I decide to eat it, I feel I’ll be making this all summer long. 
How to Make Goat’s Milk Ricotta Cheese
Ingredients:
- 1 liter (34 fl oz) fresh goat’s milk (unpasteurized is preferable, but pasteurized can also work)
- 1/2 teaspoon sea salt
- 3 tablespoons freshly squeezed lemon juice
Equipment:
- Nonreactive saucepan
- Wooden spoon or heat-resistant spatula
- Colander or fine mesh strainer
- Cheesecloth or butter muslin
- Large bowl
Step by Step Guide:
- Prepare Your Equipment: Before you begin, ensure that all your equipment is clean and ready to use. This helps prevent any unwanted bacteria from influencing the cheese-making process.
- Mix Milk and Salt: In a nonreactive saucepan, combine the goat’s milk and sea salt. Mix gently to dissolve the salt completely.
- Heat the Milk: Slowly heat the milk over low to medium heat. Stir occasionally to prevent the milk from scorching on the bottom of the pan. Use a cooking thermometer to monitor the temperature. The goal is to heat the milk to just before boiling, around 185°F – 200°F (85°C – 93°C). Do not let it boil as this can affect the formation of curds.
- Add Lemon Juice: Once the correct temperature is reached, remove the pan from heat. Gently stir in the lemon juice, then allow the mixture to sit undisturbed for 5 minutes. This will help the curds to form. If you do not see curds forming, let it sit for a few more minutes. The acidity and the temperature are crucial for curdling; if your milk is ultra-pasteurized, curdling might be difficult.
- Strain the Curds: Line a colander with a double layer of muslin or cheesecloth and place it over a large bowl. Gently pour the milk mixture into the colander, letting the whey drain away while the curds collect in the cloth.
- Let It Drain: Allow the curds to strain for at least an hour, or until the ricotta reaches your desired consistency. For a firmer ricotta, let it strain longer.
- Refrigerate and Store: Once strained, transfer the ricotta to a container. It can be refrigerated and used within 2-3 days. Pressing the ricotta under a weight in the fridge can further improve its texture, making it denser and more suitable for recipes requiring a firmer cheese.
Recipe Notes:
- Milk Quality: Fresh, unpasteurized milk works best, but if you only have access to pasteurized milk, try to avoid ultra-pasteurized varieties as they often do not curdle well. See notes further down on how to change the recipe if you need to use ultra-pasteurized milk.
- Acid Source: Lemon juice is preferred for its fresh flavor, but white vinegar can be used as an alternative. The amount might need adjustment based on the milk’s freshness and pasteurization.
- Temperature Control: Keeping the milk at the right temperature is crucial for successful curdling. If curds do not form, the milk may not have been warm enough, or the acid could have been added too early.
- Stirring: Minimal stirring after adding lemon juice is crucial as over-stirring can break the curds.
Homemade goat’s milk ricotta
- Total Time: 25 minutes
- Yield: Makes 1.5 cups 1x
- Diet: Omnivore
Description
Creamy, fresh ricotta made with just three ingredients. Perfect for pasta or crostini!
Ingredients
- 34 fl oz (1 liter) fresh goats milk
- 1/2 teaspoon sea salt
- 3 tablespoons freshly squeezed lemon juice
Instructions
- Prepare Your Equipment: Ensure all equipment is clean and ready to use.
- Mix Milk and Salt: In a nonreactive saucepan, combine the goats milk and sea salt; mix gently to dissolve the salt completely.
- Heat the Milk: Slowly heat the milk over low to medium heat, stirring occasionally to prevent scorching. Use a cooking thermometer; heat to 185°F – 200°F (85°C – 93°C). Do not boil.
- Add Lemon Juice: Remove the pan from heat. Gently stir in the lemon juice and let the mixture sit undisturbed for 5 minutes to help the curds form.
- Strain the Curds: Line a colander with a double layer of muslin or cheesecloth, place it over a large bowl, and gently pour the milk mixture into the colander, letting the whey drain.
- Let It Drain: Allow the curds to strain for at least an hour, or until the ricotta reaches your desired consistency. For a firmer ricotta, strain longer.
- Refrigerate and Store: Transfer the ricotta to a container and refrigerate. It can be used within 2-3 days. Pressing the ricotta under a weight in the fridge will improve its texture.
Notes
- For a richer flavor, use whole fat goat milk.
- If you don’t have a cooking thermometer, watch for small curds to begin forming – that indicates the milk is ready for the lemon juice.
- To prevent curdling, ensure the lemon juice is added slowly and gently to the warm milk.
- Prep Time: 10 minutes
- Straining Time: 60 mins
- Cook Time: 15 minutes
- Category: Side Dish
- Method: No-Cook
- Cuisine: Italian
Nutrition
- Serving Size: 1/4 cup
- Calories: 100
- Sugar: 2
- Sodium: 100
- Fat: 8
- Saturated Fat: 5
- Unsaturated Fat: 3
- Carbohydrates: 2
- Protein: 5
- Cholesterol: 20
Frequently Asked Questions
Does goat’s milk ricotta taste different from cow’s milk ricotta?
Yes, it has a slightly tangier, earthier flavor. The texture is typically lighter and less dense than standard ricotta made from whole cow’s milk.
What temperature should the goat’s milk reach before adding the acid?
Heat the milk to around 185 to 190 degrees Fahrenheit, then add your acid, whether lemon juice or white vinegar, and stir gently until curds form.
How long should I let the curds drain?
Drain in a cheesecloth-lined strainer for 10 to 20 minutes for a softer ricotta, or up to an hour if you prefer a firmer, drier texture.


I had no idea fresh ricotta was this simple to make at home. Spreading it on warm bread with a drizzle of honey tonight and I genuinely cannot wait.
Can you used powdered and/or evaporated goat milk? It’s so expensive by me.
Great question! You can use reconstituted powdered goat milk or evaporated goat milk, but with a few caveats:
Powdered goat milk should be mixed with water according to the package instructions to match the consistency of fresh milk. It works reasonably well, but the flavor may be slightly muted and the curd yield can be lower.
Evaporated goat milk is more concentrated, so you’ll want to dilute it back to regular milk strength (usually 1:1 with water) before using it. Be aware that the heat treatment during canning can sometimes affect curd formation.
Either option is worth trying if fresh goat milk is too expensive or hard to find, just don’t expect exactly the same texture or yield.
I freeze our goat milk right after milking. Can we thaw and use for this recipe?
Hi Catherine! Yes, frozen, thawed milk should definitely work.
Turned out great, thank you!
Just made this, and I have about a cup and a half of creamy, wonderful ricotta cheese.
Just made this and it is AMAZING! Tasted just like we were in Greece in the summer. Used ultra pasteurized goat’s milk because that is all I could find. At first I thought it was not going to work, because I did not see any curds. I trusted the process, and it did work. The cheese did separate from the whey.