
New York-style bagels were a revelation to me after moving across the pond. Growing up, the bagels I knew were slightly sweet, dense, and dry—not chewy or crunchy, but more pretzel-like. They were also thinner and had larger holes. I loved those bagels (called boublick, by the way) and was thoroughly convinced they were the pinnacle of bagel perfection—until I tried a proper New York-style bagel in America. It was love at first bite. You can’t mistake them for anything else: crunchy on the outside, distinctively chewy on the inside, plump, and adorned with toppings like kosher salt, sesame seeds, or crunchy onion bits. And no, those sad, chilled bagels from the supermarket dairy aisle don’t count. I’m talking about the real deal.
For years, my go-to indulgence was a toasted sesame bagel with plain cream cheese, topped with smoked whitefish (chunk, not salad) from Goldberg’s Bagel & Deli. Add a slice of tomato, a few green olives, and a half-sour pickle on the side, and you had perfection. My second favorite? The classic lox-and-bagel combo, complete with red onions, capers, and tomatoes.
When I discovered that yeast sponge could be swapped for wild sourdough, I knew I had to try it. With sourdough starter always on hand in my kitchen, it felt like a natural progression. To stay as authentic as possible, I picked up some white barley malt and bread flour, and the rest, as they say, is history.
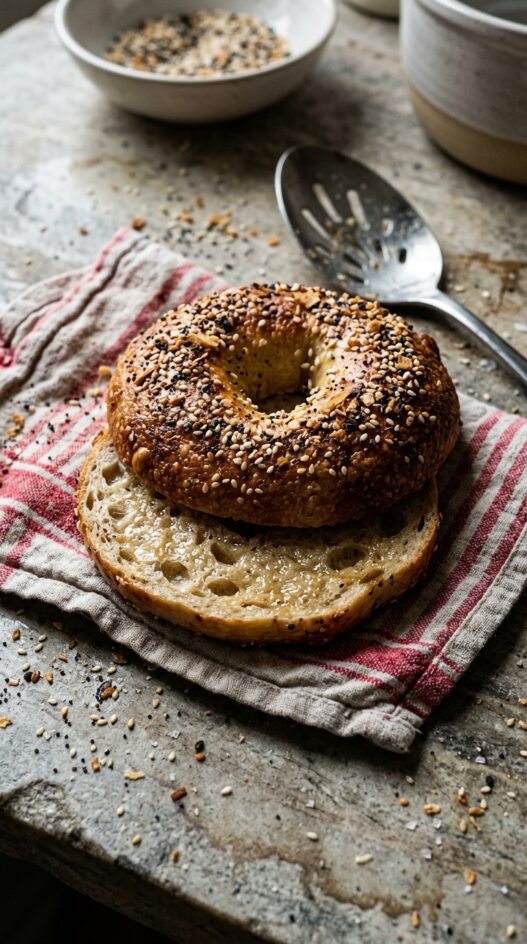
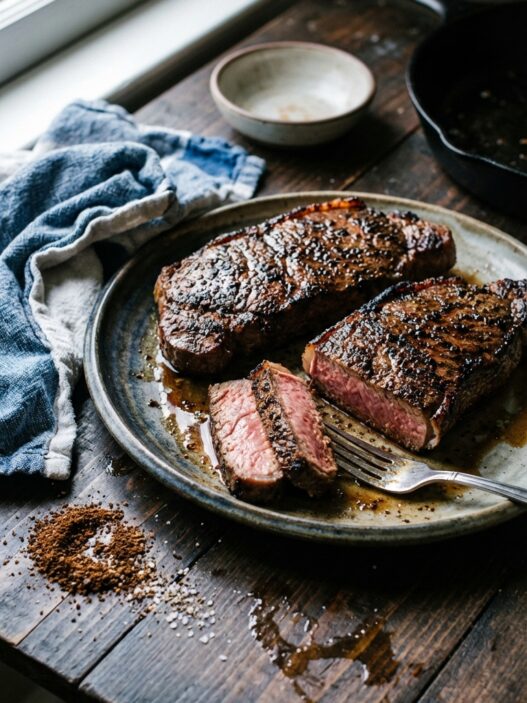
The bagels came out beautifully—everything you want in a proper bagel. They had the satisfying crunch, the perfect chew, and that malty, slightly tangy flavor. They looked stunning too, with a glossy sheen that begged to be admired (and devoured). The best part? They store well, freeze effortlessly (raw or baked), and the recipe scales like a charm.
While the process stretches over two days, it fits seamlessly into a busy schedule. Start by scaling your sourdough starter on Friday morning before heading to work. In the evening, mix the dough and refrigerate it overnight—this step is essential for the best flavor and texture. On Saturday morning, boil and bake the bagels while your oven heats up. The hands-on time is minimal, and the reward is immense.
In just 20–25 minutes of baking, you’ll have a stack of golden bagels ready to enjoy. The aroma will fill your kitchen as you slice into a still-warm bagel, slather it with cream cheese, and savor that perfect balance of crunch and chew. Pure bliss.
How to Make Peter Reinhart’s New York Style Bagels with Wild Sourdough
1. Make the Sponge
- In a large bowl, mix your ripe sourdough starter with the water until foamy.
- Add the flour and mix until fully incorporated, scraping down the sides of the bowl.
- Cover the bowl loosely with plastic wrap or a lid and let sit at room temperature for 6–8 hours, or until the mixture is foamy and stretchy.
- Test readiness by dropping 1 tsp of the sponge into a glass of cold water—if it floats, it’s ready.
2. Prepare the Final Dough
- Measure out 5 cups (1,000 g) of the prepared sponge. Reserve any extra for another recipe.
- In a large mixing bowl, combine the sponge, salt, malt, yeast, and 3 cups of flour. Mix to form a rough dough.
- Gradually add the remaining 1 cup of flour, 1/4 cup at a time, kneading the dough until it becomes tough, smooth, and non-sticky. Adjust flour or add a few drops of water if needed.
3. Knead the Dough
- Knead by hand or with a dough hook for 10 minutes (15 minutes by hand) until elastic and fully smooth. The dough will be stiff.
4. Portion and Shape the Dough
- Divide the dough into 12 equal portions (approximately 4 1/2 oz or 130 g each for standard-sized bagels).
- Shape each portion into a ball, then roll it into a sausage shape about 8 inches long.
- Form a circle by wrapping the dough around your fingers, overlapping the ends under your index finger. Seal the ends by rolling them together on a flat surface.
5. Rest and Test
- Place the shaped bagels on a parchment-lined baking sheet and cover with plastic wrap. Let them rise for 20 minutes.
- Perform the float test: Place one bagel in a bowl of cold water. If it floats, it’s ready. If it sinks, let the bagels rise for another 15–20 minutes and test again.
- Once ready, cover the bagels and refrigerate them overnight or for up to 36 hours.
6. Boil the Bagels
- Preheat your oven to 500°F (260°C) and prepare a parchment-lined baking sheet.
- Bring a large pot of water to a rapid boil and add 1 tbsp baking soda.
- Working in batches, boil 3–4 bagels at a time for 1 minute per side, flipping them once with a slotted spoon.
- Remove boiled bagels to a clean dish towel to drain.
7. Add Toppings and Bake
- While the bagels are sticky, sprinkle them with your desired toppings.
- Transfer the bagels to the prepared baking sheet and bake for 20–25 minutes, rotating the sheet halfway through if your oven has hot spots. Bagels should be golden brown on all sides.
8. Cool and Enjoy
- Cool the bagels on a wire rack before slicing or storing. Fully cooled bagels can be frozen for up to 3 months.
Tips for Success
- Sponge Readiness: Ensure the sponge is properly fermented for the best flavor and texture. The float test is a reliable indicator.
- Shaping Technique: Practice sealing the bagel ends securely to avoid separation during boiling.
- Boiling Step: Baking soda in the water helps achieve a chewy crust. Don’t skip this step!
- Overnight Refrigeration: Essential for flavor and structure development; don’t rush this part.
Peter Reinhart’s New York Style Bagels with Wild Sourdough
- Total Time: 1 hour 45 mins plus refrigeration and fermentation
- Yield: 12
Description
Made with wild sourdough, these bagels are chewy, flavorful, and full of character. With their malty taste and lovely crust, once you start making these at home, store-bought bagels will quickly become a thing of the past.
Ingredients
- 4 cups bread flour (500 g)
- 2 cups non-chlorinated water (500 ml)
- Ripe 100% hydration wheat sourdough starter (amount depends on your existing starter; typically 1/2-1 cup)
- 5 cups sourdough sponge (1,000 g)
- 4 cups bread flour, divided (500 g)
- 2 tsp barley malt or 1 tbsp barley malt syrup
- 3 tsp salt
- 1 tsp dry yeast
- 1 tbsp baking soda
- Optional toppings: sesame seeds, poppy seeds, everything bagel seasoning, coarse salt
Instructions
1. Make the Sponge
- In a large bowl, mix your ripe sourdough starter with the water until foamy.
- Add the flour and mix until fully incorporated, scraping down the sides of the bowl.
- Cover the bowl loosely with plastic wrap or a lid and let sit at room temperature for 6–8 hours, or until the mixture is foamy and stretchy.
- Test readiness by dropping 1 tsp of the sponge into a glass of cold water—if it floats, it’s ready.
2. Prepare the Final Dough
- Measure out 5 cups (1,000 g) of the prepared sponge. Reserve any extra for another recipe.
- In a large mixing bowl, combine the sponge, salt, malt, yeast, and 3 cups of flour. Mix to form a rough dough.
- Gradually add the remaining 1 cup of flour, 1/4 cup at a time, kneading the dough until it becomes tough, smooth, and non-sticky. Adjust flour or add a few drops of water if needed.
3. Knead the Dough
- Knead by hand or with a dough hook for 10 minutes (15 minutes by hand) until elastic and fully smooth. The dough will be stiff.
4. Portion and Shape the Dough
- Divide the dough into 12 equal portions (approximately 4 1/2 oz or 130 g each for standard-sized bagels).
- Shape each portion into a ball, then roll it into a sausage shape about 8 inches long.
- Form a circle by wrapping the dough around your fingers, overlapping the ends under your index finger. Seal the ends by rolling them together on a flat surface.
5. Rest and Test
- Place the shaped bagels on a parchment-lined baking sheet and cover with plastic wrap. Let them rise for 20 minutes.
- Perform the float test: Place one bagel in a bowl of cold water. If it floats, it’s ready. If it sinks, let the bagels rise for another 15–20 minutes and test again.
- Once ready, cover the bagels and refrigerate them overnight or for up to 36 hours.
6. Boil the Bagels
- Preheat your oven to 500°F (260°C) and prepare a parchment-lined baking sheet.
- Bring a large pot of water to a rapid boil and add 1 tbsp baking soda.
- Working in batches, boil 3–4 bagels at a time for 1 minute per side, flipping them once with a slotted spoon.
- Remove boiled bagels to a clean dish towel to drain.
7. Add Toppings and Bake
- While the bagels are sticky, sprinkle them with your desired toppings.
- Transfer the bagels to the prepared baking sheet and bake for 20–25 minutes, rotating the sheet halfway through if your oven has hot spots. Bagels should be golden brown on all sides.
8. Cool and Enjoy
- Cool the bagels on a wire rack before slicing or storing. Fully cooled bagels can be frozen for up to 3 months.
Notes
Adjust the size of bagels if desired; mini bagels can be made by dividing the dough into 24 portions.
To reheat, toast bagels briefly or refresh in the oven at 350°F (175°C) for 5 minutes.
- Prep Time: 60 mins
- Refrigeration and Fermentation: 24 hours
- Cook Time: 45 mins
- Category: Baking
- Method: Baking
- Cuisine: American
Nutrition
- Serving Size: 1 bagel
- Calories: 270
- Sugar: 2g
- Sodium: 500mg
- Fat: 1g
- Saturated Fat: 0g
- Unsaturated Fat: 1g
- Trans Fat: 0g
- Carbohydrates: 55g
- Fiber: 2g
- Protein: 9g
- Cholesterol: 0mg
Frequently Asked Questions
Can I use all-purpose flour instead of bread flour for the bagels?
Using all-purpose flour will result in a different texture; bread flour is recommended for its higher protein content, which contributes to the chewiness of New York-style bagels.
What type of malt should I use for the bagels?
White barley malt is the preferred choice for this recipe, as it helps to achieve the authentic flavor and color of traditional New York-style bagels.
How do I incorporate wild sourdough starter into the bagel dough?
Replace the yeast sponge with an equal amount of your active wild sourdough starter, ensuring it is bubbly and at its peak for the best results.


Has anyone made these with 100% sourdough (no added yeast)? We’re any adjustments needed?
I just made these and they’re fantastic! I’ve been meaning to try sourdough bagels and this looked like a fairly easy recipe. I also was impatient so I only let them sit in the fridge for 12 hrs but next time I will let them sit longer and add in some flavors (blueberry and some onion). If anyone is curious, a donut pan works great to hold the shape when you do mini bagels, which is what I did with this batch. Great recipe, wonderfully chewy and crusty!
Subs and notes I made:
-maple syrup for the malt
-used unfed, refrigerated sourdough starter 140g of it, let it sit overnight to ensure it was bubbly
-baked at 425 for 20 min for mini bagels
-used an egg wash to help browning
-makes 24 mini bagels, used 60g measurement for each one and it was a perfect size for little hands
Made this for the first time last week, and I was a little worried about the end result but it all came together perfectly in the end, and I made some insanely good lox bagels. Thanks for a great recipe!
I have made these three times now and each time they have gotten better and better!
Diastatic malt in the dough will leave your bagels more springy. More sugar for the yeast to go on. As for the baking soda in the water, it doesn’t do much for boiling – what it does do is break down proteins on the surface leaving you with a pretzel-like crust (in fact, when making pretzels boiling in baking soda can be a substitute for using lye). You can add non-diastatic powder to the water you boil in (cut back on the malt syrup if doing so) – that will give it a little extra flavor and boost the color.
Cheers,
Diastatic or non diastatic malt?
We just ate bagels from the first batch using this recipe – they are phenomenal. Thank you! I started them yesterday using my own very active starter. I added 2 teaspoons of non-diastatic malt powder to the dough, and 2T to the boiling water.
Next batch: I won’t use as much semolina on the towel to keep them from sticking; I will bake them until browned nicely at 17 minutes, and then use an egg white glaze to adhere the topping of dried onions, and then bake for two or three minutes only so the onions don’t burn.
Also, the shape of the bagels is odd: they are almost round, the hole has disappeared and been replaced by a raised point. They look a bit like very rotund volcanoes. I’m thinking it may be because I baked them using convection at 425 F. Next time I’ll skip the convection and see if they keep their shape. Can you think of another reason for the odd shape? Still delicious, though – great recipe.
Divine. Simply divine.
This recipe is fantastic!
The only change I made was substituting molasses for barley malt (as I had none).
I baked 6 of my bagels right away, and froze the other 6 after the overnight rise; I boiled and baked those just this morning after thawing them for an hour or so. Both way, the bagels turned out great.
I baked the second batch on a hot pizza stone, and found they cooked more evenly than on a baking sheet (bottoms got a bit to crispy on the baking sheet.
Soooo delicious. Thanks for the recipe!!!
Somewhere between 120-180 gram. I have bagel starter going all the time, so nowadays I am just eyeballing it.
This looks amazing! How much sourdough starter do you mix into the sponge? Thank you!
Superb result – thank you ! Followed as instructed though replaced barley malt with maple syrup.
made this twice now and they are super yummy!
How much starter …. Saying whatever you want is odd???
How much starter should I use? Saying whatever you want is odd???
I’m new to bread and bagel making. This recipe is a little confusing- how much sour dough starter do I use- by weight ?
I find that you need only a small amount of starter, no more than 100 g per that quantity of sponge.