Sarah Kenney sends her husband to the hardware store, and then goes on a fact finding mission to making the perfect Crème Brûlée.
Isn’t everyone always intimidated by the thought of making crème brulée at home and equally excited about eating it at restaurants? When I see this on a restaurant menu, there is no doubt what my dessert order will be. The first tap tap of the spoon on that sugary coating makes me feel like a little girl anticipating the first peek inside a wrapped gift. Or, better yet, perhaps its like the final wallop that breaks open the piñata and all the treats reveal themselves; the sprinkling to the ground of such goodness bringing endless delight.
Let me begin by unraveling this dreamy journey and perhaps some of you out there will delight yourselves and some lucky guests with this creamy, luscious, sensational dessert.
The beautiful thing about crème brulée is that it both amazingly simple and wonderfully elegant at the same time. Undoubtedly it is high in calories but for special occasions, it can be just that… special! And even though crème brulée can feel a little intimidating, one wonderful tidbit about making it is that it can be made ahead. The custard filling can easily be cooked in the oven, each in their own ramekin and then refrigerated several days ahead of time.
Just before serving, sprinkle each pot de creme with sugar, torch the tops (right there in front of your guests!!), garnish (or keep it simple) and serve.
At first, I was going try these out under the broiler. After researching that method, though, it didn’t seem like that always works well. So, I sent my husband off to Lowe’s. If you know my husband (mechanical engineer), imagine how he trotted off in full anticipation of a gadget purchase. He came back giddily carrying our new torch.
Have you ever smelled burnt sugar?
I tell you…
If the smell could be bottled and sold! It doesn’t take much (burnt sugar) to move my senses. No wonder I have tearful moments when I wander through farmer’s markets and am overwhelmed by the beauty of it all.
I must confess. I said that calorically these should be saved for those “special” occasions. There was no elegant dinner party at our house when these crème brulées were served. We just sat around our kitchen table, the four of us, in complete rapture, in complete bliss, and savored every bite.
Do you follow?
That means there were 2 leftover.
One got tucked into my husband’s lunch the following day. He told me he whipped his ramekin out during lunch and made a big “to-do” about “just having a simple little leftover” from home.
What happened to the second leftover, you might be musing? As the writer of this article…some snippets of info. just won’t be revealed…even over time…
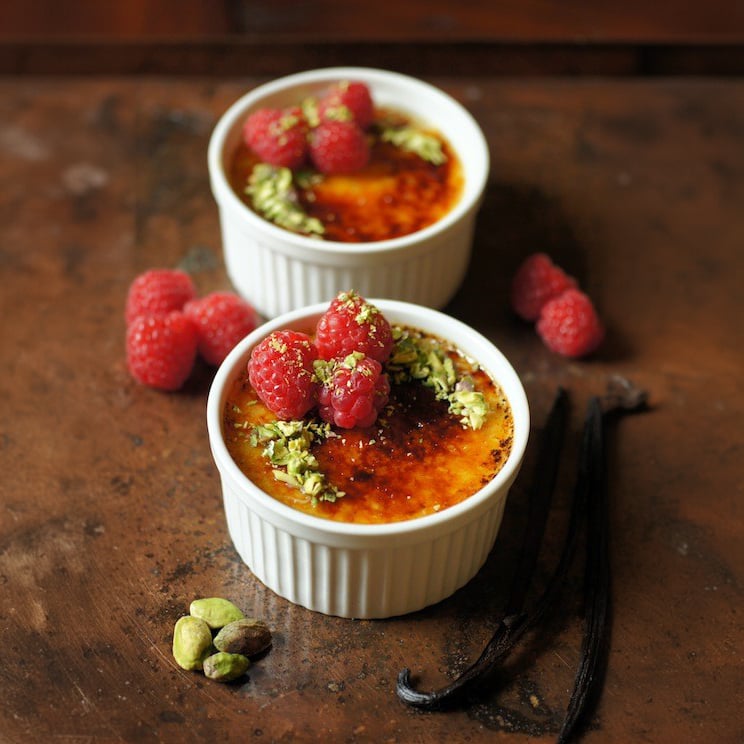
Crème Brûlée Secrets: How to Make it at Home
1. Prepare the Oven and Ingredients
- Preheat the oven to 325°F (160°C).
- Split the vanilla bean lengthwise and scrape out the seeds.
2. Heat the Cream
- In a medium saucepan, combine the heavy cream, vanilla bean, and its pulp.
- Bring the mixture to a boil over medium-high heat, then remove from heat.
- Cover and let it sit for 15 minutes to infuse the flavors.
- Remove the vanilla bean after infusion and reserve it for another use.
3. Mix the Egg Yolks and Sugar
- In a medium bowl, whisk together 1/2 cup (100 g) of vanilla sugar and the egg yolks.
- Whisk until well blended and the mixture starts to lighten in color.
4. Combine the Cream and Egg Mixture
- Gradually add the warm cream to the egg yolk mixture, stirring continuously to prevent the eggs from curdling.
5. Pour into Ramekins
- Pour the custard mixture into 6 (7 to 8-ounce) ramekins, evenly distributing the liquid.
6. Prepare the Water Bath
- Place the ramekins in a large baking dish or roasting pan.
- Pour enough hot water into the pan to reach halfway up the sides of the ramekins.
7. Bake the Crème Brûlée
- Bake in the preheated oven until the custard is set but still slightly wobbly in the center, approximately 40 to 45 minutes.
- Remove the ramekins from the water bath and let them cool at room temperature.
8. Chill the Custards
- Refrigerate the custards for at least 2 hours and up to 3 days.
9. Prepare to Serve
- Remove the ramekins from the refrigerator at least 30 minutes before serving.
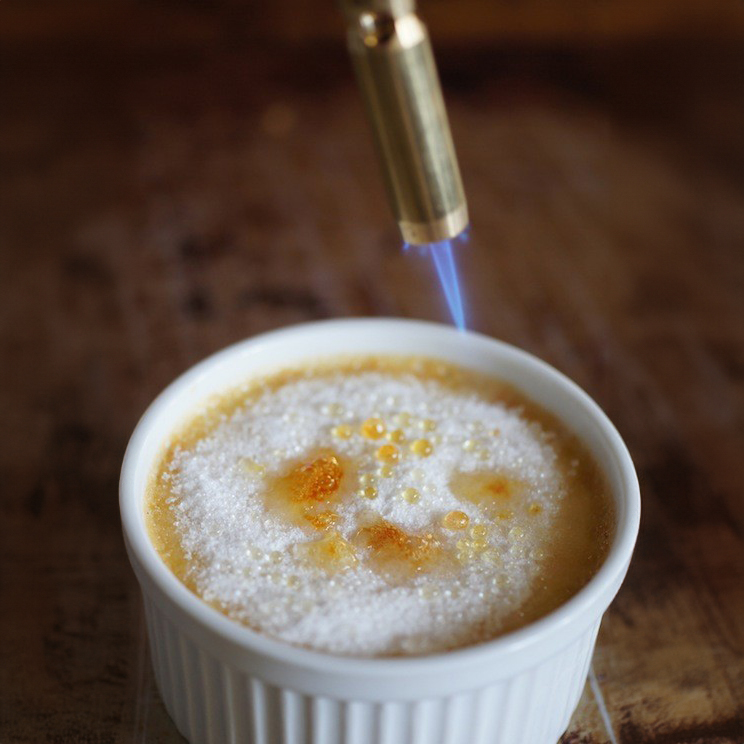 10. Caramelize the Sugar
- Sprinkle the remaining 1/2 cup (100 g) of vanilla sugar evenly on top of the custards.
- Using a kitchen torch, melt the sugar until it forms a crispy, caramelized top.
11. Final Touch
- Let the caramelized sugar sit for at least 5 minutes before serving to allow it to harden.
- Optional: top with fresh berries and nuts
Recipe Notes
- Vanilla Bean Substitute: If you don’t have a vanilla bean, you can use 1 teaspoon of vanilla extract, adding it after the cream has been heated.
- Hot Water Bath: Ensuring the water bath is halfway up the sides of the ramekins helps the custard cook evenly.
- Using a Torch: Move the torch in a circular motion to avoid burning the sugar.
Crème Brûlée Secrets: How to Make it at Home
- Total Time: 1 hour 15 minutes
- Yield: 6 1x
Description
The classic French dessert that combines rich, creamy custard with a crispy, caramelized sugar topping is surprisingly simple to make at home.
Ingredients
- Heavy cream: 1 quart (950 ml)
- Vanilla bean: 1, split and scraped
- Vanilla sugar: 1 cup (200 g), divided (1/2 cup for custard, 1/2 cup for topping) *see note below
- Large egg yolks: 6
- Hot water: 2 quarts (1.9 liters)
Instructions
1. Prepare the Oven and Ingredients
- Preheat the oven to 325°F (160°C).
- Split the vanilla bean lengthwise and scrape out the seeds.
2. Heat the Cream
- In a medium saucepan, combine the heavy cream, vanilla bean, and its pulp.
- Bring the mixture to a boil over medium-high heat, then remove from heat.
- Cover and let it sit for 15 minutes to infuse the flavors.
- Remove the vanilla bean after infusion and reserve it for another use.
3. Mix the Egg Yolks and Sugar
- In a medium bowl, whisk together 1/2 cup (100 g) of vanilla sugar and the egg yolks.
- Whisk until well blended and the mixture starts to lighten in color.
4. Combine the Cream and Egg Mixture
- Gradually add the warm cream to the egg yolk mixture, stirring continuously to prevent the eggs from curdling.
5. Pour into Ramekins
- Pour the custard mixture into 6 (7 to 8-ounce) ramekins, evenly distributing the liquid.
6. Prepare the Water Bath
- Place the ramekins in a large baking dish or roasting pan.
- Pour enough hot water into the pan to reach halfway up the sides of the ramekins.
7. Bake the Crème Brûlée
- Bake in the preheated oven until the custard is set but still slightly wobbly in the center, approximately 40 to 45 minutes.
- Remove the ramekins from the water bath and let them cool at room temperature.
8. Chill the Custards
- Refrigerate the custards for at least 2 hours and up to 3 days.
9. Prepare to Serve
- Remove the ramekins from the refrigerator at least 30 minutes before serving.
10. Caramelize the Sugar
- Sprinkle the remaining 1/2 cup (100 g) of vanilla sugar evenly on top of the custards.
- Using a kitchen torch, melt the sugar until it forms a crispy, caramelized top.
11. Final Touch
- Let the caramelized sugar sit for at least 5 minutes before serving to allow it to harden.
Notes
- Vanilla Sugar Substitute: If you don’t have vanilla sugar, you can use regular granulated sugar and add an extra 1/2 teaspoon of vanilla extract to the egg mixture.
- Vanilla Bean Substitute: If you don’t have a vanilla bean, you can use 1 teaspoon of vanilla extract, adding it after the cream has been heated.
- Hot Water Bath: Ensuring the water bath is halfway up the sides of the ramekins helps the custard cook evenly.
- Using a Torch: Move the torch in a circular motion to avoid burning the sugar.
- Prep Time: 30 mins
- Cook Time: 45 mins
- Category: Dessert
- Method: Baking
- Cuisine: French
Nutrition
- Serving Size: 5oz
- Calories: 600
- Sugar: 42g
- Sodium: 80mg
- Fat: 48g
- Saturated Fat: 28g
- Unsaturated Fat: 15g
- Trans Fat: 0g
- Carbohydrates: 46g
- Fiber: 0
- Protein: 7g
- Cholesterol: 330mg





I am in love with this recipe and will be making it on a regular basis.
Thanks a lot, this turned out really well!
This Crème Brûlée is so good, it made my kiddos speechless. Finally found the perfect recipe for some sweet silence!
My wife and I made this together and it was a fun and tasty experience.
Holy smokes, that sugar crust is pure magic! Can’t believe I nailed it on my first try. Cheers!
This was so easy to make and delicious I have made this several times and always a hit
Thank you so much for that Shout Out. I used to be shy about leaving comments a few years ago and now I comment on blogs all the time it seems. Austin is so fantastic…we are thrilled to get to run around the city in the last two years. Cheers.
Hola! I’ve been reading your sife for some time now and finally got the bravery to go ahead
andd give you a shout out from Austin Texas! Just wanted to mention keep up the gold job!
Wonderful post, thank you! Incidentally, I think Aquafina Blue Sugar comes very close to that bruleed sugar scent! I bought this for my husband; I’ll avoid the obvious comments about what I want to do to him when he wears it!
Thank you!!
Finally, a completely fool proof recipe, I love it!
Hi! You mentioned that you can make the custard a few days in advance. But how many days will it still be good? Im thinking of serving this next week’s party. Thanks in advance for your advice.
You can make this up to three days in advance :)
So happy to hear that!
So fantastic, this came out absolutely perfectly!
i’ve only tried to make creme brulee once and i failed before, but i was so determined to try it again. creme brulee is always my dessert choice if its on a restaurant’s menu. it’s how i decide if the restaurant is any good! and you know what? this turned out so PERFECT! THANK YOU!
The dessert of the gods…they look wonderful! Sorry that your torch was taken over, I hide mine ;)
Oh, this looks sooo good. I adore this dessert but I haven’t tried making one at home yet. Have to buy myself this torch. We call this dessert “Rozata” here in Croatia. Great recipe!