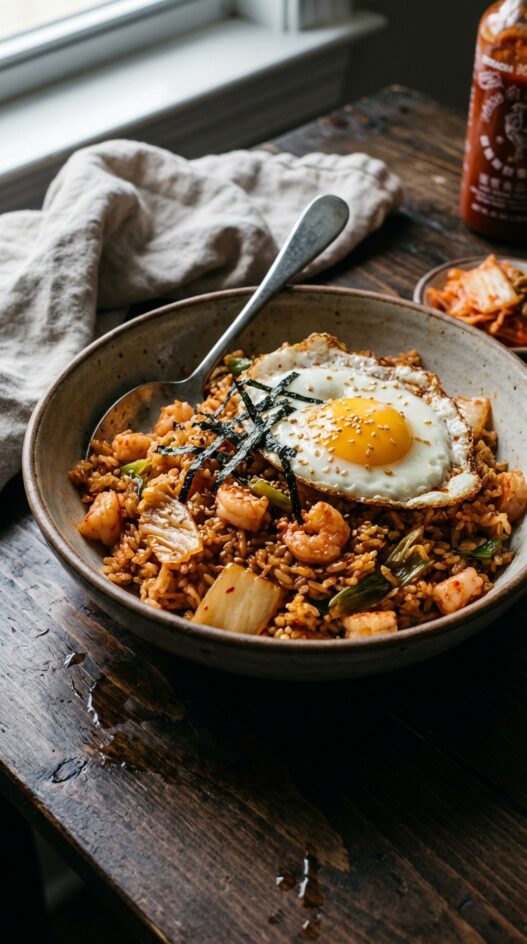

Use leftover rice and quick-cooking ingredeints to make this beautiful, cozy shrimp and kimchi fried rice on the busiest of days.
I certainly understand the need for quick and easy meals. While I’m always thinking about food and that next meal, in reality, time is often the limiting factor. There just never seems to be enough of it. I work a 9-to-5 job, on top of juggling this blog and other food-related projects. While I love a long, slow-braised stew that takes hours to develop flavor or homemade, hand-rolled pasta, most of my weeknight meals are of the quick and easy variety. Something I can pull together in less than an hour, if not shorter, following a long day at work. I reserve most weekends and, sometimes, (early) weekday mornings (am an early riser), for my aspirational cooking endeavors.
Kimchi fried rice is a hodgepodge of leftover rice and a handful of other ingredients. Day-old rice works best. As rice dries out in the refrigerator, it lends a chewier texture to fried rice, as compared to warm, freshly made rice, which results in mushier fried rice. Making the rice a day in advance enables you to pull this fried rice dish together in no more than 10 to 15 minutes. You can keep it vegetarian or jazz it up with pork (such as smoky bacon or pork belly), chopped chicken, or, in this case, shrimp.
Nowadays, kimchi (a staple of Korean cuisine comprised of spicy fermented vegetables, typically Napa cabbage) is a mainstream foodstuff. If you’re feeling inspired, you can make it yourself; refer to recipe here). For the sake of convenience, I often grab a big jar of kimchi from a local Asian market. On a side note, in addition to cabbage kimchi, you can also make bok choy kimchi, mustard green kimchi, radish kimchi, cucumber kimchi, etc.
Making kimchi fried rice is a snap. First, sear the shrimp (or cook the bacon or other pork product, if using). Next, remove the shrimp and give them a rough chop. Thereafter, add the rice (I used brown rice because that’s what I had on hand) and the remaining ingredients. Top with a fried egg (I might get mine a bit more crispy next time around; a poached or soft-boiled egg also works well). Finally, add the garnishes — scallions, toasted sesame seeds, toasted nori, and, because I always prefer a kick of heat, a spoonful of sambal or sriracha.
This dish is best when your make your own kimchi. Make it ahead so this easy meal can be thrown together on the busiest of days. Click here for the recipe.
Print
Shrimp and Kimchi Fried Rice
- Total Time: 25 minutes
- Yield: Serves 2
- Diet: Omnivore, Pescatarian
Description
Savory kimchi fried rice gets a protein boost from shrimp. A fried egg on top makes it extra special.
Ingredients
- 1/2 lb shrimp (cleaned and deveined)
- Salt and pepper
- 1 tbsp (15 ml) oil
- 1 cup (237 ml) kimchi
- 3 cups (710 ml) steamed day old short- or medium-grain rice (white or brown)
- 1/4 cup kimchi juice
- 1 to 2 tbsp gochujang (more or less to taste)
- 1 1/2 tsp soy or tamari sauce
- 1 to 2 tsp toasted sesame oil (more or less to taste)
- 1 scallion (thinly sliced)
- 1 sheet toasted nori (cut into thin strips)
- Toasted sesame seeds for garnish
- Sunny side up egg for serving
- Sriracha or sambal for serving
Instructions
- Season the shrimp with salt and pepper.
- Heat the oil in a large skillet or wok.
- When hot, add the shrimp and sear for a couple of minutes per side until pink and opaque.
- Remove shrimp from skillet and roughly chop.
- Add kimchi and sauté for one to two minutes.
- Add the rice, kimchi juice, gochujang, and soy/tamari.
- Sauté for about 5 minutes.
- Stir in the reserved shrimp.
- Add sesame oil and remove from heat.
- Spoon into bowls and sprinkle with chopped green onion, roasted nori, and sesame seeds.
- Top each bowl with a fried egg.
- Serve with sriracha or sambal.
Notes
- For optimal flavor, use day-old rice; it will fry better and absorb the sauce more effectively.
- Adjust the amount of gochujang to your preferred spice level; start with 1 tbsp and add more gradually.
- Leftovers can be stored in an airtight container in the refrigerator for up to 3 days. Reheat gently in a pan or microwave.
- Prep Time: 10 minutes
- Cook Time: 15 minutes
- Category: Main Course
- Method: Stir-Frying
- Cuisine: Korean
Nutrition
- Serving Size: 1 1/2 cups
- Calories: 450
- Sugar: 5
- Sodium: 700
- Fat: 20
- Saturated Fat: 5
- Unsaturated Fat: 12
- Carbohydrates: 60
- Fiber: 4
- Protein: 30
- Cholesterol: 150
Frequently Asked Questions
Why is it important to use day-old rice for this shrimp and kimchi fried rice?
Day-old rice dries out in the refrigerator, giving it a chewier texture that prevents the fried rice from becoming mushy.
Can I use any type of kimchi for this recipe?
While you can use any type of kimchi, traditional Napa cabbage kimchi works best for authentic flavor and texture.
What kind of shrimp should I use for this recipe?
You can use any quick-cooking shrimp, but peeled and deveined shrimp will save time and make preparation easier.


This came together in one pan in ten minutes, so savory and tangy and funky. So good and better than takeout, my new weeknight hero!