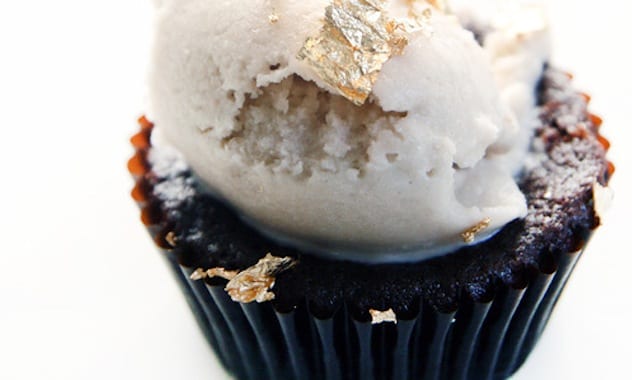
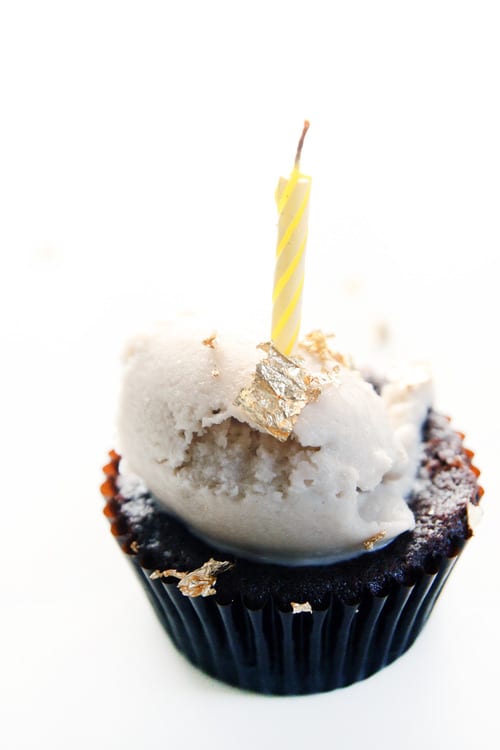
These brownies are soft and delicate; they immediately explode as you take your first bite. The ice cream is creamy and full-bodied, almost too heavy for the brownie. Nonetheless this pair works together beautifully. They remind me of the types of desserts I used to get as a kid, hot brownie, icy cold ice cream on top. Did I mention these are a breeze to make, gluten and dairy-free? Totally worth making.

Gluten & Dairy-Free Mocha Ice Cream Brownies
- Total Time: 8 hours
- Yield: 12
Description
Gluten and dairy free, in this dietary-friendly treat, creamy coffee ice cream melts slowly over decadent, chewy dark chocolate bites of deliciousness. Adapted from Minimalist Baker
Ingredients
Ice Cream
- 2 cans full fat coconut milk
- 1 cup (240 ml) fresh brewed coffee
- 3/4 cup (150 g) granulated sugar
- 1 tbsp. (15 ml) vanilla extract
Brownies
- 1 15 oz. (425 g) can cooked black beans, rinsed and drained
- 2 eggs (substitute with flax eggs if vegan)
- 3 tbsp. (45 ml) coconut oil
- 1/2 cup (50 g) cocoa powder
- 1/4 tsp. sea salt
- 1/4 cup (60 ml) maple syrup
- 1/4 cup (50 g) granulated sugar
- 2 tbsp. (30 ml) raw local honey (substitute with agave if vegan)
- 1 1/2 tsp. baking powder
- 1/3 chocolate chips
Instructions
Ice Cream
- Pour coconut milk, coffee, and sugar in a small saucepan. Bring to a simmer. Stir until sugar has dissolved.
- Remove from heat and add vanilla extract.
- Transfer to a bowl and let cool in the refrigerator for 4-6 hours.
- Pour cooled ice cream batter to an ice cream maker, then follow manufacturer’s instructions. Transfer batter to container and freeze for 6 hours.
- When ready to serve thaw for 15 minutes.
Brownies
- Preheat oven to 350 degrees Fahrenheit.
- Line muffin pan with cupcake liners.
- Place drained black bean, eggs, coconut oil, cocoa powder, salt, maple syrup, sugar, honey, and baking powder in a food processor. Pulse until everything is well incorporated. Feel free to add two to three ingredients at a time.
- Transfer to a large bowl. Add chocolate chips. Evenly distribute batter into muffin tin.
- Bake for 20-25 minutes.
- Let cool completely (at least 30 minutes).
- To assemble Mocha Ice Cream Brownies place a scoop of ice cream on top of a brownie, garnish with more chocolate chips, cacao nibs, or gold leaf. Devour immediately.
- Prep Time: 30 minutes
- Cook Time: 25 minutes
- Category: Dessert
- Cuisine: American
Nutrition
- Serving Size: 1 brownie with scoop
- Calories: 340
If You Liked This Recipe, You’ll Love These
- Plantains Foster: A Caribbean Twist on New Orleans’ Classic Dessert
- Gluten-Free Jam Crostata
- Homemade Mascarpone Ice Cream With Fresh Rhubarb Compote
- The World’s Easiest Candy Cane Ice Cream
Frequently Asked Questions
What makes these brownies gluten-free?
Instead of flour, this recipe uses a 15 oz (425 g) can of rinsed and drained black beans as the base. The beans are blended in a food processor with the eggs, coconut oil, cocoa powder, maple syrup, sugar, honey, and baking powder until fully incorporated, giving the brownies a soft, dense texture with no wheat at all.
Can I make this recipe fully vegan?
Yes — the ingredient list explicitly includes vegan substitutions: use flax eggs in place of the 2 eggs and swap the 2 tbsp of raw honey for agave. All other ingredients including the coconut milk ice cream are already plant-based.
How far ahead can I make the mocha ice cream?
The ice cream requires 4–6 hours of refrigerator cooling for the coconut milk and coffee base before churning, plus another 6 hours in the freezer after churning. Plan to make it the day before, then thaw for 15 minutes before scooping onto the warm brownies.