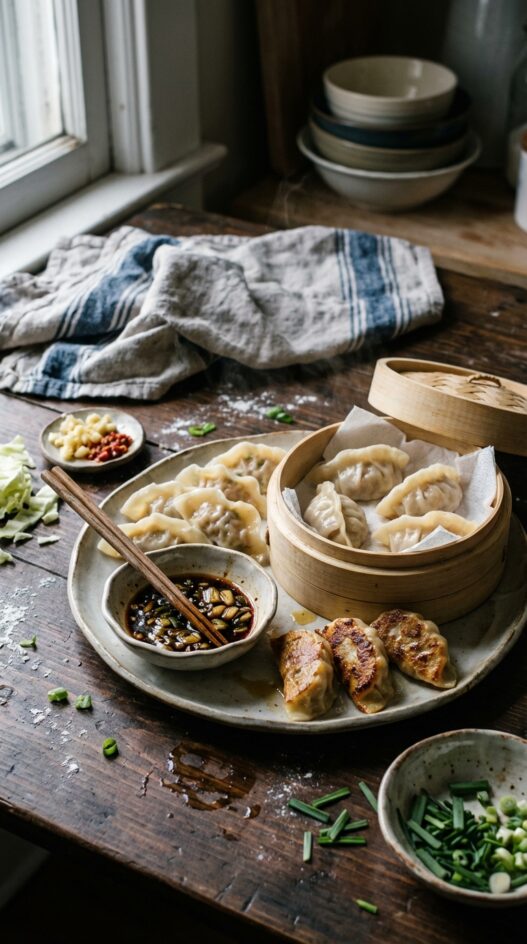

When every culture has their version of a stuffed dough pocket, you know they’re on to something. The Italians have ravioli, Spanish empanadas, Polish pirogies and the list goes on and on. Of course, I am most familiar with Chinese dumplings and those varieties are my favorite. Of all the dumplings in Chinese cuisine, the most well known are the ji?ozi. I’ve also got a cool trick that makes the wrapping process efficient and mess-free; it will blow your mind!
I used Chinese chives and white cabbage with ground pork that was half lean and half fat. Don’t be afraid of the pork fat; you need it to keep the rest of the filling moist as it cooks. As far as fillings go, it’s really open ended. You can fill it with whatever you want, but the traditional Chinese filling of choice is always pork and paired with a vegetable or two. Some other ingredients you can consider: ground chicken, ground beef, finely diced up tofu, cooked eggs, green beans, long beans, napa cabbage, celery, shrimp, mushrooms, etcetera, really the possibilities are endless. Be careful of watery veggies, especially napa cabbage. You need to heavily salt and then squeeze out the excess water otherwise it’ll bog down your fillings and make it hard to work with.
No matter what main components I choose for my dumplings, the aromatics stay consistent: green onions, including the green and the white, and tons of garlic and ginger. To season the filling, I use soy sauce, salt, rice wine and sesame oil. Crack in an egg and stir with a strong pair of chopsticks or spatula. My parents always say to only mix in one direction, so that’s what I do. Not sure if it works or not, but that’s what I’ve always done.
With so many Asian and international stores around, you’re bound to fine some dumpling wraps in the frozen or refrigerated section. I like using the “Northern Style” skins because they are thicker and easier to wrap with, especially if you are an inexperienced dumpling making. Nothing is more frustrating that constantly tearing dumplings skins. If you buy frozen skins, make sure to let them defrost in the fridge for a night before using them. You can microwave defrost them, but I don’t like taking the chance of accidentally microwave cooking the edges or melting them into a glob.
Please note that while I don’t care what style of dumpling wrapper you use, I would not use the square skins. Those are actually meant for húntun, otherwise known as wontons.
The second picture in this posts shows a couple of folding methods. The Pleat is used in the row on the right and the top half of the middle row. This method is a pretty way to make dumplings and creates a good bottom, especially useful for pan frying or steaming.
My least favorite, the Half Moon, is the easiest method but creates floppy and unappealing dumplings. You can see on the bottom half of the middle row how they lay flat on the tray without any visual interest.
I prefer the Squeeze method where you use your thumbs and forefingers to seal eat side of the dumpling, the left row. This method allows for more filling to be wrapped securely inside the skin and also gives the dumpling a nice bottom. This is probably the hardest method, so don’t worry if you don’t get it immediately. Everyone has their method of wrapping dumplings so it’s hard to say which method will work the best for you. The main goal is for the filling to stay inside the wrapper and not explode, so don’t worry if your first few aren’t picture perfect.
Now for the trick. No matter how you choose to wrap your dumplings, do not fall for the “wet your finger to seal the edge of the dumpling” method that everyone does. This little step will make your dumpling wrapping process laborious and slower than it has to be. Not to mention the mess it makes when your wet fingers touch the dry skins and then everyones flour dusted fingers have to go back into the communal water cup. Ugh.
Put down a paper towel on a plate. Pour enough water on the plate so the towel is fairly damp. Then place the skins on the wet plate. I like to put 3-4 skins down at a time on a plate, depending on how large the wet surface is. Simply pick up a skin from the plate so the wet side is facing up, and voila! You’ve already wet the entire inside of the skin and all you have to do is fill and seal. No mess here. Eventually, you’ll have to rewet the paper towel as you constant put new skins on. Just make sure not to inundate the plate, otherwise your skins will be swimming and disintegrate when you try to seal them.
As you go along making dumplings, make sure you have plenty of floured sheet pans or trays ready to go. That way your dumplings will have somewhere to sit while you finish wrapping the rest. If you let them sit out in the air too long, the skins will dry out and crack, so be mindful and stash the trays that aren’t being immediately cooked in the fridge or freezer after you cover them in plastic wrap.
Print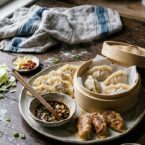
Cabbage and Pork Dumplings
- Total Time: 80 minutes
- Yield: Serves 12
- Diet: Omnivore
Description
These flavorful dumplings are surprisingly easy to make. Perfect for a weeknight meal or a fun weekend project!
Ingredients
- 2 lbs (907 g) fatty ground pork
- 2 lbs (907 g) lean ground pork
- 2 lbs (907 g) Chinese chives (chopped finely)
- 2 lbs (907 g) cabbage (chopped finely)
- 6 green onions (chopped finely (up to the root))
- 1 egg
- 8-10 garlic cloves (chopped finely)
- 1/4 cup grated ginger
- 1/2 cup soy sauce
- 1/4 cup rice vinegar
- 1/4 cup sesame oil
- Salt
- 5 packs of dumpling skins (Northern Style are thicker and easier to work with for newbies)
- 6 cloves pickled garlic
- 1/2 cup pickled garlic vinegar
- 1 tbsp sesame oil
- 1 tbsp chili paste
- 1 green onion (chopped)
Instructions
- Remove dumpling skins from refrigerator. If frozen, thaw overnight in the refrigerator or quickly defrost in the microwave.
- Chop vegetables. If using watery vegetables, salt them after chopping to remove excess liquid.
- Combine chopped vegetables, ground pork, egg, and seasonings. Stir in one direction until well mixed. Taste and adjust seasonings.
- Place a damp paper towel on a plate. Use this to wet dumpling skins while wrapping.
- Lightly flour sheet pans.
- Set up the filling, dumpling skins, wet plate, and sheet pans within easy reach.
- Pick up a damp dumpling skin, dry side down, in your non-dominant hand.
- Place a large tablespoon of filling in the center of the skin.
- Fold the dumpling closed to prevent filling from seeping out. Use a half-moon fold or a more advanced pleating technique.
- Place dumplings on floured baking sheets. Repeat until filling or skins are used up.
- Bring a large pot of unsalted water to a boil.
- Carefully add dumplings to boiling water, avoiding overcrowding. Cover and bring back to a boil.
- Once boiling, add a cup of cold water. Repeat this process two times. Dumplings will float and become translucent.
- Bring a pot of water to a boil. Place a paper towel in the steamer basket to prevent dumplings from sticking.
- Place dumplings in the steamer basket once the water boils. Steam for 12-15 minutes with the lid on.
- Pour oil into a hot pan and place dumplings flat side down. Add enough water to create a 1-centimeter depth, then cover.
- Once the water evaporates, uncover the pan and crisp the bottoms. Flip using a flat spatula to crisp the remaining sides.
- Finely chop pickled garlic and green onion.
- Mix chopped garlic and green onion with soy sauce, vinegar, sesame oil, and chili paste.
Notes
- To prevent soggy dumplings, ensure the filling isn’t too wet; salt the chopped cabbage and chives to draw out excess moisture.
- For easier dumpling assembly, keep a bowl of water nearby to lightly moisten the edges of the wrappers before sealing.
- Leftover dumplings can be frozen for up to 3 months; arrange them on a baking sheet before freezing to prevent sticking, then transfer to a freezer bag.
- Prep Time: 60 minutes
- Cook Time: 20 minutes
- Category: Main Course
- Method: Boiling
- Cuisine: Chinese
Nutrition
- Serving Size: 3-4 dumplings
- Calories: 250
- Sugar: 5
- Sodium: 600
- Fat: 15
- Saturated Fat: 5
- Unsaturated Fat: 10
- Carbohydrates: 25
- Fiber: 3
- Protein: 15
- Cholesterol: 80
Frequently Asked Questions
What type of pork should I use for the filling?
For the filling, it’s recommended to use ground pork that is half lean and half fat to ensure the mixture remains moist during cooking.
How can I prevent watery vegetables from ruining the dumpling filling?
To prevent watery vegetables like napa cabbage from affecting the filling, heavily salt them and then squeeze out the excess water before mixing them into the pork.
What is the purpose of using garlic and green onions in the filling?
Garlic and green onions are essential aromatics in the filling, providing depth of flavor and enhancing the overall taste of the dumplings.