
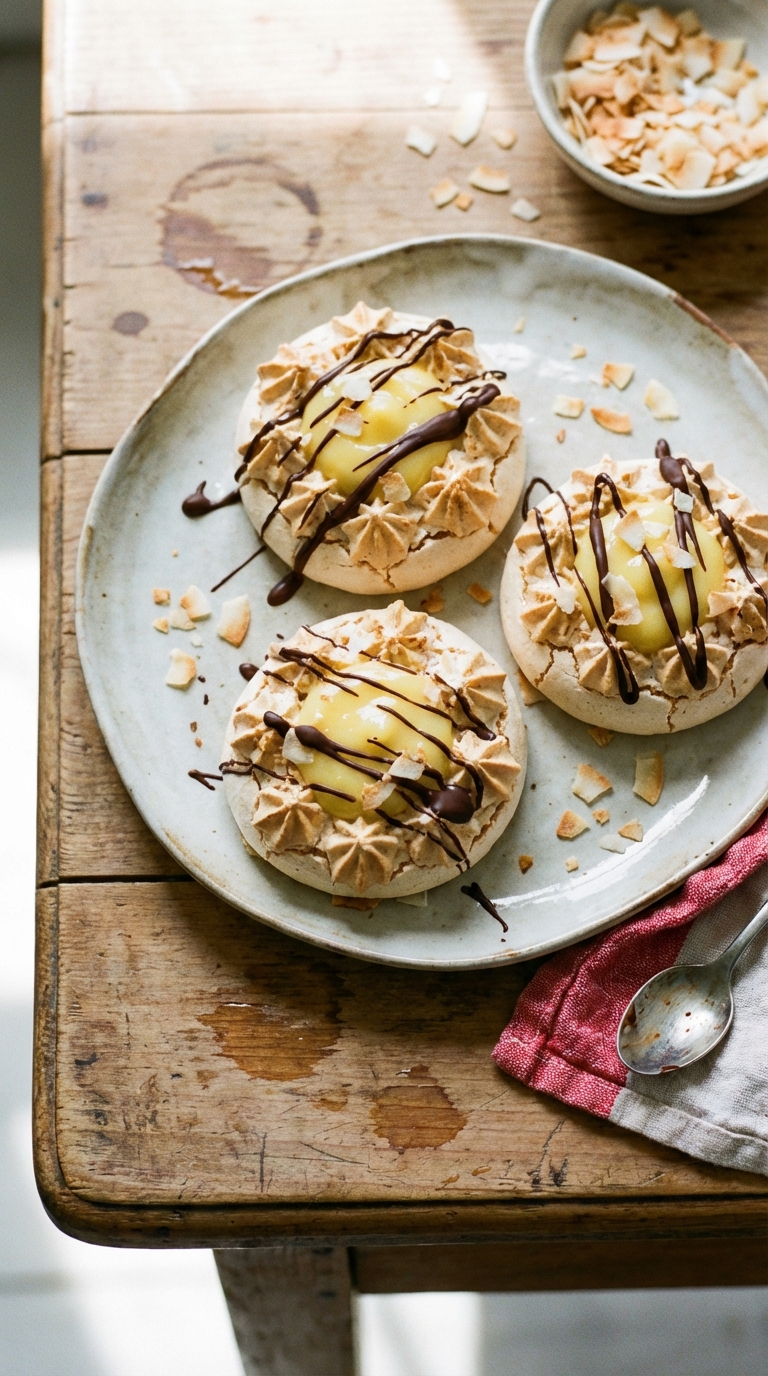
Toasted coconut pavlovas are small meringue shells filled with coconut custard and finished with melted chocolate. The shells bake at a low temperature until dry, then rest in the oven so they hold their structure. The custard is cooked on the stovetop with whole milk, coconut milk, egg yolks, and a little coconut extract. Fill them close to serving; pavlovas are charming, but they are not known for patience.
How to Make Toasted Coconut Pavlovas with Coconut Custard
Pavlova is mostly about patience and dry equipment. The ingredient list is short, but the method matters: the egg whites need to be whipped properly, the meringue needs time in a low oven, and the shells should be filled close to serving so they don’t soften too much.
Step 1: Toast the Coconut
Start by heating the oven to 350°F (175°C).
Spread the coconut flakes across a baking sheet in a thin layer. Toast them for 5 to 7 minutes, stirring once or twice so the coconut doesn’t darken too much in one spot.
Once the coconut has taken on some color, transfer it to a plate and let it cool. Leaving it on the hot baking sheet can make it continue to cook.
After the coconut is toasted, reduce the oven temperature to 200°F (93°C) for the meringue.
Step 2: Prepare the Baking Sheets
Line two baking sheets with parchment paper or silicone baking mats.
For neater pavlovas, trace 2-inch circles on the underside of the parchment paper. This gives you a guide when piping the meringue. Turn the parchment over so the pencil or pen marks do not touch the food.
Leave about 1 inch of space between each circle.
Step 3: Start the Meringue
Place the egg whites, cream of tartar, and salt in the bowl of a stand mixer fitted with the whisk attachment.
Beat on medium speed for 1 to 2 minutes, until the egg whites look foamy. At this stage, they should be loose and bubbly, not stiff.
Cream of tartar helps stabilize the egg whites. It makes the meringue less likely to collapse while you add the sugar.
Step 4: Add the Sugar Gradually
With the mixer running, add ? cup of the sugar a little at a time. Do not add it all at once; gradual addition helps the sugar dissolve into the egg whites and gives the meringue better structure.
Increase the mixer speed to medium-high and beat for 2 to 4 minutes, until the meringue looks glossy and holds stiff peaks.
A stiff peak means the meringue stands upright when the whisk is lifted. The tip may curve slightly, but it should not slump back into the bowl.
Step 5: Add the Vanilla and Remaining Sugar
Add the vanilla extract and beat just until it is worked into the meringue.
Remove the bowl from the mixer. Add the remaining ? cup sugar and fold it in with a spatula.
Folding means using the spatula to scoop from the bottom of the bowl and turn the mixture over itself. This keeps more air in the meringue than stirring.
The meringue should still look thick, glossy, and stable.
Step 6: Pipe the Pavlova Shells
Fit a piping bag with a large open star tip or plain round tip.
Spoon the meringue into the piping bag. Pipe small nests onto the prepared baking sheets, using the circles as guides. Build the sides up slightly so each pavlova has a shallow center for the custard.
Scatter the toasted coconut over the piped meringue shells before baking.
The nests do not need to look identical. A little unevenness is fine; just make sure each one has enough of a well to hold the filling.
Step 7: Bake Low and Slow
Bake the meringue shells at 200°F (93°C) for 2 hours.
The pavlovas should feel dry on the outside and lift from the parchment without sticking. They should not brown much; this is more drying than baking.
Turn off the oven, crack the oven door open slightly, and let the pavlovas sit inside for 1 to 3 hours. This helps them dry further and cool down gradually, which reduces cracking.
Some cracking is normal. Pavlova is not a dessert for people who need architectural certainty.
Step 8: Make the Coconut Custard
While the shells cool, make the custard.
Set a heatproof bowl and a fine-mesh sieve near the stove before you begin. Custard thickens fast once it gets going, so it helps to have the setup ready.
In a small saucepan, whisk together:
¼ cup sugar
2½ tablespoons cornstarch
¼ teaspoon fine sea salt
Add the whole milk a little at a time, whisking until the mixture is smooth and no dry cornstarch remains.
Whisk in the coconut milk, egg yolks, and coconut extract.
Step 9: Cook the Custard
Place the saucepan over medium heat.
Cook the custard, whisking constantly, for about 5 minutes, until it thickens enough to coat the whisk.
Once it thickens, reduce the heat to low and cook for 1 more minute, still whisking. This helps cook out the raw starch taste from the cornstarch.
Remove the pan from the heat.
Pour the custard through the fine-mesh sieve into the heatproof bowl. This removes any small lumps or bits of cooked egg.
Press plastic wrap directly onto the surface of the custard and refrigerate until cold.
Step 10: Prepare for Assembly
Once the custard is cold, whisk it until smooth.
Melt the chocolate in a small microwave-safe bowl in short bursts, stirring between each one, or melt it in a heatproof bowl set over a pan of barely simmering water.
Let the chocolate cool slightly before using. It should still be fluid, but not hot.
Step 11: Fill the Pavlovas
Shortly before serving, spoon about 1 tablespoon of coconut custard into each meringue shell.
Add a small spoonful of melted chocolate over the custard.
Finish with a little more toasted coconut, if using.
Filled pavlovas should be served soon after assembly. The custard will soften the meringue as it sits.
101 Guide: What to Watch For
Egg whites need a clean bowl.
Fat prevents egg whites from whipping properly. Even a small amount of egg yolk can cause problems, so separate the eggs one at a time before adding each white to the mixing bowl.
Sugar should go in gradually.
Adding the sugar too fast can make the meringue grainy or unstable. A slow addition gives the sugar time to dissolve.
The oven should be low.
Pavlovas are dried more than baked. A hot oven can cause browning, hollow centers, or excessive cracking.
Resting in the oven matters.
The cooling period helps the meringues dry and firm up. Pulling them straight from the oven into a cooler kitchen can make them crack more.
Custard needs constant whisking.
Cornstarch and egg yolks thicken at the bottom of the pan first. Whisking keeps the texture smooth and prevents scorching.
Fill only before serving.
The shells can be made ahead. The custard can be made ahead. But once they meet, the clock starts.
Toasted Coconut Pavlovas with Coconut Custard
- Total Time: 145 minutes
- Yield: Serves 6
- Diet: Omnivore
Description
Crispy meringue nests filled with creamy coconut custard. A delightful dessert for any occasion.
Ingredients
For the Meringue Shells:
- 4 large egg whites, room temperature
- 1/4 teaspoon cream of tartar
- Pinch of fine sea salt
- 1 cup granulated sugar (200 g), divided
- 1/2 teaspoon vanilla extract
- 1/2 cup sweetened coconut flakes (45 g), toasted
For the Coconut Custard:
- 1/4 cup granulated sugar (50 g)
- 2 1/2 tablespoons cornstarch (20 g)
- 1/4 teaspoon fine sea salt
- 1/2 cup whole milk (120 ml)
- 7 ounces coconut milk (200 ml)
- 2 large egg yolks
- 1/2 teaspoon coconut extract
For Assembly:
- 2 ounces dark or semi-sweet chocolate (57 g), melted
- 2 tablespoons toasted coconut flakes, for finishing, optional
Instructions
Heat the oven to 350°F (175°C).
Spread the coconut flakes on a baking sheet in a thin layer.
Bake for 5 to 7 minutes, stirring once or twice, until the coconut has taken on some color.
Transfer the coconut to a plate and let it cool.
Reduce the oven temperature to 200°F (93°C).
Line 2 large baking sheets with parchment paper or silicone baking mats.
For more even sizing, trace 2-inch circles on the underside of the parchment, spacing them about 1 inch apart.
Add the egg whites, cream of tartar, and salt to the bowl of a stand mixer fitted with the whisk attachment.
Beat on medium speed for 1 to 2 minutes, until the egg whites look foamy.
With the mixer running, gradually add ? cup of the sugar.
Increase the speed to medium-high and continue beating for 2 to 4 minutes, until the meringue is glossy and holds stiff peaks.
Add the vanilla extract and beat just until incorporated.
Remove the bowl from the mixer.
Add the remaining ? cup sugar and fold it in with a spatula. The goal is to keep as much air in the meringue as possible.
Fit a piping bag with a large open star tip or plain round tip.
Fill the bag with the meringue.
Pipe small 2-inch nests onto the prepared baking sheets, building up the sides so each one has a shallow center for the custard.
Scatter the toasted coconut over the meringue nests.
Bake at 200°F (93°C) for 2 hours.
The pavlovas should feel dry on the outside and lift from the parchment without sticking.
Turn off the oven, crack the door open slightly, and let the pavlovas sit inside for 1 to 3 hours. This helps them dry out further.
Once cool, store the unfilled shells in an airtight container until ready to assemble.
Set a heatproof bowl and a fine-mesh sieve near the stove.
In a small saucepan, whisk together the sugar, cornstarch, and salt.
Add the whole milk a little at a time, whisking until no dry patches remain.
Whisk in the coconut milk, egg yolks, and coconut extract.
Set the pan over medium heat.
Cook, whisking constantly, for about 5 minutes, until the custard thickens enough to coat the whisk.
Reduce the heat to low and cook for 1 more minute, still whisking.
Remove the pan from the heat.
Pour the custard through the sieve into the heatproof bowl, pressing it through with a spatula to remove any small lumps.
Press plastic wrap directly onto the surface of the custard.
Refrigerate until cold.
Whisk the chilled custard until smooth.
Spoon about 1 tablespoon of custard into each meringue shell.
Add a small spoonful of melted chocolate over the top.
Finish with a little more toasted coconut, if using.
The pavlovas are best filled close to serving, since the custard will soften the meringue over time.
Notes
- For perfectly crisp pavlovas, ensure your egg whites are at room temperature and your bowl and whisk are completely grease-free.
- To toast coconut flakes, spread them on a baking sheet and bake at 350°F (175°C) for 5-7 minutes, stirring occasionally, until lightly golden.
- Leftover pavlovas can be stored in an airtight container at room temperature for up to 2 days, or in the refrigerator for up to 3 days; custard should be stored separately.
- Prep Time: 20 minutes
- Cook Time: 125 minutes
- Category: Dessert
- Method: Baking
- Cuisine: American
Nutrition
- Serving Size: 1 pavlova
- Calories: 350
- Sugar: 50
- Sodium: 50
- Fat: 15
- Saturated Fat: 10
- Unsaturated Fat: 5
- Carbohydrates: 60
- Fiber: 2
- Protein: 4
- Cholesterol: 100
Frequently Asked Questions
What type of eggs should I use for the meringue in the Toasted Coconut Pavlovas?
It’s recommended to use eggs that have been sitting in the fridge for a while, as some believe they help achieve better meringue, but ensure they aren’t expired.
How do I ensure my meringue turns out crisp for the pavlovas?
Make sure your mixing bowl and utensils are completely clean and free of any fat or egg yolk, as even a tiny bit can prevent the meringue from achieving its desired texture.
Can I substitute the chocolate drizzle on the pavlovas with something else?
Yes, you can use caramel sauce or a fruit coulis instead of chocolate if you prefer a different flavor profile.


There is no tecipe for the filling
Hi there Pat, thank you for calling that out – that part had fallen out during a recent update of the recipe. It’s back in now, so you should be good to go. Thank you again for bringing this to our attention!
Thank you so much for such a detailed explanation as to how to go about with the dish. Will definitely try it out.
Omg, they look amazing! I have to try these. Thanks for sharing.
Best regards Tina
These look phenomenal! Thanks for all the tips to go along with the recipe. I had no idea high humidity would do in a meringue.