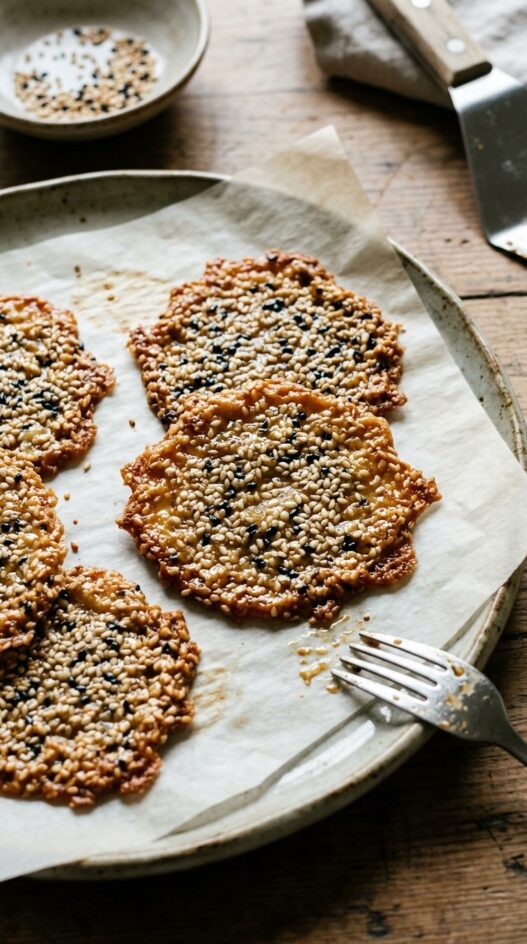

These Sesame Crisps are not sweet at all but filled with nutty and aromatic sesame flavour. I made these with my gluten free blend of 50% rice flour & 50% tapioca starch. It’s so addictive that we finished the 1st batch on the same day and I made a 2nd batch with triple the volume. Even though the method is pretty easy, you need a lot of patience when spreading the layer very thinly so that you will have a crunchy crisp.
Print
Sesame Seed Crisps
- Total Time: 25 minutes
- Yield: 8
Description
Nutty and Addictive Sesame Crisps, courtesy of Shannon Lim.
Ingredients
- 25g Egg White (about 1 medium egg at room temperature)
- 30g Brown Sugar
- 30g All-Purpose Flour (I use 15g rice flour & 15g tapioca starch for gluten free recipe) - sift flour twice
- 20g Butter - melted
- 80g White Sesame Seeds - toasted
- 10g Black Sesame Seeds - toasted
Instructions
- Preheat oven at 170°C and line baking tray with grease proof baking paper.
- In a mixing bowl, whisk egg white (with a hand whisk) until you see white bubbles. Add in sugar and beat in circular movement until the sugar dissolves.
- Stir in melted butter and mix well.
- Add in flour and mix till no traces of flour and lump-free.
- Add in toasted sesame seeds, use a spatula to fold in until the mixture is well combined. You will find the mixture is dry and sticky. That’s the correct texture you need.
- Spoon ? or 1/2 tbsp of mixture on the baking tray. Spread out into a round shape (about 2cm diameter) using a fork. Dip fork into water to wet it for easier spreading of the sesame mixture.
- Bake at 170°C for 8-10 minutes or until golden brown and crispy. Rotate the baking tray towards the last 2 minutes.
- Remove from the oven, leave to cool and then store into an air-tight container.
Notes
- The layer must be thin and even to make it crispy.
- Wet the fork lightly to avoid mixture sticking on it and easy spreading.
- Be careful not to overbake the crisps.
- If not, the sesame seeds will be burnt If the crisps turn soft, you can reheat them for 2-3 minutes at 160°C in a preheated oven.
- Prep Time: 30 mins
- Cook Time: 10 mins
- Category: Baking
- Cuisine: Asian
Nutrition
- Serving Size: 2 crisps
- Calories: 80
Frequently Asked Questions
How do I make these crisps gluten-free?
Swap the 30g all-purpose flour for 15g rice flour and 15g tapioca starch. That 50/50 blend is what I use, and the crisps turn out just as good. I finished the first batch the same day I made it.
Why do my crisps come out chewy instead of crunchy?
The layer was not thin enough. Spread each half-tablespoon portion into a round about 2cm across, and wet the fork lightly first. A dry fork makes the sticky sesame mixture clump instead of spreading flat, and thick blobs will never crisp up.
What do I do if the crisps go soft after cooling?
Pop them back into a preheated oven at 160C for 2 to 3 minutes. That restores the crunch. Move them straight into an airtight container once they come out.
How do I know when they are done baking without burning the sesame seeds?
Pull them at golden brown, around 8 to 10 minutes at 170C. Rotate the tray in the last 2 minutes so they colour evenly. Push past golden and the sesame seeds will burn.


Thank you so much for this recipe, Shannon! I happened to have some bakery bought sesame crisps that were just heavenly, and I tried to work out what the ingredients might be; then searched the internet for something that would seem to have the same ingredients. I came across your recipe, I made it and it is what I was looking for! I try to cut back on sugar so I just added 40g of brown sugar or jaggery instead of 60g, but that’s just me. Your recipe is absolutely perfect, grateful for you sharing!
Edit: sorry for the confusion. I doubled the quantities – that’s why I said 40g instead of 60g of sugar.
Wow I’m so going to make these Thankyou
Hi Shannon,
Thanks for the recipe! I haven’t tried it yet, but intend to. Tell me, have you ever tried to shape these before they cool?
Why the ratio of black and white sesame different? Is there any particular reason?
I think it is mostly for the look, the black and white contrast is prettier on the plate. When I made them with all white seeds the flavor came out exactly the same!