


Cake pops were all the rage in the early 2010’s – as they exploded onto the foodie scene and home-bakers across the globe started making them for parties and get togethers. Then, Starbucks came in and ruined it for everyone when they launched a line of cheap cake pops, and home-bakers grew tired of them. BUT, that’s a dang shame, because cake pops are awesome, delicious and fun to eat. So let’s bring ’em back, shall we?
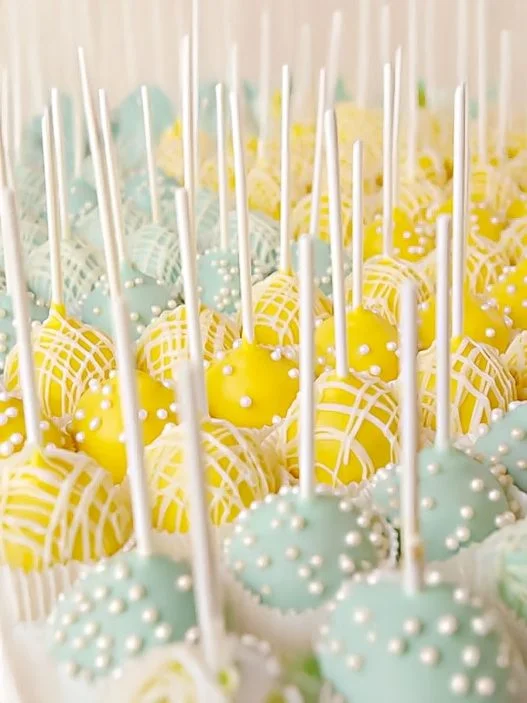
A cake pop is essentially cake, crumbled and mixed with frosting, formed into a ball, popped on a stick, and dipped in a super-sweet candy coating. I re-introduced cake pops for the first time in a decade for a friend’s wedding last spring (about 350 of them to be exact) and since then, virtually everyone I know has now become re-obsessed. Certain friends (who shall remain anonymous) have been known to hoard them in their freezer and ration them out until the next batch of leftovers is delivered. It’s madness I tell you.
Why You’ll Love This Recipe:
- A Little Sweet, a Little Tangy: The combination of lemon cake and cream cheese frosting is AWESOME.
- Fun and Portable: Cake pops are easy to serve, which essentially makes them perfect for birthdays, parties, and special occasions. You can also just keep them for yourself and not tell anyone.
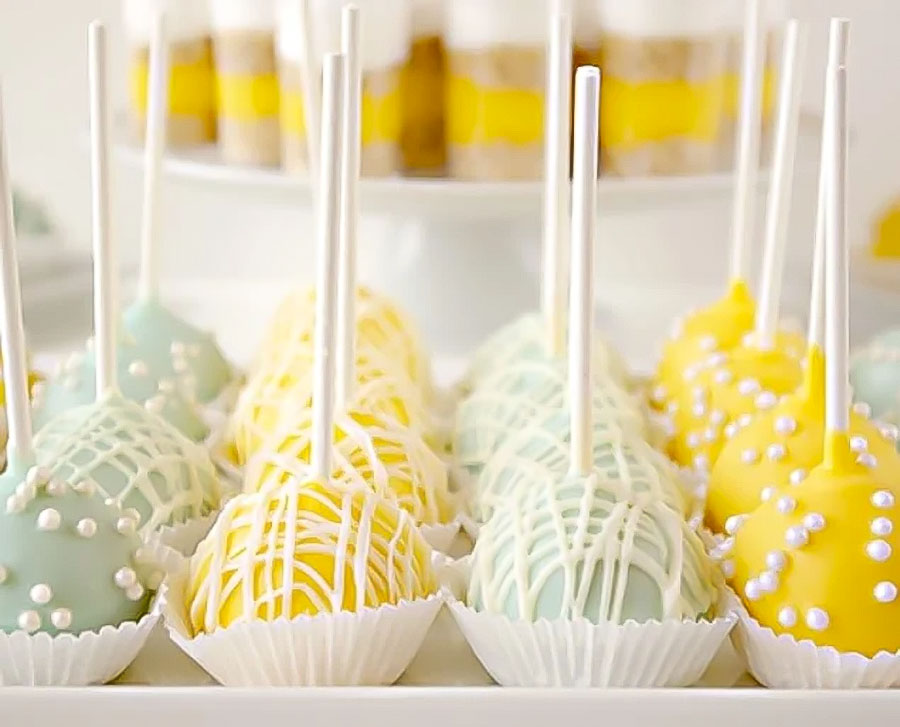
- Customizable Coating: Dip them in classic white chocolate, colorful candy melts, or even drizzle with dark chocolate for contrast.
- Make-Ahead Friendly: Cake pops store well in the fridge or freezer, so you can prepare them in advance.
- Great for Gifting: Pack them in treat bags with ribbons – makes an awesome and appreciated homemade gift.
Ingredients You’ll Need:
- Lemon-Buttermilk Cake: This is your base. Homemade or store-bought works.
- Cream Cheese Frosting: Delicious of course, but also binds the cake crumbs together.
- Candy Melts or White Chocolate: This is what creates the smooth outer shell. Candy melts set faster, while white chocolate gives a richer taste.
- Cake Pop Sticks: Essential for shaping and serving, because, well it’s not a cake pop if it doesn’t have a handle! If unavailable, use sturdy straws or skewers.
- Optional Decorations: Sprinkles, edible glitter, or a chocolate drizzle to customize the look. Go creative and have fun with it!
Equipment You’ll Need:
- Mixing Bowls: For crumbling the cake and mixing with frosting.
- Baking Sheet: To chill the cake pops before dipping.
- Microwave or Double Boiler: To melt the candy coating.
- Cake Pop Stand or Styrofoam Block: Helps the pops set evenly without smudging.
Important Cooking Tips:
- Crumble the Cake Well: The finer the cake crumbs, the smoother the texture of the cake pops. Avoid large chunks.
- Use Just Enough Frosting: Add frosting gradually—too much will make the mixture too soft, and too little will cause cracks.
- Chill Before Dipping: Refrigerating the cake balls for at least 30 minutes helps them hold their shape when coated.
- Thin the Coating if Needed: If the candy melts or chocolate is too thick, stir in a small amount of vegetable oil or shortening.
- Dip at an Angle: Submerge the cake pop at an angle, then gently rotate to prevent air bubbles.
Planning Ahead:
- Make the Cake in Advance: Bake and crumble the cake a day ahead to save time.
- Prepare in Batches: You can roll and freeze the cake pops before dipping, making them easier to coat later.
- Decorate for Special Occasions: Use colored candy melts or themed sprinkles for holidays and celebrations.
Storing, Freezing, Reheating:
- Refrigeration: Store in an airtight container for up to 5 days.
- Freezing: Freeze dipped cake pops for up to 3 months. Wrap individually for best results.
- Bringing to Room Temperature: Allow frozen cake pops to thaw in the fridge for a few hours before serving.
FAQ:
Q: Can I use a different cake flavor?
A: Absolutely! Vanilla, strawberry, or chocolate cake work just as well with this method.
Q: Why are my cake pops falling off the stick?
A: The cake balls might be too heavy, or the coating wasn’t properly set. Try chilling them longer before dipping and avoid overloading with frosting.
Q: Can I make these without a cake pop stand?
A: Yes! You can place the dipped pops face-down on parchment paper to create a flat-bottomed style.
Q: What’s the best way to get a smooth coating?
A: Use a deep, narrow cup for dipping and gently tap off excess coating while twirling the pop.
Q: Can I add lemon zest or extract for extra flavor?
A: Definitely! A little lemon zest in the frosting enhances the citrus flavor.
Q: How do I fix cracked cake pops?
A: Cracks happen when the cake pop is too cold and the coating is too hot. Let the cake balls sit for a few minutes before dipping to reduce temperature contrast.
Substitutions and Allergies:
- Dairy-Free: Use dairy-free cake, frosting, and chocolate. Coconut-based alternatives work well.
- Gluten-Free: Substitute with a gluten-free cake mix. The texture will still work perfectly.
- Low-Sugar Option: Reduce sugar in the cake and use unsweetened chocolate for the coating.
Beverage Pairings:
- Iced Lemon Tea: Complements the citrus notes in the cake pops.
- Sparkling Prosecco: Light and bubbly, also makes it feel like less of a kids party!
- Vanilla Latte: Because a vanilla latte always works with cake, as you well know.

Step by Step Guide to Making Lemon Cream Cheese Cake Pops
Step 1: Make the Cake
- Preheat the oven to 350°F (175°C). Grease and flour two 8 or 9-inch round cake pans.
- In a large bowl, whisk together cake flour, sugar, baking powder, salt, and lemon zest.
- Add the butter and half the buttermilk, beating until smooth (about 3–4 minutes).
- In a separate bowl, whisk the eggs, egg whites, remaining buttermilk, vanilla extract, and lemon extract.
- Gradually add the egg mixture to the batter in three additions, beating for 2 minutes after each addition.
- Divide batter evenly between the cake pans and bake for 35–40 minutes, until a toothpick inserted in the center comes out clean.
- Let cakes cool in the pans, then turn them out onto wire racks to cool completely.
Step 2: Prepare the Cream Cheese Frosting
- In a stand mixer, beat the cream cheese and butter until smooth.
- Add vanilla and salt, mixing to combine.
- Gradually add the confectioners’ sugar, beating for 3–4 minutes until light and fluffy.
Step 3: Form the Cake Pops
- Crumble the cooled cake into a large bowl, breaking it up into pea-sized pieces.
- Mix in about 2/3 of the frosting to start, stirring with a spoon or using your hands.
- Take about 2 tablespoons of cake mixture and roll it into a ball. If it holds together, continue rolling the rest of the mixture into balls and place them on a parchment-lined baking sheet.
- If the cake doesn’t hold together, add more frosting a little at a time until the mixture is moist enough to form intact balls.
Step 4: Chill the Cake Balls
- Place the cake balls in the refrigerator for 30 minutes to firm up.
- Melt a small amount of candy melts in the microwave according to package directions.
- Dip the end of a lollipop stick into the melted candy, then insert it about halfway into a cake ball.
- Repeat with all cake balls and return them to the parchment-lined tray.
- Freeze for 30–60 minutes to make coating easier.
Step 5: Coat the Cake Pops
- Melt the remaining candy melts according to package instructions.
- Dip each cake pop into the melted candy, ensuring it is fully coated and that the coating seals where the stick meets the cake ball.
- Gently tap off excess coating while rotating the pop for an even finish.
- While the coating is still wet, add sprinkles, edible glitter, or crushed nuts as desired.
- Place coated cake pops upright in styrofoam or return them pop-side down to the baking sheet.
- Let cake pops dry for at least 1–2 hours before storing.
Love these? Check out two of our other favorite cake pop recipes:
Red, White, and Blue Patriotic Cake Pops
Lemon Cream Cheese Cake Pops
- Total Time: 2 hours 20 minutes
- Yield: Makes about 50 cake pops 1x
Description
These fabulous-looking and delicious-tasting cake pops are made with crumbled lemon-buttermilk cake and cream cheese frosting, then rolled into balls and dipped in a smooth candy coating. Perfect for parties, birthdays, or just because.
Ingredients
For the Lemon Buttermilk Cake:
- 3 1/2 cups (350g) cake flour
- 2 cups (380g) granulated sugar
- 1 tablespoon baking powder
- 1/2 teaspoon salt
- 1 cup (2 sticks, 460g) unsalted butter, room temperature
- 1 cup (240ml) buttermilk, room temperature
- 4 large eggs, room temperature
- 2 large egg whites, room temperature
- 1 teaspoon vanilla extract
- 1 teaspoon lemon extract
- Zest of 1 large or 2 small lemons
For the Cream Cheese Frosting:
- 16 ounces (450g) cream cheese, softened
- 1/2 cup (230g) unsalted butter, room temperature
- 1 teaspoon vanilla extract
- 2 1/2 cups (325g) confectioners’ sugar
- Pinch of salt
For the Cake Pops:
- 1 batch lemon-buttermilk cake, baked and cooled
- 1 batch cream cheese frosting
- 1–2 packages white vanilla candy melts (or substitute with white chocolate or almond bark if needed)
- Candy melt coloring (optional, but avoid liquid food coloring as it will seize the candy melts)
- Sprinkles (optional)
- 50 lollipop sticks
Instructions
Step 1: Make the Cake
- Preheat the oven to 350°F (175°C). Grease and flour two 8 or 9-inch round cake pans.
- In a large bowl, whisk together cake flour, sugar, baking powder, salt, and lemon zest.
- Add the butter and half the buttermilk, beating until smooth (about 3–4 minutes).
- In a separate bowl, whisk the eggs, egg whites, remaining buttermilk, vanilla extract, and lemon extract.
- Gradually add the egg mixture to the batter in three additions, beating for 2 minutes after each addition.
- Divide batter evenly between the cake pans and bake for 35–40 minutes, until a toothpick inserted in the center comes out clean.
- Let cakes cool in the pans, then turn them out onto wire racks to cool completely.
Step 2: Prepare the Cream Cheese Frosting
- In a stand mixer, beat the cream cheese and butter until smooth.
- Add vanilla and salt, mixing to combine.
- Gradually add the confectioners’ sugar, beating for 3–4 minutes until light and fluffy.
Step 3: Form the Cake Pops
- Crumble the cooled cake into a large bowl, breaking it up into pea-sized pieces.
- Mix in about 2/3 of the frosting to start, stirring with a spoon or using your hands.
- Take about 2 tablespoons of cake mixture and roll it into a ball. If it holds together, continue rolling the rest of the mixture into balls and place them on a parchment-lined baking sheet.
- If the cake doesn’t hold together, add more frosting a little at a time until the mixture is moist enough to form intact balls.
Step 4: Chill the Cake Balls
- Place the cake balls in the refrigerator for 30 minutes to firm up.
- Melt a small amount of candy melts in the microwave according to package directions.
- Dip the end of a lollipop stick into the melted candy, then insert it about halfway into a cake ball.
- Repeat with all cake balls and return them to the parchment-lined tray.
- Freeze for 30–60 minutes to make coating easier.
Step 5: Coat the Cake Pops
- Melt the remaining candy melts according to package instructions.
- Dip each cake pop into the melted candy, ensuring it is fully coated and that the coating seals where the stick meets the cake ball.
- Gently tap off excess coating while rotating the pop for an even finish.
- While the coating is still wet, add sprinkles, edible glitter, or crushed nuts as desired.
- Place coated cake pops upright in styrofoam or return them pop-side down to the baking sheet.
- Let cake pops dry for at least 1–2 hours before storing.
- Prep Time: 60 mins
- Chilling Time: 40 mins
- Cook Time: 40 mins
- Category: Dessert
- Method: Baking
- Cuisine: American
Nutrition
- Serving Size: 1 cake pop
- Calories: 160
- Sugar: 12g
- Sodium: 90mg
- Fat: 8g
- Saturated Fat: 5g
- Unsaturated Fat: 2g
- Trans Fat: 0g
- Carbohydrates: 20g
- Fiber: 0g
- Protein: 2g
- Cholesterol: 35mg


Let’s bring them back! I made these last weekend and they were so popular, everyone loved them and were excited to have cake pops again!
I tried to decorate a batch of my cake pops with the lines you have shown above but the candy melts would cool too quickly and clump in the bag. Do you have any suggestions on what I should use instead or a way to keep the melts soft long enough? Thanks!
Hi Maria!
To prevent candy melts from cooling and clumping too quickly during decoration:
Use a Piping Bag: Place the melted candy melts into a piping bag.
Keep Warm: Hold the filled piping bag in a warm towel or place it over a warm (not hot) surface to maintain a fluid consistency.
Reheat Gently: If the melts begin to harden, gently massage the bag to redistribute heat or briefly place it in a warm area to soften.
Bria! I’ve been craving some sort of lemony cake for weeks now. I made these and they were fantastic!! xoxo
I’m hoping they come back, they are so fun. This has been my favorite recipe for a long time, ever since it was first published here!
Your cake pops are beautiful and absolutely frickin’ delicious!!
I made this lemon cakepop recipe for my nephew’s grad party, I made two batches and when I ate some cake plain it was not that good, it was not sweet enough and it didn’t rise enough, and it seemed pasty so I was worried since I didn’t want to make another two batches, but I made the frosting and dipped the balls and drizzled white candy melts on them and immediately sprinkled lemonade mix on them and put them away I the fridge for the night, and served them at room temperature next day! Wow it was a huge hit! Everyone raved and wanted to know the recipe! The cakepops were sparkly and tangy on the outside and sweet and subtly lemony on the inside! Thank you
I will never buy Starbucks cake pops. This is the recipe. This one, right here.
These are fantastic, loved them!
I am welcoming the cake pop back, gladly!! Especially this recipe!
Mee too!!!
I love cake pops, let’s bring them back! This recipe is fantastic!
I started making cake pops about 15 years ago. When I heard Starbucks was selling them, I was a little bummed. But I have lots and lots and lots of flavors, and I can’t keep up with demand. Most people that eat mine don’t even know Starbucks carries cake pops, or they tell me mine are better. :)
Recipe works well, can recommend!
Great recipe.I love anything lemon.
Thank you from Iran, these were really delicious and turned out perfect (although not as pretty as yours)!
Mine were not very pretty but they were very good tasting! I think I didn’t mix properly, will go back and retry.
your recipe sounds delicious! cant wait to try it! your decoration is flawless!! couple questions for you, 1. can you color the candy with powder coloring?? i cant find candy coloring here in Honduras (Central America)…the other question, sometimes my pops dont hold on the stick, they fall off…how can I improve that? please help!! :) happy baking!!!
Hi Miriam!
Use Oil-Based Colors: Candy melts require oil-based colorings to maintain the correct consistency. Water-based or powder colorings can cause the melts to seize. If oil-based colors are unavailable, consider purchasing pre-colored candy melts.
Preventing Cake Pops from Falling Off Sticks:
Proper Consistency: Ensure the cake and frosting mixture is firm enough to hold its shape but not overly moist.
Chilling: After forming the cake balls, chill them thoroughly before inserting the sticks.
Dipping Sticks: Dip the tip of each stick into melted candy before inserting it into the cake ball. This acts as an adhesive when the candy sets.
Avoid Overheating Coating: Ensure the candy melt coating is not too hot, as excessive heat can cause the cake balls to slide off the sticks.
These cake pops are delicious. So happy I found the recipe!!
Wow, those look awesome! Thanks for noting an alternative to the candy melts!
I have been experimenting with using other binders instead of frosting to form my cake pop dough. For example, I recently made a cake pop version of the classic English dessert, Sticky Toffee Pudding, using the toffee sauce instead of frosting. There are so many other ideas I can’t wait to try. I love the creativity cake pops allow you to explore.
starbucks cake pops are horrible. I would rather buy cake pops from a good online store that can ship nationwide.
Hi from Cape Town, South Africa
Great recipe and tips, thanks so much.
I can’t get Candy Melts or anything similar in Cape Town. Do you think I could use thinnish Royal icing to coat cake pops?
i don’t see why not…i like to dip mine in melted chocolate as well…if it doesn’t work, at least you can still eat your mistakes….can u have candy melts shipped in?
Hi Wendy,
Where did you manage to purchase the Cake Pops trays in Cape Town?
I’m from CT and would love to get my hands on these trays.
Tx
Kim
I made the cake this past weekend. I just did it as a two layer frosted cake. Absolutely delicious! I will definitely make this again. To decorate, I candied lemon peel for the top. It was the perfect ending to our BBQ.
ARE THERE ANY SITES THAT PROVIDE MAIL ORDER CAKE POPS – WOULD LIKE TO ORDER SOME OF THESE DELECTABLE GOODIES. THANK YOU. mimi444@aol.com
Let Them Eat Cake Pops Company has DIVINE cake pops. Also, overnight shipping is free through the end of August. They’re also on Facebook.
Hi there! :)
I am the owner of Jen’s Pop Shoppe, based in Tyler, TX. I have several flavors to choose from, and can custom design them any way you would like. I offer Nationwide shipping as well. My website is http://jenspopshoppe.com, and my email address is info@jenspopshoppe.com
This looks absolutely perfect for my daughter’s high school graduation party…it’s going to be an open house and I think this would work great. I have a question for you though…can you tell me how to freeze them and defrost them correctly? I am hoping to get them started ahead of time and have less to worry about right before the party. Any help you can give me would be greatly appreciated! Thank you so much.
I would say you can definitely bake the cakes and make all the frosting (if you are doing from scratch) as far ahead of time as you would like, wrap them up really well and freeze them. This will get you ahead of the game. As far as storing the finished cake pops, I have friends that are keeping them full dipped and decorated in the freezer for weeks with no detriment to their taste or texture. I have made them and kept them in the refrigerator for up to a week prior to serving in a paper towel-lined plastic ziploc bag and they tasted just the same as they did the day I made them. The candy melt coating protects the insides from drying out which make the shelf life quite long. If you are freezing them whole, I would let them come up to room temperature before serving them (though I must say they are good frozen or cold). I typically let them defrost in the refrigerator overnight, and then let them sit out at room temperature for a few hours before serving. There isn’t really anything in these pops that can’t be at room temperature for extended periods of time, so you can really be flexible about storing them. Hope this helps, please let me know if you have any more questions!
Thanks everyone!
Aimy – yep, there are all kind of fun sprinkles and edible pearls available these days, I find it’s a fun way to add a little extra something to your pops!
Lulu – Bakerella, if I remember correctly, does not take credit for inventing the cake pop, but she sure is the one that made them famous. She does use boxed cake and canned frosting though, I like to make them homemade, I think they taste MUCH better. You should check out her site though, she does some pretty amazingly cute things with cake pops.
It’s nice to feel the cake pop love over here, I seem to have incited a cake pop hate-storm at some other websites when they picked up this article :-)
I found out about cake pops at CafeMom which led me to Bakerella. I have been making them for holidays for the past year and 1/2. I use boxed mixes ( I didn’t know Bakerella does too!) and canned frosting. My son loves the Butter Recipe yellow cake and others love the Red Devils food. Only one customer wasn’t happy. She was expecting them to have the texture and taste of cake. FYI I put the candy melt dipped stick in after I form the ball, which would eliminate one of your cooling steps.. And I do not freeze them as when they are cooling they can expand and crack the candy melts. However, YOUR recipe sounds delicious. I think I will need to give it a try this summer. Thanks for sharing. I have “baseball” cakepops(balls) in my frig right now.
Susan-
That is a good idea, I like the idea of skipping a step…I don’t know why I haven’t ever tried that! I may have to give it a shot next time. I do get some cracking when they are cooling, but the last time I made them from just being in the refrigerator, I had so many fall off the stick, that a few lost to cracking was worth it! If I had more time between steps, I would just leave them in the ridge for longer, but the freezer does definitely speed up the process! Thanks again for the kind words!
I would REALLY love to her your solution for the cracking caused by expansion…
Cake pops have definitely become a trend. Who originally came up with the idea anyway? The newest trend seems to be anything in a jar
I’m pretty sure it was Bakerella who came up with the idea of cake pops.
http://www.bakerella.com/
I lalalalalove this recipe. Will try some time. Thank you so so much?! And for decorations you used edible pearls, correct?
Anyways, thank you much!? I love this recipe seems not to complicated;)
Forgot to rate, my bad?
Look’s delicious- and adorable. Ya gotta give credit to the Starbucks people- they definitely know what they’re doing. But I, too, hate to see something that can be so beautifully handcrafted (yours) turned into a mass-produced quasi-junkfood (theirs); luckily, those of us that matter know the difference!
I saw cake pops for the first time at bakerella’s blog. I like the idea of it, it’s decorative and fun to make. I like your lemony version much better, I myself would always choose lemon over chocolate :) These really look elegant ad perfect!