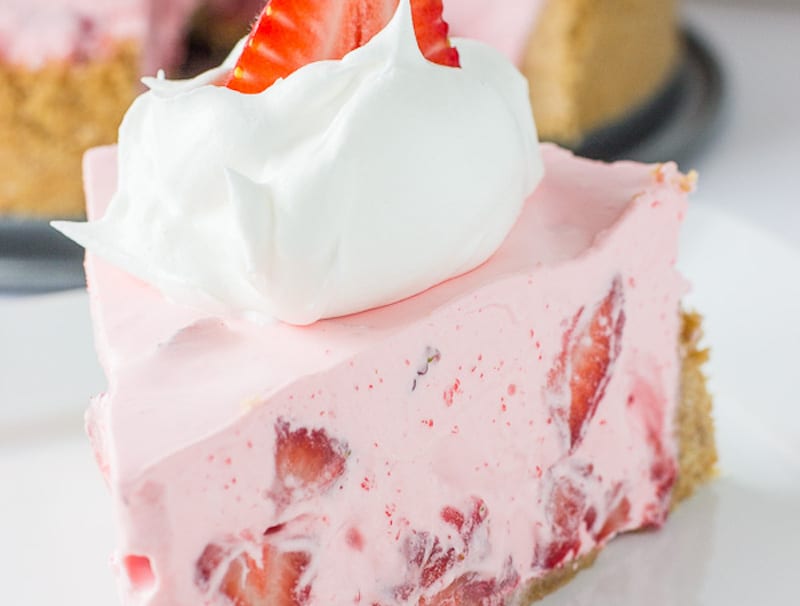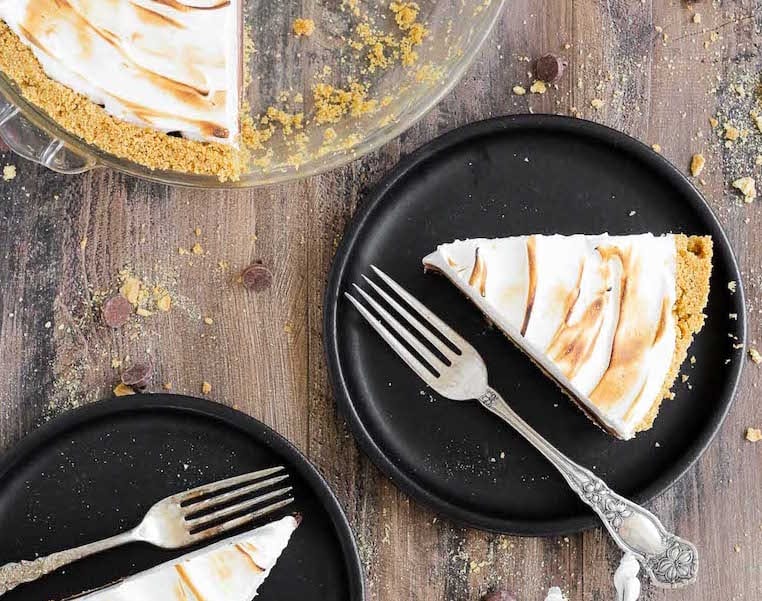
This No Bake Whiskey Smores Pie is a slice of Summer Heaven! There are layers of dark chocolate whisky ganache, milk chocolate mousse and fluffy toasted marshmallow in the perfect graham cracker crust. Go ahead…help yourself to another slice.
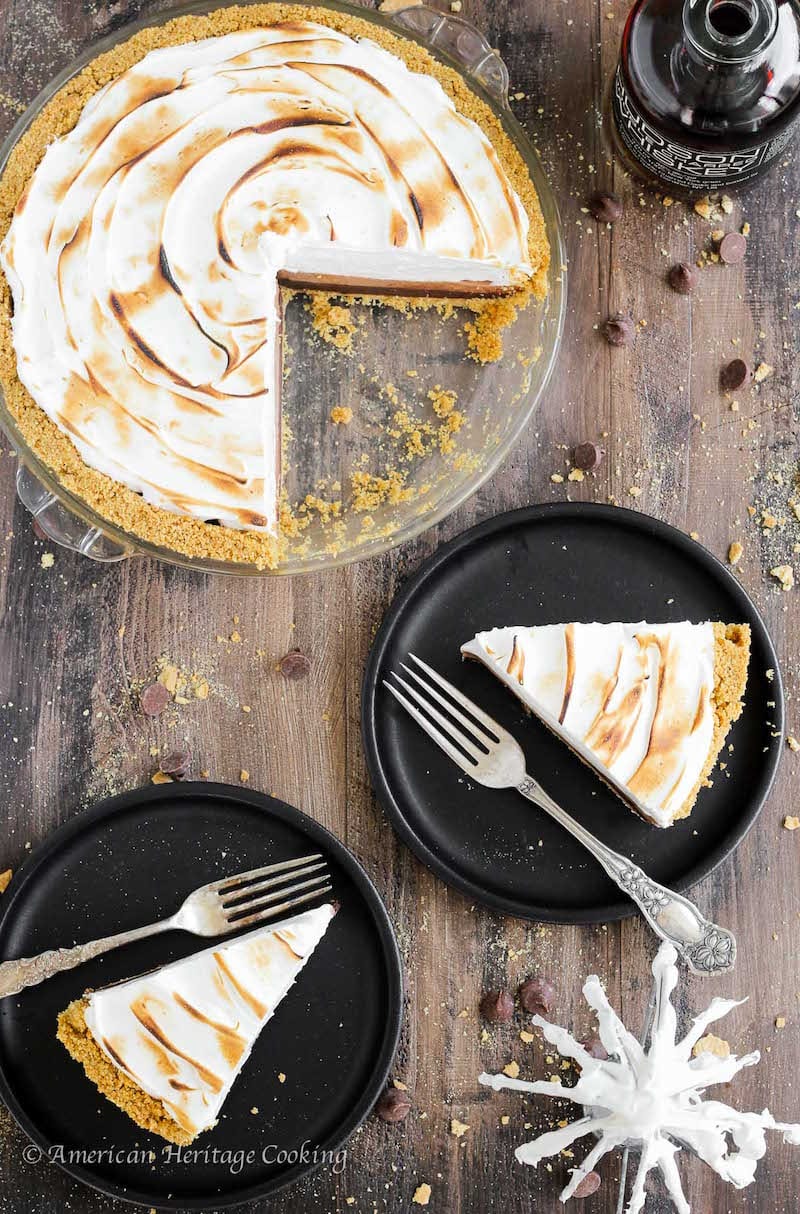
The usual suspects are all present and accounted for: graham crackers, chocolate and toasted marshmallow.
“Yeah, yeah, yeah,” I can hear you saying now.
But it is how all the layers of flavors work together that will make your eyes roll back in your head and have you saying a different sort of “yeah.”
Yeah, I went there. It’s that good.
Let me break this down for you. Just try to tell me that you aren’t running for your kitchen at lightning speed by the end…mmmkay?
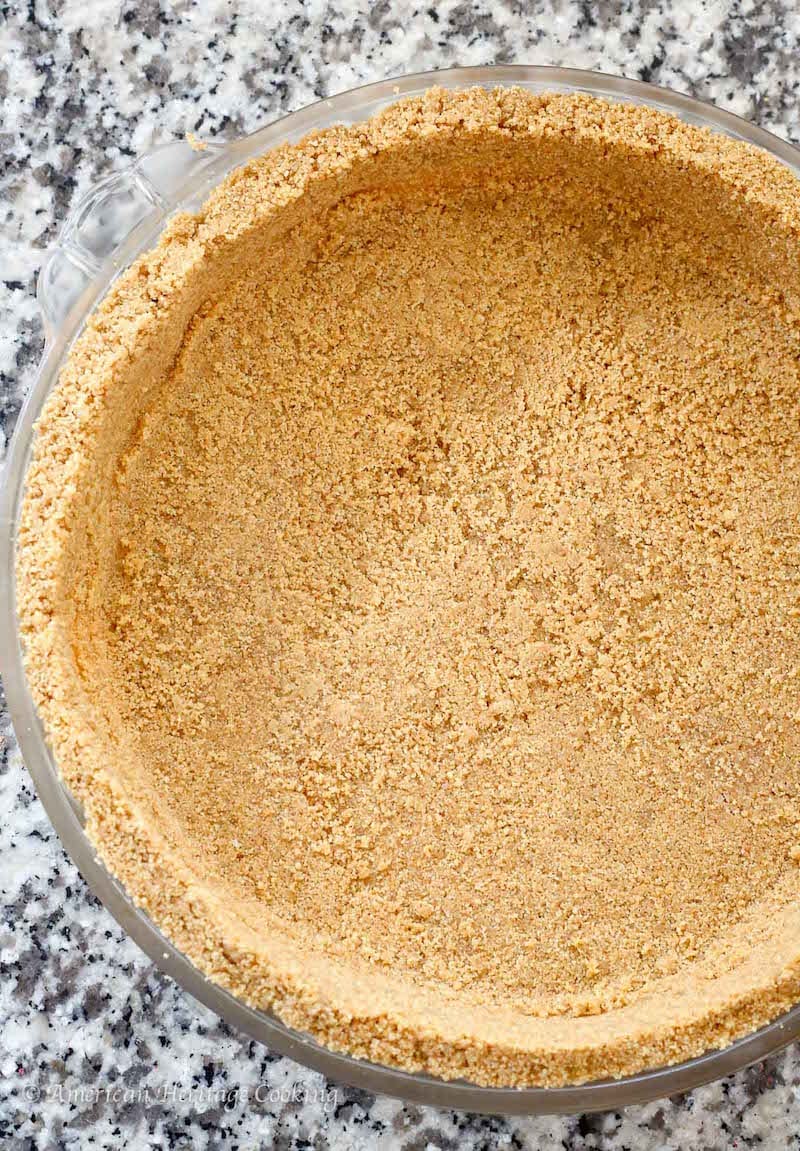
I started with a thick graham cracker crust because nobody wants a little, wimpy crust. It is the textural and slightly salty contrast in this summer symphony.
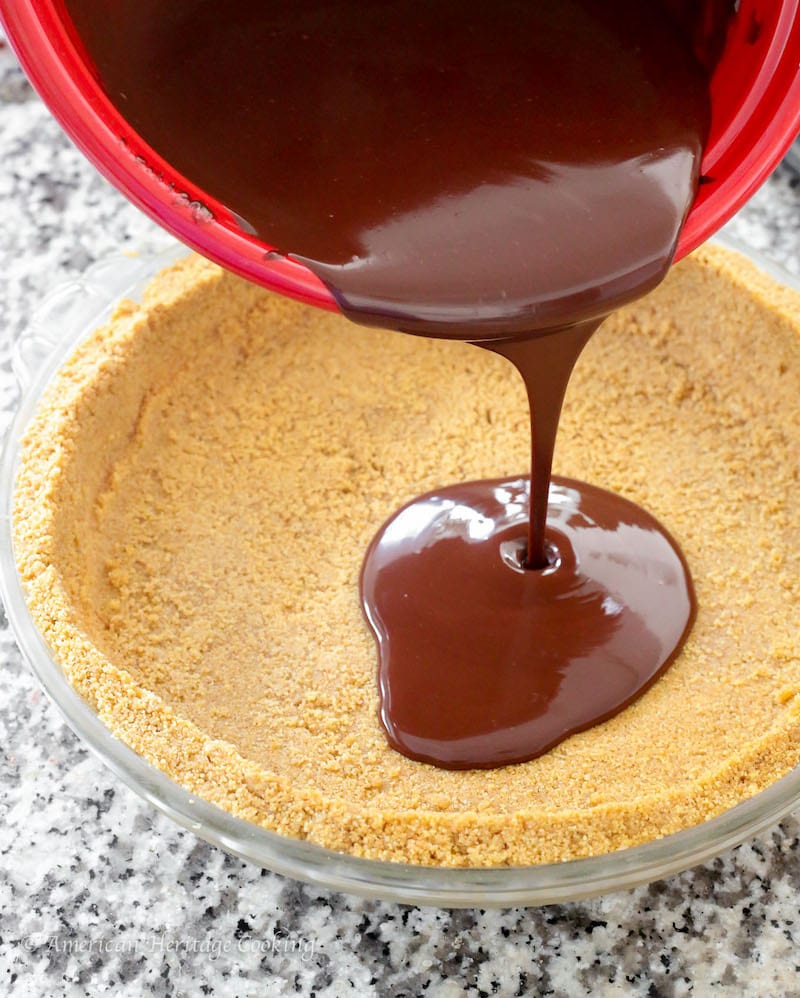
Then I layered on an easy, but tipsy, whisky dark chocolate ganache. So smooth, so silky, so delightfully boozy! The dark chocolate here is a must because it balances the sweetness of the milk chocolate and marshmallow. Trust peeps. Trust.
Next there is a fluffy, milk chocolate cream cheese mousse. Oh no she didn’t.
Oh. Yes. I. did. It is the milk chocolate for your complete s’more experience, but the cream cheese adds just a hint of tang.
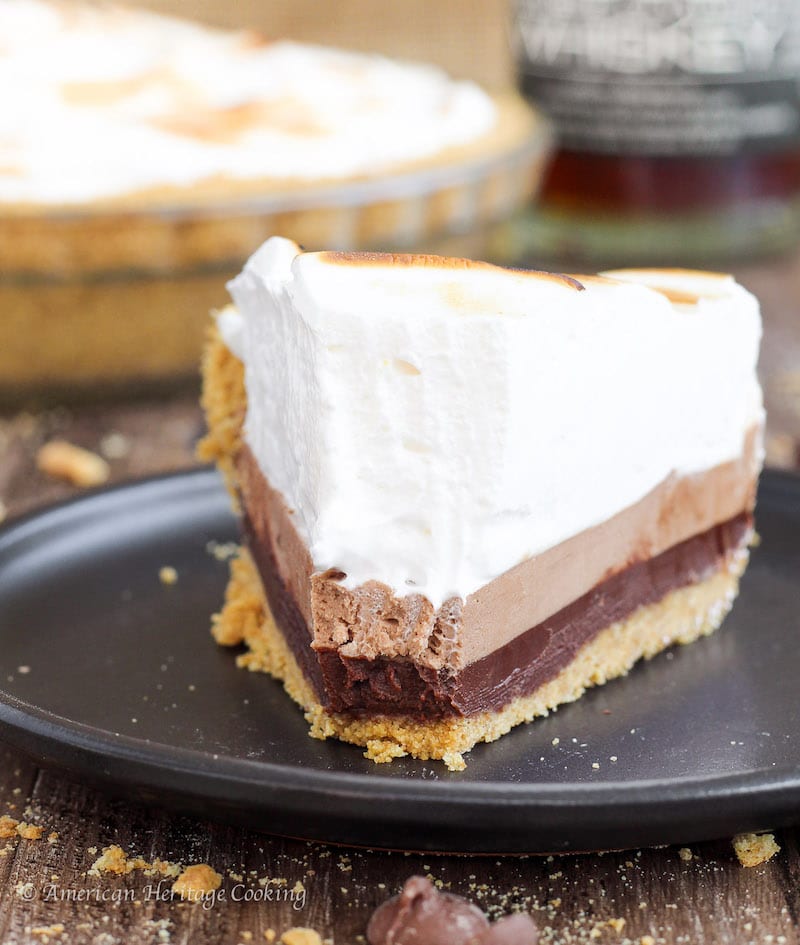
And to top it off there is a thick, luscious layer of toasted, homemade marshmallow fluff. Even straight from the fridge it’s like a pillow of marshmallowy goodness. A pillow I tell you.
You get all of that in every bite. Dreams do come true.
Print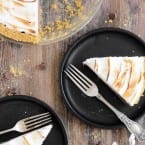
Bake-Free Whiskey S’mores Pie
- Yield: 10 " pie
Ingredients
- For the Graham Cracker Crust
- 1 3/4 cups graham cracker crumbs (2 packages of full crackers)
- 1/4 teaspoon kosher salt
- 1/2 cup melted butter (1 stick)
For the Whiskey Ganache:
- 8 ounces semi-sweet baking chocolate (I used Ghirardelli)
- 8 ounces 1 liquid cup heavy cream
- pinch kosher salt
- 2 tablespoons quality whiskey
For the Milk Chocolate Mousse:
- 8 ounce package of cream cheese (not light or whipped)
- 1/4 cup powdered sugar
- 3/4 cup 5 ounces milk chocolate, melted but not hot
- Pinch of kosher salt
Marshmallow Fluff:
- 1 cup sugar
- 4 egg whites (make sure there are no bits of yolk!)
- pinch kosher salt
- 1 teaspoon vanilla extract
Instructions
Graham Cracker Crust
- In a food processor (or you can buy them pre-ground, which is AMAZING!), finely grind the crackers until there are no more discernable pieces of cracker. Pour into a medium bowl. Add the salt and melted butter and mix until all the crumbs are moist and homogenous.
- Press into your 9-10 inch pie dish (the one pictured is 9 ½ inches) using a tart tamper or the back of a ½ cup measuring cup, which is what I did.
- Refrigerate while you assemble the ganache.
Make the Whiskey Ganache:
- In a small saucepan heat the heavy cream just until it boils over medium heat.
- Meanwhile, finely chop your chocolate even if they are chocolate chips. This will make the incorporation process easier and will help ensure a smooth ganache. Place chopped chocolate in a heat-proof bowl with the pinch of salt.
- Pour hot cream over the chocolate and let sit for 5 minutes. Don’t be impatient – this is important. Then gently whisk the chocolate mixture starting in the middle. Whisk in the middle until you see the ganache begin to emulsify. You will know this is happening because it will look like a smooth ganache. Then slowly whisk in larger circles until the entire bowl is one silky, emulsified ganache. You don’t want to whisk vigorously because you don’t want to incorporate any air into the mixture, so stop as soon as there is no visible cream left.
- Add the whiskey and then whisk, from the middle out, to incorporate.
- If your ganache breaks, add a little bit more cream and gently stir to incorporate.
- Pour about 3/4 of the ganache onto chilled crust and spread evenly with a small offset spatula. Reserve the remainder for another use. Chill while you make the mousse.
Make the Milk Chocolate Mousse:
- In the bowl of a stand mixer add the cream cheese and powdered sugar. Beat on high speed using the paddle attachment until it is smooth.
- While your mixer runs, melt your chocolate. In a microwave safe bowl, add the milk chocolate and salt. Microwave the chocolate in 20 second intervals, stirring between each one, just until almost all the chocolate has melted. Stir to melt the remaining bits of chocolate.
- Stop the stand mixer and pour all the melted chocolate into the cream cheese mixture. Beat to incorporate the chocolate. Switch to the whisk attachment and whisk on high until the mixture is light and fluffy.
- Spoon the mousse over the chilled ganache layer and smooth into an even layer with a small offset spatula. Chill while you make the marshmallow fluff.
Make the marshmallow fluff:
- Place the sugar, eggs whites and pinch of salt in the bowl of your stand mixer. [Make sure that your bowl is well cleaned! Stray fat will keep your meringue from whipping up to its full potential. If it isn’t whipping up then you can add a pinch of cream of tartar to try and stabilize it.]
- Place the bowl over a pot with about 1 inch of simmering water and whisk constantly until the sugar has dissolved and it is warm to the touch (120F). Place bowl on the stand mixer fitted with the whisk attachment and beat on medium-high until the meringue has cooled and become glossy. Add the vanilla and beat on high to incorporate.
- Spoon marshmallow fluff over the top of the chilled mousse and smooth with a spoon, spatula or offset spatula. I used an offset to achieve the look in the pictures.
- Toast meringue using a kitchen torch or the broiler in your oven. To toast the meringue with the broiler the pie needs to be very close, almost touching the flame or heating element. I left the door open and reached inside and moved the pie around to toast it evenly. I also have no fear. If you aren’t comfortable with that, yours might not be as evenly toasted.
- Your pie is now fully assembled and can be enjoyed immediately or you can refrigerate it up to 3 days! How easy was that? No sweat.
Notes:
- Serve immediately or refrigerate (uncovered) up to 3 days. After 3 days the marshmallow fluff starts to break down. Toasting the meringue helps keep it from breaking down faster, so don’t skip that step!
Frequently Asked Questions
Can I substitute the dark chocolate for milk chocolate in the ganache?
While you can use milk chocolate, it will alter the flavor balance of the pie, making it sweeter. The dark chocolate is essential for offsetting the sweetness of the milk chocolate mousse and marshmallow.
What type of whiskey works best for the ganache?
A smooth, quality whiskey is recommended, as it will enhance the flavor of the dark chocolate ganache. Bourbon or rye can both work well, but choose one that you enjoy drinking.
How do I achieve the perfect toasted marshmallow topping?
To toast the marshmallow fluff, use a kitchen torch to carefully brown the top until it reaches your desired level of toastiness, ensuring that you keep the flame moving to avoid burning.