


These are fairly easy to do and it only takes a bit of patience, because the result is beyond tasty and you can be sure that you will be surprising your guest with these cute little appetizers.
By Ariel Rebel

Ohhh Dumplings! I have a serious obsessions over them. Either it’s the classic Chinese pork and shrimps served with hot sauce or dijon mustard, like the one I’m presenting you today, or something more exotic like bananas and strawberries served with chocolate or maple/honey sauce, I love them all… 
They are fairly easy to do and it only take a bit of patience because the result is beyond tasty and you can be sure that you will be surprising your guest with these cute little appetizers. What’s also fun about them is that they are super versatile! You can pretty much fill them with anything you like and either steam, fry, boil and bake them without any problems and every ways will end up different and delicious.
PrintChinese Pork and Shrimp Dumplings
- Total Time: 1 hour 20 minutes
- Yield: 38 dumplings 1x
Description
These are fairly easy to do and it only takes a bit of patience, because the result is beyond tasty and you can be sure that you will be surprising your guest with these cute little appetizers.
Ingredients
For the filling:
- 0.506 kg of raw Ground pork
- 12 Fnely chopped BIG raw shrimps, finely chopped (I used the blacktiger shrimps)
- 1 teaspoon of ginger powder
- 2 teaspoons of corn starch
- 2 teaspoon of sesame oil
- 2 teaspoon of sugar
- 2 egg whites
For the Process:
- 2 egg yolks
- 1 teaspoon of water
- 38 wonton wrappers
- 1 wet rag
- 1 dry rag
- baking sheet
- waxed paper
- plastic wrap
Instructions
- Prepare your filling. Mix all the ingredients in a mixing bowl, take only a small portion and keep it out of the fridge, the rest goes back in the fridge with a plastic wrap on top. My reason for doing it this way, is that the process take some time and you wouldn’t want to leave so much raw meat on the counter. Prepare also your “glue” by mixing the egg yolks with the water. This will help us make sure our wrapper glue well together. Some people only use water but I like to go for a save bet and use yolk and stretch it out with the water so it’s not too thick when I apply it. It’s at your discretion ;)
- Take 1 wonton wrapper out and leave the other ones wrapped in plastic because they will dry otherwise. With a small rolling pin (I used the one that came with my ravioli trays but you can use pretty much anything you feel comfortable using.) take the bottom palm of the hand and stretch out all sides of the wrapper leaving the middle thicker. This process will make sure we have a nice distribution of dough around the filling.
- As you can see by the photo below, every sides of my wrapper are a bit more transparent, because I stretched them and the middle is still has the same thickness as my normal wrapper.
- Take about 1 teaspoon of filling (rolled in a small ball) and bring it in the middle of your wrapper.
- With your finger, dip them in your “glue” mixture and apply a THIN layer of glue around the side of your wrapper.
- Wipe your fingers on the wet rag and dry them on the dry rag, then delicately bring back two sides of your wrapper and press them so they stick together. You want to do the same for all the side of your wrapper to seal it but make sure to REMOVE THE AIR INSIDE BEFORE CLOSING IT.
- With your index fingers, keep one pressing on the middle of your dumpling and bring back one side over it before removing your finger and press everything together. This will create this cute little ”coin purse” folding pattern we are trying to achieve. Repeat this process till your done both sides. Remember to always bring back your dough to the middle.
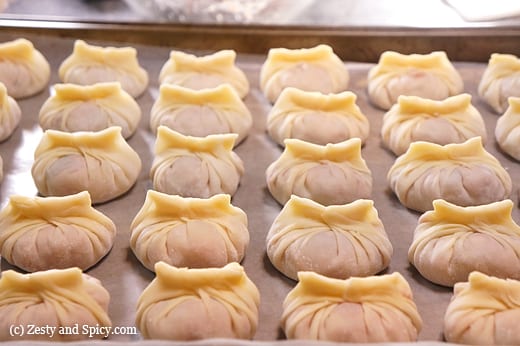
- Once you’re done, press hard on the top of your dumpling to seal it perfectly, stretch the top dough and make sure it’s not too thick. At this point your can either cut the excess dough and then create your cute little “cat ears” or simply fold the extra dough on itself, press it down to make sure it’s not too thick and then create your cat ears.
- When you’re dumpling is ready, place it on the the baking sheet that was previous lined with a waxed paper, and make sure to add plastic wrap over the whole thing so no air touch them and they don’t dry before you have the time to freeze them.
- Prep Time: 20 mins
- Cook Time: 1 hour