
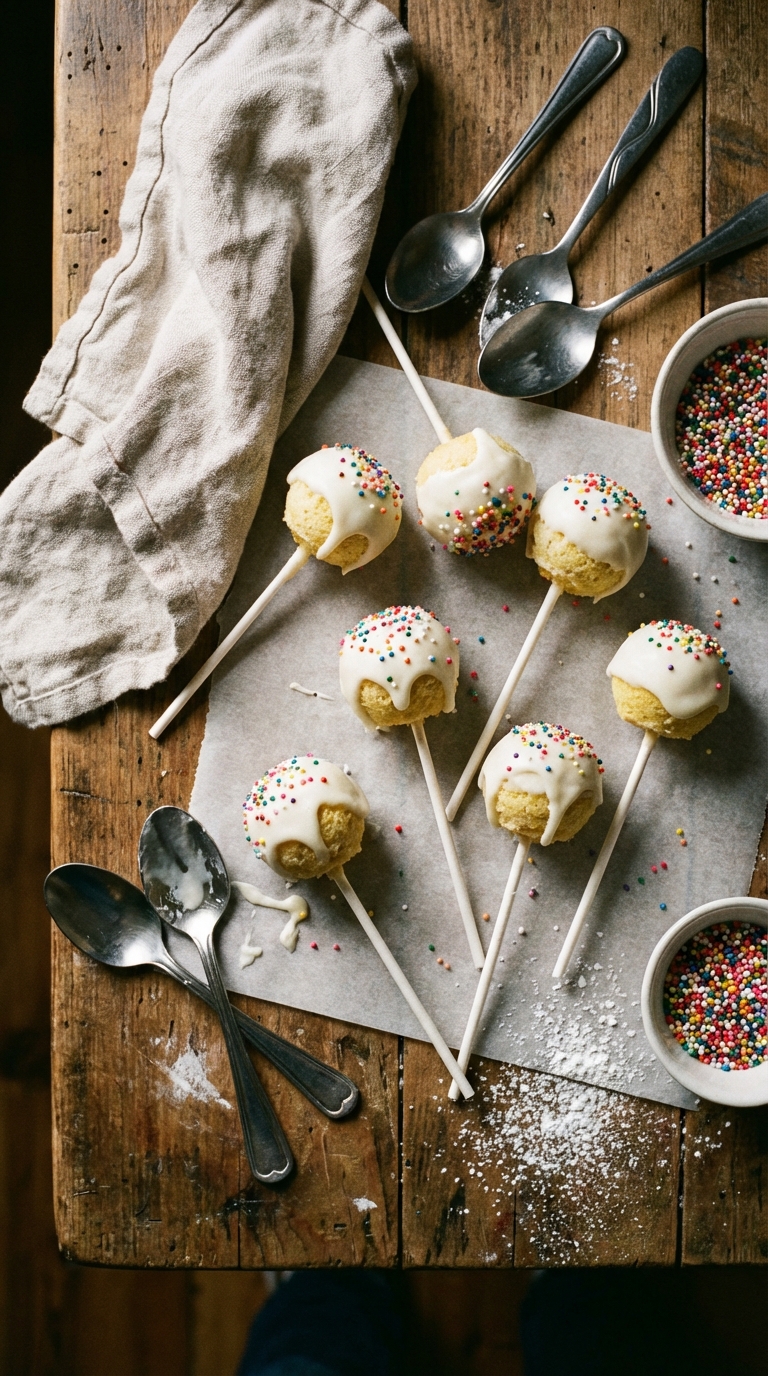
Cake pops were all the rage in the early 2010’s – as they exploded onto the foodie scene and home-bakers across the globe started making them for parties and get togethers. Then, Starbucks came in and ruined it for everyone when they launched a line of cheap cake pops, and home-bakers grew tired of them. BUT, that’s a dang shame, because cake pops are awesome, delicious and fun to eat. So let’s bring ’em back, shall we?
A cake pop is essentially cake, crumbled and mixed with frosting, formed into a ball, popped on a stick, and dipped in a super-sweet candy coating. I re-introduced cake pops for the first time in a decade for a friend’s wedding last spring (about 350 of them to be exact) and since then, virtually everyone I know has now become re-obsessed. Certain friends (who shall remain anonymous) have been known to hoard them in their freezer and ration them out until the next batch of leftovers is delivered. It’s madness I tell you.
Why You’ll Love This Recipe:
- A Little Sweet, a Little Tangy: The combination of lemon cake and cream cheese frosting is AWESOME.
- Fun and Portable: Cake pops are easy to serve, which essentially makes them perfect for birthdays, parties, and special occasions. You can also just keep them for yourself and not tell anyone.
- Customizable Coating: Dip them in classic white chocolate, colorful candy melts, or even drizzle with dark chocolate for contrast.
- Make-Ahead Friendly: Cake pops store well in the fridge or freezer, so you can prepare them in advance.
- Great for Gifting: Pack them in treat bags with ribbons – makes an awesome and appreciated homemade gift.
Ingredients You’ll Need:
- Lemon-Buttermilk Cake: This is your base. Homemade or store-bought works.
- Cream Cheese Frosting: Delicious of course, but also binds the cake crumbs together.
- Candy Melts or White Chocolate: This is what creates the smooth outer shell. Candy melts set faster, while white chocolate gives a richer taste.
- Cake Pop Sticks: Essential for shaping and serving, because, well it’s not a cake pop if it doesn’t have a handle! If unavailable, use sturdy straws or skewers.
- Optional Decorations: Sprinkles, edible glitter, or a chocolate drizzle to customize the look. Go creative and have fun with it!
Equipment You’ll Need:
- Mixing Bowls: For crumbling the cake and mixing with frosting.
- Baking Sheet: To chill the cake pops before dipping.
- Microwave or Double Boiler: To melt the candy coating.
- Cake Pop Stand or Styrofoam Block: Helps the pops set evenly without smudging.
Important Cooking Tips:
- Crumble the Cake Well: The finer the cake crumbs, the smoother the texture of the cake pops. Avoid large chunks.
- Use Just Enough Frosting: Add frosting gradually—too much will make the mixture too soft, and too little will cause cracks.
- Chill Before Dipping: Refrigerating the cake balls for at least 30 minutes helps them hold their shape when coated.
- Thin the Coating if Needed: If the candy melts or chocolate is too thick, stir in a small amount of vegetable oil or shortening.
- Dip at an Angle: Submerge the cake pop at an angle, then gently rotate to prevent air bubbles.
Planning Ahead:
- Make the Cake in Advance: Bake and crumble the cake a day ahead to save time.
- Prepare in Batches: You can roll and freeze the cake pops before dipping, making them easier to coat later.
- Decorate for Special Occasions: Use colored candy melts or themed sprinkles for holidays and celebrations.
Storing, Freezing, Reheating:
- Refrigeration: Store in an airtight container for up to 5 days.
- Freezing: Freeze dipped cake pops for up to 3 months. Wrap individually for best results.
- Bringing to Room Temperature: Allow frozen cake pops to thaw in the fridge for a few hours before serving.
FAQ:
Q: Can I use a different cake flavor?
A: Absolutely! Vanilla, strawberry, or chocolate cake work just as well with this method. 
Q: Why are my cake pops falling off the stick?
A: The cake balls might be too heavy, or the coating wasn’t properly set. Try chilling them longer before dipping and avoid overloading with frosting.
Q: Can I make these without a cake pop stand?
A: Yes! You can place the dipped pops face-down on parchment paper to create a flat-bottomed style.
Q: What’s the best way to get a smooth coating?
A: Use a deep, narrow cup for dipping and gently tap off excess coating while twirling the pop.
Q: Can I add lemon zest or extract for extra flavor?
A: Definitely! A little lemon zest in the frosting enhances the citrus flavor.
Q: How do I fix cracked cake pops?
A: Cracks happen when the cake pop is too cold and the coating is too hot. Let the cake balls sit for a few minutes before dipping to reduce temperature contrast.
Substitutions and Allergies:
- Dairy-Free: Use dairy-free cake, frosting, and chocolate. Coconut-based alternatives work well.
- Gluten-Free: Substitute with a gluten-free cake mix. The texture will still work perfectly.
- Low-Sugar Option: Reduce sugar in the cake and use unsweetened chocolate for the coating.
Beverage Pairings:
- Iced Lemon Tea: Complements the citrus notes in the cake pops.
- Sparkling Prosecco: Light and bubbly, also makes it feel like less of a kids party!
- Vanilla Latte: Because a vanilla latte always works with cake, as you well know.
Step by Step Guide to Making Lemon Cream Cheese Cake Pops
Step 1: Make the Cake
- Preheat the oven to 350°F (175°C). Grease and flour two 8 or 9-inch round cake pans.
- In a large bowl, whisk together cake flour, sugar, baking powder, salt, and lemon zest.
- Add the butter and half the buttermilk, beating until smooth (about 3–4 minutes).
- In a separate bowl, whisk the eggs, egg whites, remaining buttermilk, vanilla extract, and lemon extract.
- Gradually add the egg mixture to the batter in three additions, beating for 2 minutes after each addition.
- Divide batter evenly between the cake pans and bake for 35–40 minutes, until a toothpick inserted in the center comes out clean.
- Let cakes cool in the pans, then turn them out onto wire racks to cool completely.
Step 2: Prepare the Cream Cheese Frosting
- In a stand mixer, beat the cream cheese and butter until smooth.
- Add vanilla and salt, mixing to combine.
- Gradually add the confectioners’ sugar, beating for 3–4 minutes until light and fluffy.
Step 3: Form the Cake Pops
- Crumble the cooled cake into a large bowl, breaking it up into pea-sized pieces.
- Mix in about 2/3 of the frosting to start, stirring with a spoon or using your hands.
- Take about 2 tablespoons of cake mixture and roll it into a ball. If it holds together, continue rolling the rest of the mixture into balls and place them on a parchment-lined baking sheet.
- If the cake doesn’t hold together, add more frosting a little at a time until the mixture is moist enough to form intact balls.
Step 4: Chill the Cake Balls
- Place the cake balls in the refrigerator for 30 minutes to firm up.
- Melt a small amount of candy melts in the microwave according to package directions.
- Dip the end of a lollipop stick into the melted candy, then insert it about halfway into a cake ball.
- Repeat with all cake balls and return them to the parchment-lined tray.
- Freeze for 30–60 minutes to make coating easier.
Step 5: Coat the Cake Pops
- Melt the remaining candy melts according to package instructions.
- Dip each cake pop into the melted candy, ensuring it is fully coated and that the coating seals where the stick meets the cake ball.
- Gently tap off excess coating while rotating the pop for an even finish.
- While the coating is still wet, add sprinkles, edible glitter, or crushed nuts as desired.
- Place coated cake pops upright in styrofoam or return them pop-side down to the baking sheet.
- Let cake pops dry for at least 1–2 hours before storing.
Love these? Check out two of our other favorite cake pop recipes:
Red, White, and Blue Patriotic Cake Pops

Lemon Cream Cheese Cake Pops
- Total Time: 85 minutes
- Yield: Makes 50 1x
- Diet: Omnivore
Description
Crumbly lemon cake, creamy frosting, and a candy shell— these cake pops are party-perfect! A delightful bite-sized treat for any occasion.
Ingredients
- 3 1/2 cups (350 g) cake flour
- 2 cups (380 g) granulated sugar
- 1 tablespoon baking powder
- 1/2 teaspoon salt
- 1 cups (2 sticks, 460 g) unsalted butter, room temperature
- 1 cup (240 ml) buttermilk, room temperature
- 4 large eggs, room temperature
- 2 large egg whites, room temperature
- 1 teaspoon vanilla extract
- 1 teaspoon lemon extract
- Zest of 1 large or 2 small lemons
- 1 lbs (450 g) cream cheese, softened
- 1/2 cup (230 g) unsalted butter, room temperature
- 2 1/2 cups (325 g) confectioners’ sugar
- Pinch of salt
- 1 batch lemon-buttermilk cake, baked and cooled
- 1 batch cream cheese frosting
- 1-2 packages white vanilla candy melts
- Candy melt coloring
- Sprinkles
- 50 lollipop sticks
Instructions
- Preheat the oven to 350°F (175°C). Grease and flour two 8 or 9-inch round cake pans.
- In a large bowl, whisk together cake flour, sugar, baking powder, salt, and lemon zest.
- Add the butter and half the buttermilk, beating until smooth (about 3–4 minutes).
- In a separate bowl, whisk the eggs, egg whites, remaining buttermilk, vanilla extract, and lemon extract.
- Gradually add the egg mixture to the batter in three additions, beating for 2 minutes after each addition.
- Divide batter evenly between the cake pans and bake for 35–40 minutes, until a toothpick inserted in the center comes out clean.
- Let cakes cool in the pans, then turn them out onto wire racks to cool completely.
- In a stand mixer, beat the cream cheese and butter until smooth.
- Add vanilla and salt, mixing to combine.
- Gradually add the confectioners’ sugar, beating for 3–4 minutes until light and fluffy.
- Crumble the cooled cake into a large bowl, breaking it up into pea-sized pieces.
- Mix in about 2/3 of the frosting to start, stirring with a spoon or using your hands.
- Take about 2 tablespoons of cake mixture and roll it into a ball. If it holds together, continue rolling the rest of the mixture into balls and place them on a parchment-lined baking sheet.
- If the cake doesn’t hold together, add more frosting a little at a time until the mixture is moist enough to form intact balls.
- Place the cake balls in the refrigerator for 30 minutes to firm up.
- Melt a small amount of candy melts in the microwave according to package directions.
- Dip the end of a lollipop stick into the melted candy, then insert it about halfway into a cake ball.
- Repeat with all cake balls and return them to the parchment-lined tray.
- Freeze for 30–60 minutes to make coating easier.
- Melt the remaining candy melts according to package instructions.
- Dip each cake pop into the melted candy, ensuring it is fully coated and that the coating seals where the stick meets the cake ball.
- Gently tap off excess coating while rotating the pop for an even finish.
- While the coating is still wet, add sprinkles, edible glitter, or crushed nuts as desired.
- Place coated cake pops upright in styrofoam or return them pop-side down to the baking sheet.
- Let cake pops dry for at least 1–2 hours before storing.
Notes
- For easier handling, chill the cake pops for at least 30 minutes before dipping in candy melts.
- To prevent cracking, work with a small amount of melted candy melts at a time and keep the rest warm in a double boiler or microwave at low power.
- Store leftover cake pops in an airtight container in the refrigerator for up to 3 days; they will keep for longer in the freezer.
- Prep Time: 45 minutes
- Chilling Time: 40 mins
- Cook Time: 40 minutes
- Category: Dessert
- Method: Baking
- Cuisine: American
Nutrition
- Serving Size: 1 cake pop
- Calories: 200
- Sugar: 25
- Sodium: 50
- Fat: 12
- Saturated Fat: 7
- Unsaturated Fat: 4
- Trans Fat: 0g
- Carbohydrates: 25
- Fiber: 1
- Protein: 3
- Cholesterol: 30
Frequently Asked Questions
What type of cake should I use for the Lemon Cream Cheese Cake Pops?
You should use lemon cake to complement the cream cheese frosting, enhancing the sweet and tangy flavor profile.
Can I use something other than white chocolate for coating the cake pops?
Yes, you can use colorful candy melts or drizzle with dark chocolate for a different flavor and visual appeal.
How should I store the cake pops after making them?
You can store the cake pops in the fridge or freezer to keep them fresh, making them a make-ahead treat.


I made a batch of these for a baby shower and they were the perfect little two-bite treat, bright and lemony with that tangy cream cheese. The hardest part was dipping them smoothly, but the second tray came out much neater. So cute on a stand and just sweet enough. Thanks for a recipe I will be making on repeat!