Mayssam Samaha tries out a recipe from Momofuku Milk Bar by Christina Tosi.
By Mayssam Samaha
A few Sundays ago, I spent all day in the kitchen with my new Momofuku Milk Bar book. I had been looking forward to a whole day of cooking and baking for a long time and this was the perfect book to spend the day with. The Milk Bar desserts are really delicious but they are multi-layered and not a spare-of-the-moment kind of baking, which is what makes them so good. You need to be prepared, make some crumbs, crumbles and crusts in order to be ready to bake most of the recipes. I can definitely say though that it is all worth it! And once you have made those crumbs, crumbles and crusts, you can keep some in your freezer for the next time you’re craving a Milk Bar cookie or cake.
 I didn’t need to be sold on the whole Milk Bar phenomenon since I’ve been a fan for years and it is always on my itinerary whenever I visit New York. The compost cookie, crack pie, cakes and cereal milk soft serve ice cream have all earned their well deserved reputations. When you live in Montreal like I do tough, you come to miss those favourite Milk Bar dessert and I so happy that I am now able to make them at home.
I’d had the Milk Bar book on pre-order for weeks and was so happy to finally receive it. It reminded me a little of David Chang’s Momofuku cookbook, and I found myself reading it from cover to cover like a great fiction book. I found it to be even more inspiring, not only in terms of recipes but also in terms of Christina Tosi’s journey and how she got to where she is today. I’ve always thought her flavour combinations were genius and after having gone through making some of her recipes, I am even more convinced now. If you love baking and have a sweet tooth, this book should definitely be on your wishlist this Holiday season.
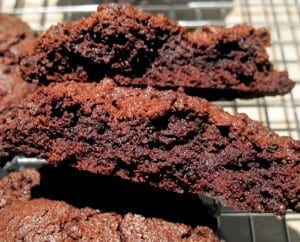
I am sharing the recipe for the Chocolate-Chocolate Cookies with you today. They are chewy and moist and so chocolatey that they will surely become some of your favourites. I have also since made the blueberry and cream cookies as well as the pistachio cake but for those you will have to buy the book and try them for yourself.
PrintMilk Bar’s Chocolate Chocolate Cookies
- Total Time: 33 minutes
- Yield: 10 to 15 cookies 1x
Description
Recipe taken from Momofuku Milk Bar by Christina Tosi
Ingredients
- 225g (2 sticks) butter, at room temperature
- 300g (1 1/2 cups) sugar
- 100g (1/4 cup) glucose (or 35 g corn syrup)
- 1 egg
- 1g vanilla extract
- 60g (2 oz) 55% chocolate, melted
- 200g (1 1/4 cups) flour
- 100g (3/4 cup) cocoa powder
- 3g (3/4 tsp) baking powder
- 1.5g (1/4 tsp) baking soda
- 7g ( 1 3/4 tsp) kosher salt
- 1/2 recipe chocolate crumbs
- CHOCOLATE CRUMBS
- The following makes a full recipe, you only need half for the cookies:
- 105g (2/3 cup) flour
- 4g (1 tsp) cornstarch
- 100g (1/2 cup) sugar
- 65g (2/3 cup) cocoa powder
- 4g (1 tsp) kosher salt
- 85g butter, melted
Instructions
- Cream the butter, sugar and glucose together for 2 to 3 minutes then add the egg, vanilla and melted sugar. Mix well for 7 to 8 minutes on medium high.
- Add the flour, cocoa powder, baking powder, baking soda and salt on low speed until just mixed.
- Add the chocolate crumb and mix for a few seconds.
- Shape the cookies with an ice cream scoop and place them on a parchment-lined cookie sheet. Flatten the tops of the cookies then wrap the trays well and refrigerate for a minimum of 1 hour or up to a week.
- Pre-heat the oven to 375º
- Place the cookies 4? apart and bake for about 18 minutes (don’t over-bake them!)
- The cookies will keep for 5 days at room temperature or you can freeze them for up to a month.
- CHOCOLATE CRUMBS RECIPE:
- Pre-heat your oven to 300º F
- Mix all the dry ingredients together in your cake mixer
- Add the butter and mix until small crumbs start forming
- Spread the mixture on a parchment-lined cookie sheet and bake for about 20 minutes
- Let it cool then use half of the crumbs in the chocolate cookie recipe and keep the rest for up to a month in your freezer (Note: Only use half of this recipe for the cookies)
Notes
1 – I put half the amount of salt in and you could still taste the salt in the cookies. The full amount would have been too much for my taste.
2 – It is easy to over-bake these cookies so be careful!
3 – I got a lot more than 10 to 15 cookies using this recipe and they were all very large in size. Good thing cookie-loving friends are never hard to find!
- Prep Time: 15 mins
- Cook Time: 18 mins










Thank you for noticing that Austin, it’s now been corrected! Have a good day!
There is a problem with the recipe! It says a stick of butter when 225g is 2 sticks! I made my first batch with 1 and it turned out a dense dry ball of chocolatey crumbs, don’t make the same mistake as me! Happy Baking.
It really is a fantastic book.
Isn’t it? I have since made these cookies again, as well as the blueberry and cream ones and the pistachio cake. Everything is delicious!