
Sponsored Post: Whether you are hosting a wine party or looking for the perfect pairing for your dinner party menu, we’ve teamed up with Sonoma-Cutrer to provide wine inspiration for your next gathering.
Check out this detailed tutorial on how to roast a whole beef tenderloin, the favorite filet mignon, complete with wine pairings and multiple serving ideas.
When I used to work as a personal chef, a big part of my job was catering small, intimate dinner parties ranging anywhere from 2 to 20 guests. Before the event, the host and I would work together to create a menu that would please everyone at the table. Nine times out of ten, that meant I was cooking beef for dinner and something chocolate for dessert. No matter how many unique and interesting entree options I suggested, filet mignon was always what people wanted me to serve.
It is, after all, a people pleaser. Unless you avoid red meat altogether, chances are you’ll be happy with a big, juicy hunk of beef tenderloin on your plate. I always opted to roast the loin whole as opposed to cooking individual steaks, which has way more room for error. When you’re cooking the entire meal yourself, and you have a limited supply of an expensive protein, ease and accuracy are essential.
A whole roasted beef tenderloin feels fancy because it is fancy, making it ideal for serving on special occasions like the holidays. Knowing how to properly roast a whole beef tenderloin is something that’s great to have in your back pocket for any kind of entertaining. It’s elegant, but approachable, and always gets rave reviews from the crowd.
So here it is: My detailed tutorial on how to select, trim, tie, roast, cut, and serve a whole beef tenderloin, aka filet mignon, followed by several serving suggestions and wine pairings. Feel free to comment with any questions or concerns you may have. I want you to go into this feeling confident and able. You got this!
Let’s first address the elephant in the room: Yes, this is a very pricey piece of meat. A whole beef tenderloin can run you anywhere from $60-$300 depending on the size, quality, time, and place of purchase. The average cost for a whole, untrimmed USDA Choice Angus beef tenderloin usually falls roughly between $10-$20/lb, again, depending when and where you purchase it. When you get into the organic, grass-fed, or Prime category, expect to pay a lot more. Catch them on sale, and you can pay considerably less. In fact, the days right after Christmas is when you’ll usually find whole tenderloins on sale, making them a great option for New Years Eve.
How much? I bought this 7.09 lb loin (which is on the small side) at my local Shoprite supermarket for $12.99/lb, for a total of $99.19. After trimming, that will feed about 6-8 hungry people, or more if served as part of a buffet with other food. You’ll want to budget about 1 lb per person before trimming if serving at a sit-down dinner, and slightly less if part of a buffet. I always err on the side of more, as I’d rather have leftovers than not enough.
To trim or not to trim? Some folks choose not to trim and tie their roast, but I’m a firm believer in doing it. The upside to roasting untrimmed is that it looks bigger and ultimately will feed more people, but the downside is that most people will wind up trimming the fatty parts off themselves, leaving good meat on the plate and essentially wasting the hard-earned money you spent on this precious hunk of beef.
Trimming the meat will leave you with a much smaller loin to work with, but I find it cooks more evenly and results in consistently round, extremely meaty pieces of steak with virtually nothing to cut off. When entertaining, I find this to be especially important because it means no one is forced to awkwardly spit out a bunch of fat and connective tissue into your fancy cloth napkins.
But what about all those trimmings? Well, my friends, this was perhaps my favorite part of always serving fillet mignon in my catering days. I would keep all the trimmings and then grind them into the best damn burger meat on the planet. It’s very fatty, very flavorful, and very delicious. You can freeze the trimmings and save them for a later date, as chances are you’ll hit your red meat quota for a little while. Pro Tip: Meat grinds easier when it’s partially frozen.
Trimming can seem a little bit intimidating, especially when dealing with such an expensive protein, but I promise it’s really not that hard. Allow me to walk you through it.
*Before we get started, it’s worth mentioning that you can always ask your butcher to do all of this for you, including grinding up the trimmings. Sometimes they will charge a fee for this, but a lot of the time they won’t (always ask first). Personally, I like to be in control so I do it myself, but sometimes you just don’t have the time or patience, and there is absolutely no shame in having your butcher do the heavy lifting. This is their job, after all.
First, remove the meat from the packaging. I do this over the sink because there’s often a lot of liquid that comes out. Give it a rinse if you wish, and then pat it very dry with several paper towels.
Next, locate the chain. The chain is a long piece of meat, fat, and connective tissue that runs down the side of the loin. You can see a noticeable separation between the main, round section of meat and the more marbled, sinewy section to the side. We need to take that off.
You should be able to separate it with your fingers and actually pull it off completely. Use your knife to help as needed. Don’t throw it out! Save all these trimmings in the freezer for enjoying at a later date.
Now we need to take off that silver skin, which is exactly what it sounds like. It’s impossible to chew through and really takes away from the eating experience. This part can be a bit tricky, but just take your time. Use the sharpest knife you own, turn the blade away from you, angle it slightly up, and slice along the very top of the meat, being careful to take as little of the flesh underneath as possible.
You’ll find that the silver skin continues down into the meat around the fat end of the loin. Use your knife to get in there and trim it out as best as possible without hacking it up too much. It’s okay to leave a little bit behind, but do the best you can.
You’ll notice that one side is significantly thicker than the other. That’s okay. Chances are that everyone at your gathering will like their steak cooked a little differently, so the thinner end will become more well-done and the thicker end more rare, making it perfect for all parties.
However, if everyone demands their steak at the exact same temperature, you have a few different options. You can either cut the loin into two pieces and roast them separately, or you can tuck the skinny side under (before tying) to create a more consistent width throughout.
Next, tie it up. Tying the loin is important to keep it nice and compact so that it roasts evenly (even roasting is something you’ll hear me mention a lot). There are all kinds of different techniques for tying a roast, but I find just keeping it simple is the best way. Take some butchers twine and loop it around one section, then tighten it to be firm, but not super tight, and tie it in a basic knot. Repeat every few inches.
Now it’s time to season. Again, keep it simple so that the meat can shine. First rub all over with olive oil, then plenty of Kosher salt (do NOT be shy) and freshly cracked black pepper – the fresh part is very important. Let the meat sit like this for at least an hour, and up to over night.
Let’s roast. I’ve messed with different roasting techniques over the years and this is the one I’m currently into. It’s called the “reverse sear” – Low and slow at first, then a quick broil (the sear) at the end to brown the exterior. I find this gives the meat an incredibly juicy and evenly cooked center with a nice crust on the outside.
Time? Forget about it. Rely on temperature only. I can’t stress this part enough: You need – and I mean NEED – a good quality probe thermometer (I like this one) to tell you exactly when your meat is at the perfect temperature. Properly roasting a tenderloin does not come down to sorcery or really even skill. It is all about having the right equipment, which will make your life soo much easier. Why would you spend over $100 on a piece of meat only to guess when it’s finished cooking? Invest in the thermometer and you’ll be so glad you did.
That said, you want to budget at least 2-3 hours for roasting and resting, but time will ultimately depend on the size of your loin.
Let your meat sit out at room temperature for an hour prior to roasting. This will help it to cook more evenly. Preheat the oven to 275 degrees F, then plop the loin on a sheet pan. If the sheet pan is too small, you can cut the tenderloin in half, but try to avoid this if possible so you don’t wind up with extra end pieces (no one really wants those). You can also opt to tuck that tail piece under and tie it it to stay secure.
Insert the thermometer into the center of the meat- not the skinniest part, not the thickest part, but somewhere right in the middle. Make sure the tip of the probe is in the center of the flesh and not near the edge, as this will cause you to undercook the meat. Program the thermometer for your desired temperature, place the sheet pan on the center rack of the oven, close the door, and let it do it’s thing.
Medium rare is the best temperature to shoot for unless your crew likes it different. This is how my friends and family all like it. The skinnier pieces will be a little more well-done and the thicker pieces will be more rare. Everyone wins.
The following temperatures take into account this “reverse sear” cooking technique, which requires broiling after the temperature is taken (otherwise the extreme high heat from the broiler will throw off and damage the thermometer – I know this from experience). These numbers are lower than what you’ll typically see because they account for a little extra cooking during the broiling stage, in addition to the carry-over-cooking that happens while the meat rests. Understood?
Rare: 115-120 degrees F
Medium-Rare: 125-130 degrees F (this is what I recommend)
Medium: 135-140 degrees F
Medium-Well to Well-Done: Don’t waste your money on filet mignon if you’re going to cook it to death. It is what it is. #sorrynotsorry
Once your thermometer tells you that your meat is at the right temperature, remove the probe, then move the pan up to the top rack of the oven and turn on the broiler. At this point, don’t take your eyes off it. Allow the meat to get nicely browned on top, about 30 seconds to 2 minutes, then use a pair of tongs to turn it 1/4 of the way. The goal is to let it brown on all four sides. This will add lots of flavor and give it a more attractive appearance.
*Important Note: DO NOT, I repeat, DO NOT line your pan with parchment paper or else it will burst into flames the minute your turn on that broiler. Again, I know this from experience. Tin foil is okay.
Next: REST. REST. REST. This step is super important. Don’t even think about skipping it. Throw some foil over that bad boy and let him sit for a good 15-20 minutes or more – never less – before slicing. You can always heat it up slightly before serving if need be, but I actually like it when it’s room temperature or just slightly warm.
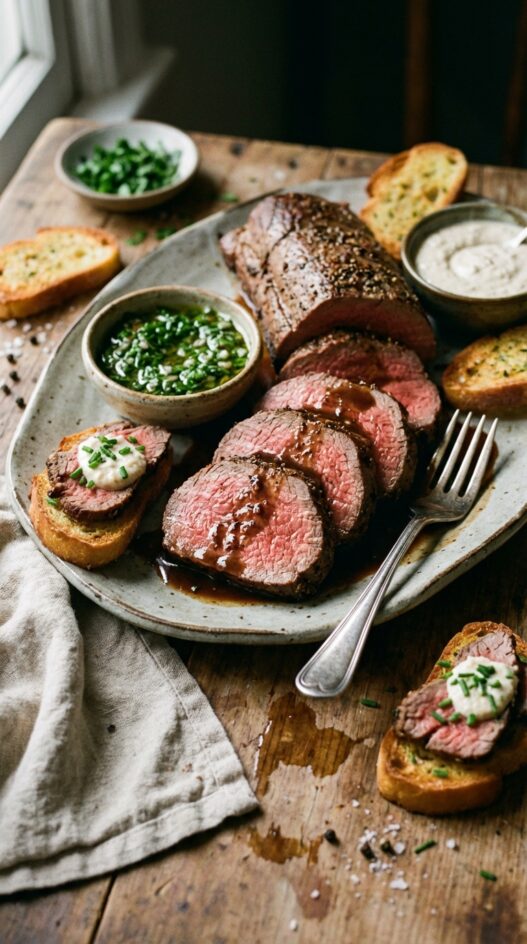
See! That wasn’t so bad, was it? Now, let’s talk about serving. There are so many ways to serve beef tenderloin, whether it’s for a sit-down dinner, a buffet, or even as an hors d’oeuvre.
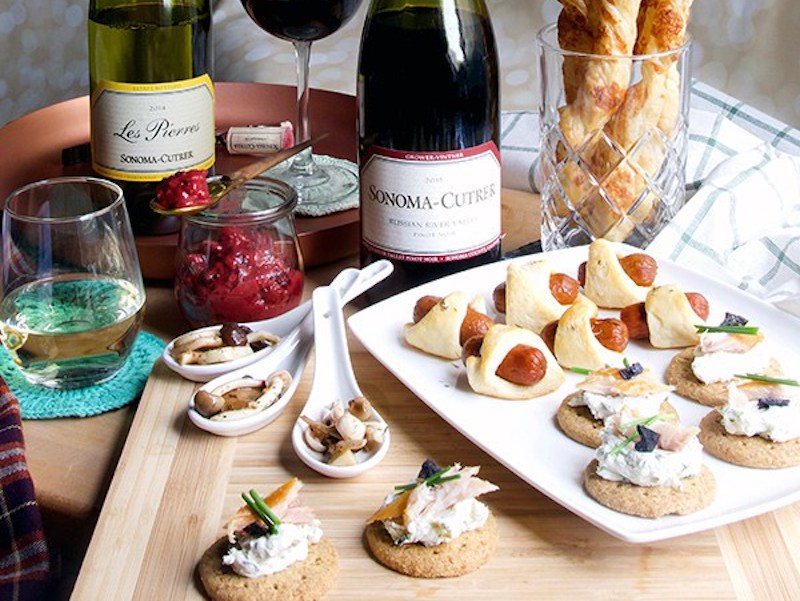
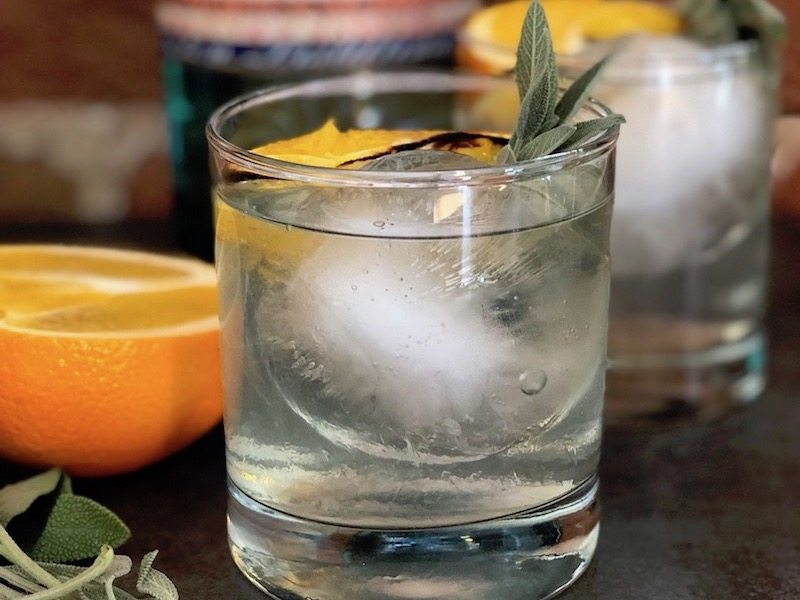
Wine Pairing: First things first, a juicy steak dinner requires an elegant wine that can stand up to the bold flavor of the meat. A red wine is really in order, but not something so big that it will overwhelm. This 2015 Russian River Valley Pinot Noir from Sonoma-Cutrer Vineyards is an extremely drinkable and enjoyable wine that pairs well with so many foods, but especially beef tenderloin. It’s round, silky, and makes a perfect match for this lean and tender cut of meat.
Sonoma-Cutrer marries old world Burgundian traditions with new California innovations and techniques to create a catalog of artfully balanced and delicious wines. They can be easily ordered on their website and delivered straight to your door, but they’re also widely available at fine wine and liquor stores. Tours and tastings at their stunning winery are also available if you ever find yourself exploring the Sonoma Valley.
Serving Suggestions: (keep scrolling all the way down for full recipes.)
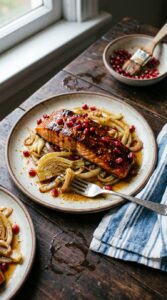
For a sit-down dinner, you can’t beat the French classic known as bordelaise. It’s a rich sauce made from shallots, red wine, pan juices, and butter. It’s elegant and always a crowd pleaser. Slice the meat into thick steaks, about 1 1/2-2 inches, and serve it with a nice pool of bordelaise right on the plate.
For a buffet, I like to go with something green and bright, like chimichurri. This iconic Argentinian sauce is made with garlic, parsley, vinegar and olive oil. It’s one of our favorites because it really cuts through the meat and wakes up your mouth. Slice the meat into 1/2-inch medallions and serve it with the sauce on the side.
For hors d’oeuvres, I love putting thinly sliced pieces of beef on top of garlic toast, and then smothering them in a creamy horseradish sauce. It’s a classic that everyone loves. You can’t go wrong. It’s also a great way for using up any leftovers (but chances are there won’t be any).
So there you have it. I hope this tutorial was informative and inspiring. Leave all your burning questions in the comments below and I’ll be happy to help troubleshoot if need be. Here’s to the happiest holiday yet – the one that has a whole roasted beef tenderloin and a juicy class of Sonoma-Cutrer Pinot Noir on the table.
Print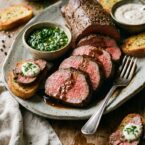
How to Make Roasted Beef Tenderloin and Pair It with Wine
- Total Time: 70 minutes
- Yield: Serves 4
- Diet: Omnivore
Description
A classic roast beef tenderloin, perfectly cooked and paired with a rich Bordelaise sauce. Three delicious sides complete this elegant meal.
Ingredients
- 1 whole beef tenderloin
- Olive oil
- Kosher salt
- Freshly cracked black pepper
- 2 tsp olive oil
- 4 large shallots
- salt
- 2 tsp flour
- 2 cups (473 ml) dry red wine
- 3 cups (709 ml) beef tenderloin pan juices and beef stock
- 2 tbsp (30 g) unsalted butter
- 2 medium shallots
- 2-3 large cloves garlic
- 1/4 cup (59 ml) red wine vinegar
- 1/2 cup (118 ml) extra virgin olive oil
- 1 bunch flat leaf parsley
- 1 tsp kosher salt
- 1 baguette
- 8 tbsp (113 g) salted butter
- 2-3 cloves garlic
- 1 1/2 cups (355 ml) sour cream
- 1/4 cup (59 ml) prepared horseradish
- 1 lbs (454 g) roasted and chilled beef tenderloin
- finely chopped fresh chives
Instructions
- Let the meat sit at room temperature for an hour before roasting.
- Preheat oven to 275°F (135°C), place the loin on a sheet pan.
- Rub with olive oil, then generously with kosher salt and pepper. Insert a meat thermometer into the center.
- Roast on the center rack until desired internal temperature is reached: Rare: 115-120°F (46-49°C); Medium-Rare: 125-130°F (52-54°C); Medium: 135-140°F (57-60°C).
- Remove thermometer, move pan to the top rack, and broil. Watch closely until browned on top (30 seconds to 1 minute), turn 1/4 turn with tongs. Repeat until all sides are browned.
- Remove from oven, cover with foil, and let rest for 15-20 minutes.
- Slice and serve.
- Basic Bordelaise Sauce
- Heat olive oil in a large saucepan over medium heat. Add shallots with a pinch of salt; cook until softened and golden, about 10 minutes.
- Stir in flour, whisk in red wine and beef stock. Simmer until thickened and reduced by half.
- Strain mixture through a fine-mesh strainer into another saucepan, pressing to extract all liquid. Season with salt and pepper. Whisk in butter, serve immediately.
- Basic Chimichurri Sauce
- Combine shallots, garlic, and red wine vinegar in a bowl. Let sit for 10 minutes.
- Whisk in olive oil, parsley, salt, and pepper. Taste and adjust seasoning.
- Alternatively, make this in a food processor.
- Garlic Toasts with Filet Mignon and Horseradish Sauce
- Preheat oven to 325°F (163°C).
- Melt butter and garlic in a small pan. Arrange baguette slices on a sheet pan, brush with garlic butter. Bake until golden and crisp (15-20 minutes). Let cool.
- Whisk together sour cream and horseradish. Season with salt.
- Top each toast with 1-2 slices of beef tenderloin. Add horseradish sauce and chives. Serve immediately.
Notes
- For a richer flavor, sear the tenderloin in a hot pan before roasting.
- Use a meat thermometer to ensure the beef reaches your desired doneness; avoid overcooking.
- Leftover beef tenderloin can be sliced and added to salads or sandwiches.
- Prep Time: 25 minutes
- Cook Time: 45 minutes
- Category: Main Course
- Method: Roasting
- Cuisine: French-Inspired
Nutrition
- Serving Size: 6 oz
- Calories: 500
- Sugar: 5
- Sodium: 1500
- Fat: 35
- Saturated Fat: 15
- Unsaturated Fat: 15
- Carbohydrates: 20
- Fiber: 4
- Protein: 45
- Cholesterol: 180
Frequently Asked Questions
What internal temperature should I aim for when roasting the beef tenderloin?
For a medium-rare beef tenderloin, aim for an internal temperature of 130-135°F (54-57°C). Use a meat thermometer to ensure accuracy.
How do I enhance the flavor of the beef tenderloin before roasting?
You can enhance the flavor by seasoning the tenderloin with salt, pepper, and your choice of herbs, such as rosemary or thyme, before roasting.
What type of wine pairs best with roasted beef tenderloin?
A full-bodied red wine, such as Cabernet Sauvignon or Merlot, pairs exceptionally well with roasted beef tenderloin, complementing its rich flavors.