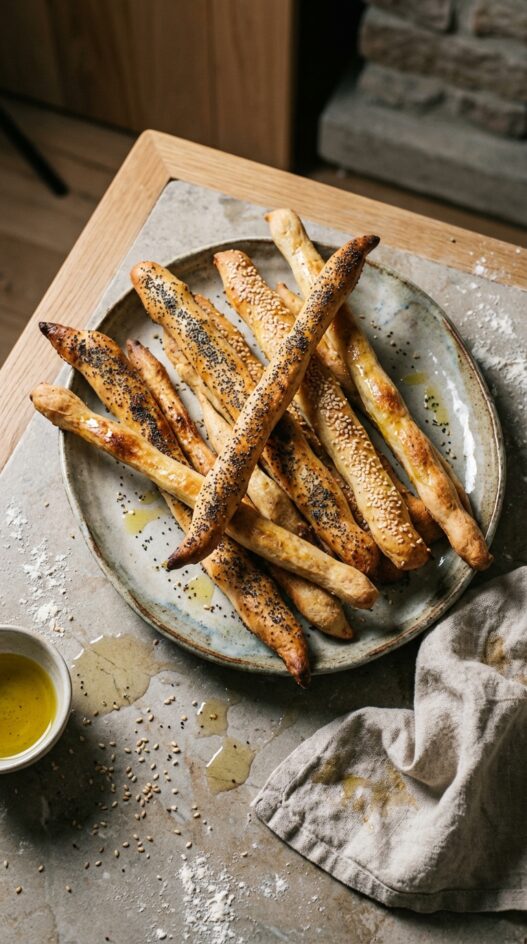

Imagine. One of these deliciously crispy breadsticks wrapped with savory Italian Prosciutto. Or next to a fancy cheese platter and tasty olives. You can even place some of these breadsticks into a tall glass or in a small vase and make a deliciously edible centerpiece. Everyone will be impressed, especially when they find out you made these from scratch. So remember: go for a rustic look, not perfectly shaped, like store-bought grissini.
Top 10 Tips for Perfecting Grissini – Italian Breadsticks
- Dough Consistency: Achieving the right dough consistency is key. It should be pliable but not too sticky or dry. Adjust with flour or water as needed to reach the desired texture.
-
Yeast Activation: Ensure the yeast is active for the dough to rise properly. The water added to the yeast should be warm (around 110°F) but not too hot, as extreme temperatures can kill the yeast.
-
Uniform Thickness: When rolling out the dough, aim for uniform thickness to ensure even baking. Uneven thickness can lead to some breadsticks being overcooked while others remain undercooked.
-
Gentle Stretching: When shaping the grissini, gently stretch the dough. Over-stretching can cause the breadsticks to tear or lose their shape, resulting in uneven baking.
-
Flavor Variations: Experiment with different flavors by adding herbs like rosemary or thyme, or spices such as garlic powder or onion powder into the dough.
-
Seeds and Toppings: For an added crunch and flavor, sprinkle the breadsticks with sesame seeds, poppy seeds, or even grated Parmesan cheese before baking.
-
Oven Watch: Keep a close eye on the grissini while baking, as they can go from perfectly crisp to overly browned quite quickly.
-
Cooling: Allow the breadsticks to cool on a wire rack after baking. This helps them maintain their crispness.
-
Storage: Store the grissini in an airtight container to keep them crisp. They’re best enjoyed within a few days of baking.
-
Serving Suggestions: Grissini are versatile and can be served as an appetizer, with dips, alongside a cheese platter, or as a complement to soups and salads.

The good news, you can wow everybody, without too much effort. Just prepare a simple pizza dough. And as you do for pizza, make sure to knead the dough until smooth and elastic. Store covered in a warm place, and give it enough time for it to rise. Stretch the dough, brush with tasty olive oil, cut it in strips and stretch the breadsticks. At this point you can add different flavors to the grissini, from herbs like chopped rosemary, to poppy or sesame seeds. Make it fun and delicious.
Step by Step Guide to Making Grissini – Italian Breadsticks
1. Preparing the Dough:
- In a large bowl, combine the bread flour, sugar, and dry yeast.
- Add 2 tablespoons of olive oil and 1/2 cup of warm water to the flour mixture. Mix with a spoon until combined.
- Dissolve 1 teaspoon of salt in the remaining 1/4 cup of warm water. Add this to the dough.
- Start mixing with a spoon until all the water is absorbed.
2. Kneading the Dough:
- Transfer the dough onto a clean counter.
- Knead by hand for about 5 minutes until the dough is smooth and elastic. If the dough is too hard, add a bit more water; if it’s too sticky, add a bit more flour.
3. First Rise:
- Shape the dough into a ball. Cover it in plastic wrap and a kitchen towel to keep it warm.
- Let the dough rise for at least 1 hour until it doubles in size.
4. Shaping the Dough:
- After the first rise, flatten and stretch the dough into a rectangular shape, about 1/4 inch thick and approximately 14 x 9 inches.
- Brush the dough with the remaining 1 tablespoon of olive oil.
- Cover again with plastic wrap and let it rest for an additional hour.
5. Preheating the Oven:
- Preheat the oven to 400°F (200°C).
6. Cutting and Shaping Grissini:
- Cut the dough into strips along the shorter side, each about 1/3 inch (1 cm) wide, using a sharp knife or pizza cutter.
- Gently stretch each strip to almost double its size or the length of your baking sheet.
7. Adding Seeds (Optional):
- If using, sprinkle sesame or poppy seeds over the strips.
- Roll the breadsticks gently so the seeds stick to the dough.
8. Baking:
- Arrange the breadsticks on a baking sheet lined with parchment paper.
- Bake for about 12 minutes, but keep a close eye on them. The exact time may vary depending on the thickness of your breadsticks.
9. Cooling and Serving:
- Remove the baked grissini from the oven and allow them to cool on a wire rack.
- Serve as a snack or appetizer, or pair with soups and salads.
How to Make Grissini: Italian Bread Sticks
- Total Time: 32 minutes
- Yield: Makes 20 1x
- Diet: Vegetarian
Description
Crispy, savory Italian breadsticks are surprisingly simple to make. Perfect for dipping or snacking!
Ingredients
- 2 cups (591 ml) bread flour
- 1/2 teaspoon sugar
- 1 package (15 g) active dry yeast
- 3 tablespoons extra virgin olive oil
- 3/4 cup (177 ml) warm water
- 1 teaspoon (6 g) salt
- Poppy seeds and/or sesame seeds
Instructions
Preparing the Dough
- In a large bowl, combine the bread flour, sugar, and dry yeast. Add 2 tablespoons of olive oil and 1/2 cup of warm water to the flour mixture. Mix with a spoon until combined. Dissolve 1 teaspoon of salt in the remaining 1/4 cup of warm water and add this to the dough. Mix with a spoon until all the water is absorbed.
Kneading the Dough
- Transfer the dough onto a clean counter and knead by hand for about 5 minutes until smooth and elastic. Add more water if the dough is too hard, or more flour if it’s too sticky.
First Rise
- Shape the dough into a ball, cover it with plastic wrap and a kitchen towel, and let it rise for at least 1 hour until doubled in size.
Shaping the Dough
- Flatten and stretch the dough into a 1/4 inch thick rectangle, approximately 14 x 9 inches. Brush with the remaining 1 tablespoon of olive oil, cover with plastic wrap, and let rest for an additional hour.
Preheating the Oven
- Preheat the oven to 400°F (204°C).
Cutting and Shaping Grissini
- Cut the dough into 1/3 inch (1 cm) wide strips along the shorter side using a sharp knife or pizza cutter. Gently stretch each strip to almost double its size or the length of your baking sheet.
Adding Seeds (Optional)
- If using, sprinkle sesame or poppy seeds over the strips and roll gently to adhere.
Baking
- Arrange the breadsticks on a baking sheet lined with parchment paper and bake for about 12 minutes, keeping a close eye on them as baking time may vary.
Cooling and Serving
- Remove the grissini from the oven and let them cool on a wire rack. Serve as a snack or appetizer, or with soups and salads.
Notes
- For a richer flavor, use high-quality extra virgin olive oil.
- To prevent sticking, ensure your baking sheet is well-greased or lined with parchment paper.
- Store cooled grissini in an airtight container at room temperature for up to 3 days, or freeze for longer storage.
- Prep Time: 20 minutes
- Cook Time: 12 minutes
- Category: Baking
- Method: Baking
- Cuisine: Italian
Nutrition
- Serving Size: 2-3 breadsticks
- Calories: 100
- Sugar: 2
- Sodium: 150
- Fat: 4
- Saturated Fat: 1
- Unsaturated Fat: 3
- Carbohydrates: 18
- Fiber: 1
- Protein: 3
Frequently Asked Questions
What temperature should the water be when activating the yeast?
The water added to the yeast should be warm, around 110°F, to ensure the yeast activates properly without being killed by extreme temperatures.
How can I achieve the right dough consistency for the grissini?
The dough should be pliable but not too sticky or dry; adjust with additional flour or water as needed to reach the desired texture.
What can I add to the dough for extra flavor?
You can experiment with different flavors by adding herbs like rosemary or thyme, or spices such as garlic powder or onion powder directly into the dough.