Focaccia bread topped with a salty, savory olive tapenade. This impressive bread comes together in a couple of hours, and is easily customizable.
If your fridge looks anything like mine, you probably have a couple of half-full jars of olives claiming residency on the shelves. Turning them into a batch of savory, salty olive tapenade is one of my favorite ways to put that prime fridge real estate back on the market. I almost always have some capers and a half a lemon hanging out, too. Garlic and olive oil are always in my kitchen. All it takes to make some of this addictive relish is a few pulses in the food processor.
A quick batch of tapenade tumbled atop this bubbly dough works out beautifully. This loaf of focaccia will make a wonderful addition to any lunch or dinner table; and it will also be tasty alongside a cheese tray or some charcuterie.
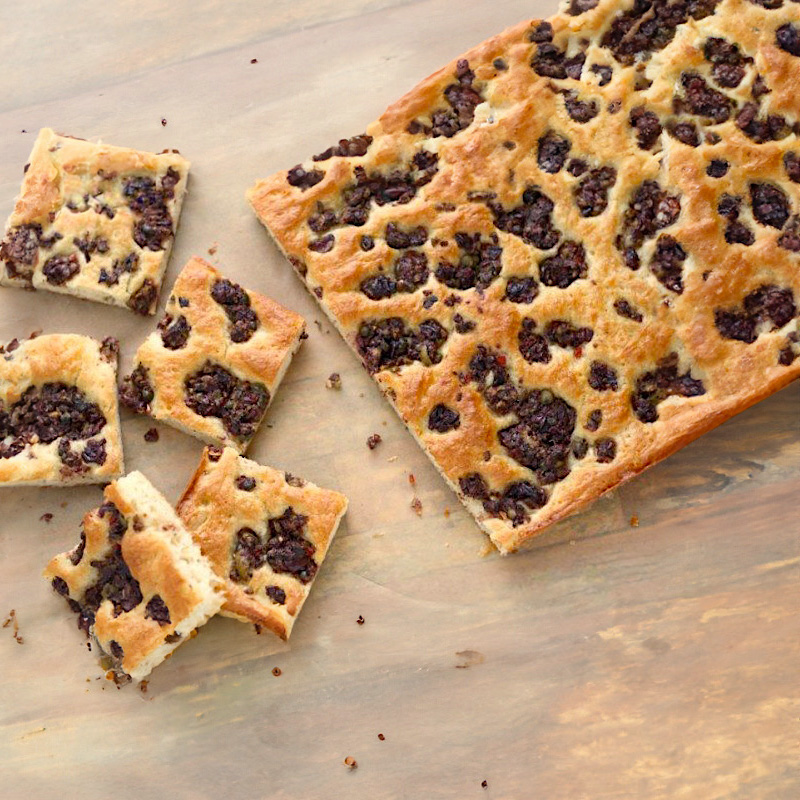
Step by Step Guide to Making Olive Tapenade Foccaccia
1. Prepare the Olive Tapenade:
- Rinse the olives and pat them dry.
- In a small food processor, combine olives, garlic, capers, basil, olive oil, lemon juice, and white pepper.
- Pulse the mixture until it achieves a coarse consistency, scraping down the sides as needed. Set aside.
2. Making the Focaccia Dough:
- In a large bowl, combine the yeast, water, and sugar. Let it sit until the yeast blooms and appears creamy.
- Using a wooden spoon, stir in the flour and salt, mixing until the dough comes together.
- Turn the dough out onto a lightly floured work surface and knead a few times. If the dough is sticky, lightly flour your hands but avoid making the dough too stiff.
3. Prepare the Baking Sheet:
- Lightly sprinkle water onto a 15″x10″ rimmed baking sheet.
- Line the baking sheet with parchment paper.
- Spread 2 tablespoons of olive oil evenly over the parchment paper.
4. Shape and Rise the Dough:
- Place the kneaded dough onto the prepared baking sheet.
- Gently stretch and shape the dough to fit the pan.
- Cover the pan with plastic wrap and let the dough rise until it slightly surpasses the edges of the pan, approximately 45-60 minutes.
5. Preheat the Oven:
- As the dough nears the end of its rising time, preheat the oven to 400° F.
6. Add Toppings and Bake:
- Evenly spread the prepared tapenade over the risen dough.
- Drizzle the remaining tablespoon of olive oil on top.
- Place the baking sheet in the preheated oven and bake for about 25 minutes or until the focaccia turns golden and has crisp edges.
7. Cooling:
- After baking, carefully slide the focaccia (with the parchment paper) onto a wire rack.
- Allow it to cool slightly.
8. Serving:
- Enjoy the focaccia while warm or at room temperature.
Focaccia Bread with Olive Tapenade
- Total Time: 1 hour 40 minutes
- Yield: 1 10x15 Inch Bread 1x
Description
Focaccia bread topped with a salty, savory olive tapenade. This impressive bread comes together in a couple of hours, and is easily customizable.
Ingredients
For the Olive Tapenade:
- 3 ounces pitted Manzanilla olives w/ pimento
- 3 ounces pitted Kalamata olives
- 2 cloves garlic
- 1 1/2 tablespoons capers
- 1 1/2 tablespoons freshly chopped basil
- 1 1/2 tablespoons olive oil
- 1 teaspoon lemon juice
- A pinch of ground white pepper
For the Dough:
- 2 tablespoons active dry yeast
- 1 1/4 cups lukewarm water (110° F)
- 1 heaping tablespoon sugar
- 2–2/3 cups (347 grams) bread flour, plus more for work surface
- A pinch of sea salt
- 3 tablespoons olive oil, divided
Instructions
1. Prepare the Olive Tapenade:
- Rinse the olives and pat them dry.
- In a small food processor, combine olives, garlic, capers, basil, olive oil, lemon juice, and white pepper.
- Pulse the mixture until it achieves a coarse consistency, scraping down the sides as needed. Set aside.
2. Making the Focaccia Dough:
- In a large bowl, combine the yeast, water, and sugar. Let it sit until the yeast blooms and appears creamy.
- Using a wooden spoon, stir in the flour and salt, mixing until the dough comes together.
- Turn the dough out onto a lightly floured work surface and knead a few times. If the dough is sticky, lightly flour your hands but avoid making the dough too stiff.
3. Prepare the Baking Sheet:
- Lightly sprinkle water onto a 15″x10″ rimmed baking sheet.
- Line the baking sheet with parchment paper.
- Spread 2 tablespoons of olive oil evenly over the parchment paper.
4. Shape and Rise the Dough:
- Place the kneaded dough onto the prepared baking sheet.
- Gently stretch and shape the dough to fit the pan.
- Cover the pan with plastic wrap and let the dough rise until it slightly surpasses the edges of the pan, approximately 45-60 minutes.
5. Preheat the Oven:
- As the dough nears the end of its rising time, preheat the oven to 400° F.
6. Add Toppings and Bake:
- Evenly spread the prepared tapenade over the risen dough.
- Drizzle the remaining tablespoon of olive oil on top.
- Place the baking sheet in the preheated oven and bake for about 25 minutes or until the focaccia turns golden and has crisp edges.
7. Cooling:
- After baking, carefully slide the focaccia (with the parchment paper) onto a wire rack.
- Allow it to cool slightly.
8. Serving:
- Enjoy the focaccia while warm or at room temperature.
Notes
- Olive Varieties: Feel free to experiment with different types of olives for the tapenade. Just ensure they’re pitted for a smoother tapenade.
- Dough Consistency: The focaccia dough should be a bit sticky but still manageable. If it’s too wet, add a little more flour, but be careful not to overdo it as this can make the bread dry and dense.
- Rising Location: For optimal rising, place the dough in a warm, draft-free spot. If your kitchen is particularly cold, consider placing the dough inside an oven (turned off) with the light on.
- Olive Oil Quality: Using a high-quality extra virgin olive oil can elevate the flavor profile of both the tapenade and the bread itself.
- Storing: If you have leftovers, store the focaccia in an airtight container or wrapped in plastic wrap at room temperature for up to 2 days. For longer storage, consider freezing the bread and warming it in the oven before serving.
- Serving Suggestions: Focaccia pairs wonderfully with soups, salads, or as a side to pasta dishes. It’s also delicious when sliced horizontally and used for sandwiches.
- Herb Variations: If you’d like, you can add rosemary, thyme, or other favorite herbs to the dough or sprinkle on top before baking for added flavor.
- Salt Variation: For a more gourmet touch, consider sprinkling flaky sea salt or kosher salt on top of the focaccia just before baking.
- Topping Variations: Beyond the olive tapenade, focaccia is versatile and can be topped with a variety of ingredients. Consider using sun-dried tomatoes, thinly sliced onions, roasted garlic cloves, cherry tomatoes, or even feta cheese crumbles. Or go the sweeter route and top with strawberry slices and mascarpone cheese.
- Prep Time: 75 mins
- Cook Time: 25 mins
- Category: Baking, Bread, Pane
- Method: Baking
- Cuisine: Italian
Nutrition
- Serving Size: 2 slices
- Calories: 250
- Sugar: 1g
- Sodium: 400mg
- Fat: 10g
- Saturated Fat: 1.5g
- Unsaturated Fat: 7g
- Trans Fat: 0g
- Carbohydrates: 35g
- Fiber: 2g
- Protein: 5g
- Cholesterol: 0mg









Delicious bread, I reckon you can’t go wrong with focaccia and tapenade. Easy to make too!
I am a retired career chef. For some reason, I never made focaccia. This recipe is superb. I knew the wax paper in the instructions was a simple error, and I used parchment paper.
If this were served to me in a cafe, I would be delighted. Wonderful!
Thank you for your kind comment Susan, and yes, it should definitely be parchment paper – will update. Thank you again!
Wax paper? You should NEVER put wax paper in the oven. Please use parchment/baking paper. It’s a bit hard to believe you are a food writer if you don’t know this simple step. =(