
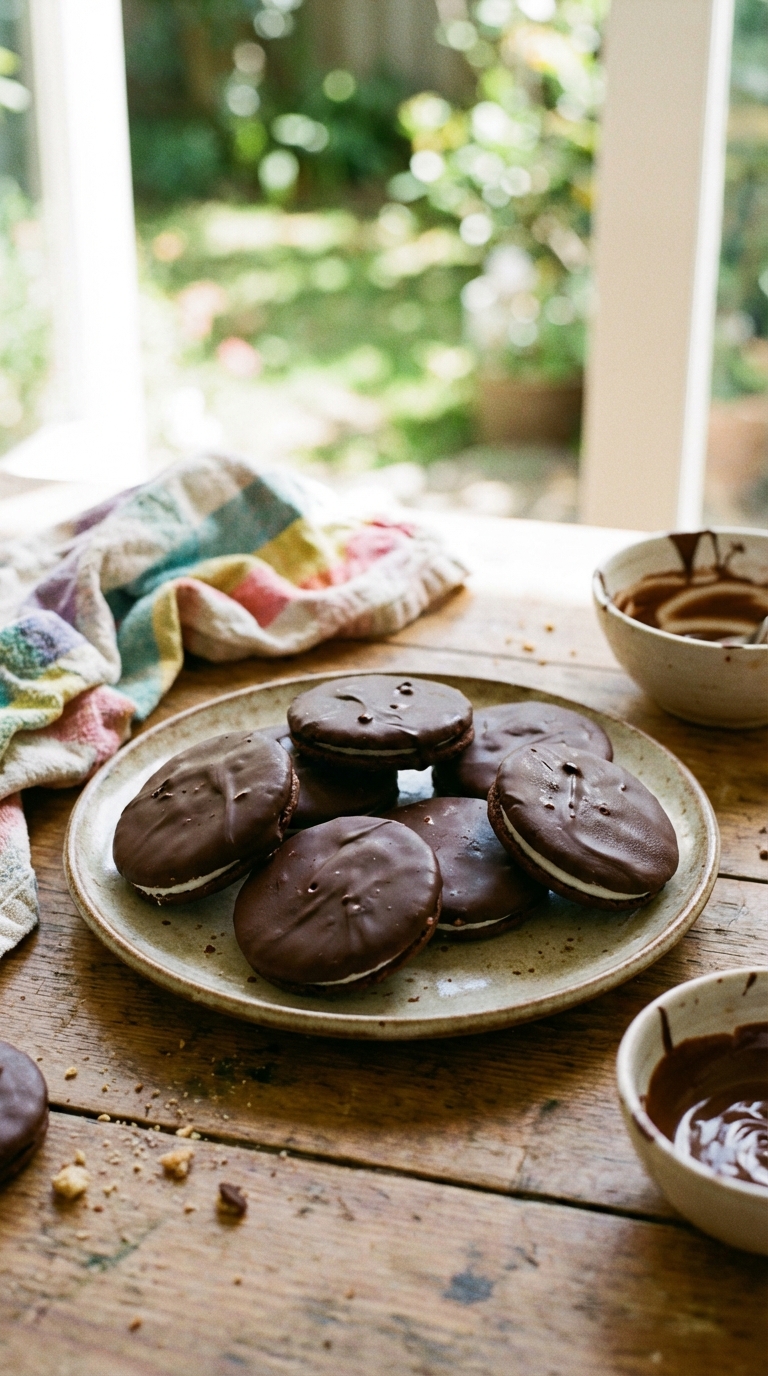
In Australia, we have a cookie called Mint Slice, and it’s absolutely delicious. It’s a chocolate cookie topped with mint cream and smothered in dark chocolate. It’s very close to the Thin Mint cookies sold by the US Girl Scouts, and also shares some similarities with the classic After Eight chocolates.
Mint Slice is one of my all-time favorite cookies, so I wanted to try my hand at creating my own version. I started with a crunchy chocolate cookie base. One of the great things about a Mint Slice is the combination of textures: the base is crunchy, the middle is creamy, and the whole thing is coated in chocolate. With the base nailed down, I moved on to the filling, and for that, I used a simple combination of powdered sugar and peppermint flavoring oil.
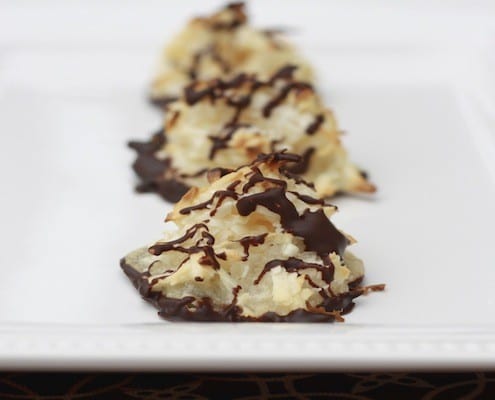
After spreading the peppermint icing over the cookies, I left it to set. Once it was ready, I dipped each cookie into a bowl of melted dark chocolate and let them set again. The only hiccup in the process was that I happened to pick two particularly humid days in Brisbane to make and photograph my creations. Melting chocolate in that weather was a challenge, but aside from that, the cookies taste very very close to the real thing.
While I’ll admit that making your own chocolate mint cookies at home can be a bit fiddly, the great thing is that you know exactly what ingredients go into them. Plus, you can adjust the intensity of the peppermint to suit your taste, or even swap the peppermint flavoring for something else entirely.
How to Make Chocolate Coated Peppermint Cream Cookies
1. Prepare the Dough:
- Preheat the oven to 350°F (180°C) and line two baking trays with parchment paper.
- In a food processor, combine the butter, caster sugar, and egg yolk. Blend until well combined and creamy.
- Add sifted flour and cocoa powder to the processor. Blend until the mixture starts to come together in a ball of dough.
- Divide the dough into two portions and flatten each into a disc. Wrap the discs in plastic wrap and refrigerate for 1 hour to chill.
2. Roll and Cut the Dough:
- Remove one disc of dough from the refrigerator. Roll it out between two sheets of parchment paper to about 1/4 inch (6mm) thickness.
- Use a small circular cookie cutter to cut out cookies from the dough, placing them on the prepared baking trays.
- Bake for 8-10 minutes, until firm but not too browned. Allow the cookies to cool on the tray for a few minutes before transferring them to a wire rack to cool completely.
- Repeat the process with the second disc of dough.
3. Make the Peppermint Cream:
- In a medium bowl, mix together the sifted powdered sugar, peppermint extract, and hot water until it forms a smooth, spreadable paste.
- Taste the cream and adjust the peppermint extract as needed. Be cautious, as too much peppermint may make the cookies taste overly minty.
- Spread the peppermint cream over each cooled cookie and allow it to set before proceeding to the next step.
4. Dip in Chocolate:
- Line a wire rack with parchment paper to catch any drips.
- Melt the chocolate in a heatproof bowl over a pot of simmering water, stirring until smooth. Once melted, remove from heat.
- Dip each cookie into the melted chocolate, ensuring they are fully coated. Place the cookies back on the wire rack and let the chocolate set.
5. Serve:
- Once the chocolate has fully set, your peppermint cream cookies are ready to enjoy!
Recipe Notes:
Homemade Mint Slice: Chocolate Coated Peppermint Cream Cookies
- Total Time: 40 minutes
- Yield: Makes 24
- Diet: Omnivore
Description
Crisp chocolate cookies filled with creamy peppermint and dipped in dark chocolate. A classic Aussie treat!
Ingredients
- 7 tbsp butter (100 g) butter
- 1 cups (237 ml) all-purpose flour
- 2 tbsp (20 g) cocoa powder
- 0.5 cups (100 g) caster sugar
- 1 egg yolk
- 2 cups (473 ml) powdered sugar
- 0.25 tsp peppermint extract
- 2 tbsp hot water
- 1 lbs (400 g) dark chocolate
Instructions
- Preheat the oven to 350°F (180°C) and line two baking trays with parchment paper.
For the Dough
- In a food processor, combine the butter, caster sugar, and egg yolk. Blend until well combined and creamy.
- Add sifted flour and cocoa powder to the processor. Blend until the mixture starts to come together in a ball of dough.
- Divide the dough into two portions and flatten each into a disc. Wrap the discs in plastic wrap and refrigerate for 1 hour to chill.
For Rolling and Cutting the Dough
- Remove one disc of dough from the refrigerator. Roll it out between two sheets of parchment paper to about 1/4 inch (6mm) thickness.
- Use a small circular cookie cutter to cut out cookies from the dough, placing them on the prepared baking trays.
- Bake for 8-10 minutes, until firm but not too browned. Allow the cookies to cool on the tray for a few minutes before transferring them to a wire rack to cool completely.
- Repeat the process with the second disc of dough.
For the Peppermint Cream
- In a medium bowl, mix together the sifted powdered sugar, peppermint extract, and hot water until it forms a smooth, spreadable paste.
- Taste the cream and adjust the peppermint extract as needed.
- Spread the peppermint cream over each cooled cookie and allow it to set.
For Dipping in Chocolate
- Line a wire rack with parchment paper to catch any drips.
- Melt the chocolate in a heatproof bowl over a pot of simmering water, stirring until smooth. Once melted, remove from heat.
- Dip each cookie into the melted chocolate, ensuring they are fully coated. Place the cookies back on the wire rack and let the chocolate set.
Serve
- Once the chocolate has fully set, your peppermint cream cookies are ready to enjoy!
Notes
- Use a good quality dark chocolate with a high cocoa percentage for the best flavor and melt.
- If the peppermint cream is too thick, add a tiny bit more hot water, 1/2 teaspoon at a time, until you reach desired consistency.
- To prevent the cookies from spreading too much during baking, chill the dough thoroughly and don’t overcrowd the baking trays.
- Prep Time: 30 minutes
- Cook Time: 10 minutes
- Category: Dessert
- Method: Baking
- Cuisine: Australian
Nutrition
- Serving Size: 1 cookie
- Calories: 200
- Sugar: 20
- Sodium: 50
- Fat: 12
- Saturated Fat: 7
- Unsaturated Fat: 4
- Trans Fat: 0g
- Carbohydrates: 25
- Fiber: 1
- Protein: 2
- Cholesterol: 20
Frequently Asked Questions
Why does the chocolate coating crack when I cut the slices?
The chocolate needs to be tempered or at least cooled slowly at room temperature rather than in the fridge. Chilling it too fast makes the coating brittle and prone to cracking when sliced.
How do I get the peppermint cream layer to set firmly enough to coat?
The cream layer needs to be well chilled and fully set before dipping. If it is still soft, the chocolate weight will cause it to squash and the coating will be uneven.
Can I adjust the peppermint intensity in the cream filling?
Yes, peppermint extract is strong so add it gradually and taste as you go. Too much will make the filling harsh rather than cool and minty.


These cookies are a holiday tradition in my house now! The peppermint cream is just the right amount of mint.
These cookies are dangerously good! Can’t wait to make them again.
These cookies are so good, I’m pretty sure I just cheated on Thin Mints. Sorry, Girl Scouts, but homemade wins this round!
As a certified Aussie – I formally endorse this recipe. Spot on, turned out so fantastic!!
I just ate a Mint Slice cookie (love them!) and decided to look for a recipe to make them at home and saw this one! This looks great, and I can’t wait to try them. Thank you!
These are so delicious! Thank you!
Hey there! These look like exactly what I am looking for but I was wondering do you have standard conversions for the measurements? I don’t have a scale! EDIT: THANKS FOR THE UPDATED INGREDIENT LIST WITH CONVERSIONS!