

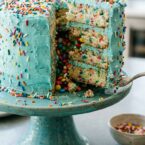
Candy-Filled Funfeti Piñata Cake
- Total Time: 2 hours 30 mins
- Yield: 12 servings
Description
If you’ve got a birthday or other celebration coming up, this just might be the sweetest, happiest, most colorful cake you can make.
Ingredients
for two layers (I made 6)
- 4 egg whites from large eggs
- 1 cup (240 ml) milk, divided
- 1 1/2 tsp vanilla
- 3 cups (720 ml) cake flour
- 1 1/2 cups (360 ml) white sugar
- 4 tsp baking powder
- 1/2 tsp salt
- 4 tbsp unsalted butter, very soft but not warm
- 8 tbsp shortening
- 2/3 cup (160 ml) multi-colored jimmies
for the frosting (will cover two layers)
- 2 cups (480 ml) confectioners' sugar
- 2 tbsp butter, softened
- 2 tbsp milk
- 1/2 tsp vanilla extract
Instructions
- Heat the oven to 350°F. Grease and flour two 9-inch round cake pans. In a small bowl mix the egg whites, 1/4 cup milk,and the vanilla extract.
- In the bowl of a stand mixer mix the cake flour, sugar, baking powder, and salt. Mix until evenly combined. Add the butter and shortening and mix on medium speed until well-combined with the flour mixture (about 30 seconds). Pour in the remaining 3/4 cup milk and continue mixing on medium speed for about 3 minutes. Scrape down the sides of the bowl twice during mixing.
- Pour the egg white mixture is 3 increments, mixing for 30 seconds after each addition. Mix for one more minute after all of the egg white has been added. Fold in the multi-colored jimmies.
- Divide the batter evenly between the prepared cake pans and bake for 25 to 30 minutes or until the middle of the cake springs back when you lightly poke it with your finger.
- Remove the layers from the oven and place the pans on baking racks to cool for about 10 minutes. This is really important. To get the cake out of the pans, there are many techniques, but I grab the pans (after loosening the cake with a spatula) and turn it into my flat hand, then flip them (right side up) onto the cooling rack. Some people use a plater instead of their hand, that will work, too.
for the frosting
- Beat all of the ingredients until completely smooth. To make it this aqua blue color, use 3 drops of blue gel coloring, and 1 drop of green and mix until the color is solid. If your batch is doubled or tripled, you can increase the number of drops but make sure it’s a 3 to 1 ratio.
for the assembly
- Place one layer on your cake stand/plate with a tiny dab of frosting here the center of the cake will be. (This keeps it from sliding around when you’re assembling it and frosting it.) Using a ziplock bag with the corner cut out (or a piping bag if you’re fancy) to pipe a single line of frosting around the edge of the layer (about 1/8″ from the edge). Place layer number two evenly in the middle and repeat the piping procedure. Then take a large sharp knife (not serrated!) and cut a 5″ wide circle in the middle and take out what you have cut. This doesn’t have to be an exact science. Repeat with however many layers you make. All of them should have holes in the middle except for the top and bottom layers. Then pick your favorite candy and fill it 3/4 full. Place for final layer on top.
- To make a cake really pretty, I do a crumb coat. You’ll use just about half a cup of frosting and spread a very thin, but very straight and flat layer all around the cake. Then you chill it for at least an hour. Then when you go to frost it for real, none of the crumbs will make it into your frosting. It’ll also give you a more solid and workable surface so you can get your frosting just right!
- After that I just dumped a TON of sprinkles on top. To get the cascading look on the side I literally threw tiny handfuls of sprinkles at the top of the side edge and a few strays landed further down.
- Prep Time: 2 hours
- Cook Time: 30 mins
- Category: Cake
- Cuisine: American
Nutrition
- Serving Size: 1 slice
- Calories: 420
If You Liked This Recipe, You’ll Love These
- Tres Leches Cake Donuts with Dulce de Leche Glaze
- Easy Homemade Banana Loaf – The Ultimate Classic Recipe
- Lemon Cream Cake: Light, Buttery, and Irresistible
- Maritozzi con la Panna: Cream Filled Italian Buns
Frequently Asked Questions
How do I create the hollow candy-filled center without splitting the cake?
After stacking all layers with a piped ring of frosting around the edge (about 1/8 inch from the edge), use a large sharp non-serrated knife to cut a 5-inch circle through the middle layers only — not the top or bottom layers. Remove the cut pieces, fill the cavity 3/4 full with candy, then place the final top layer on to seal it. The top and bottom layers are left intact to contain the candy.
What is a crumb coat and why does the recipe require it?
A crumb coat is a thin, flat layer of frosting (about 1/2 cup) spread all around the cake and then chilled for at least one hour. The instructions explain that it traps loose crumbs so they don’t contaminate the final frosting layer, and it creates a firm, even surface that makes the outer coat easier to apply cleanly.
How do I get the aqua-blue frosting color shown in the recipe?
The instructions give the exact ratio: 3 drops of blue gel food coloring and 1 drop of green gel food coloring mixed into the frosting. The 3-to-1 ratio is maintained even if you double or triple the frosting batch — increase the number of drops but keep that proportion.
want to see step by step how it made