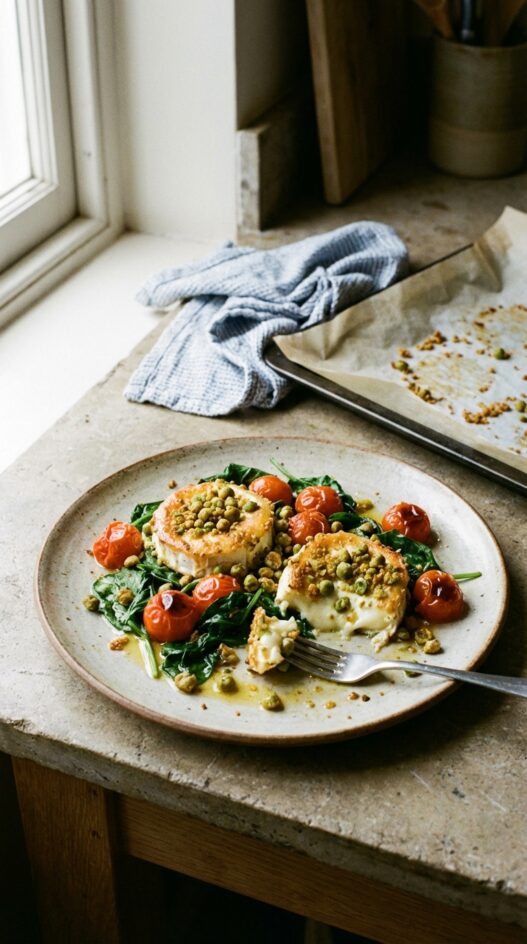

A friend brought this to a dinner party years ago and I spent the whole evening trying to figure out what the coating was. Wasabi peas: that was it. Crushed wasabi peas pressed onto rounds of cold goat cheese, frozen briefly to firm up, then baked until warm through and just starting to brown on the edges. Sharp and creamy at the same time, with a crunch that holds up to the heat. I have made it for almost every dinner party since. It works as an appetizer on its own or perched on a handful of dressed greens with some cherry tomatoes.
How to Make Baked Wasabi Pea Goat Cheese
Crushing the peas
A zip bag and a rolling pin works well. You want a rough, uneven crumb rather than a fine powder. Some larger pieces in the coating give better texture after baking. A food processor on pulse gets the job done faster if you want something more consistent.
Freezing before baking
Fifteen minutes in the freezer is essential. Cold, firm goat cheese holds its shape in the oven and keeps the crust attached. Rounds that skip this step tend to slump and the coating slides off before it can set.
On the salad
Place the warm rounds on greens right out of the oven. The heat wilts the leaves slightly and the cheese starts to soften at the edges. A simple lemon and olive oil dressing is enough. No need for anything richer against the goat cheese.

Baked Wasabi Pea Goat Cheese
- Total Time: 15 minutes
- Yield: 2 servings
- Diet: Omnivore
Description
Creamy goat cheese gets a spicy kick from wasabi peas, then bakes to golden perfection. A simple yet elegant appetizer or salad topper.
Ingredients
- 1/2 cups (118 ml) wasabi peas, crushed
- 4 oz (113 g) log of goat cheese
- your favorite salad or spinach leaves
- handful of cherry tomatoes
Instructions
- Add the wasabi peas to a ziplock bag and crush using your hands, rolling pin, or meat tenderizer.
- Slice the goat cheese into 1/2-1 inch wide rounds and coat evenly with wasabi peas.
- Place a sheet of parchment paper on a baking sheet and place the goat cheese rounds on it.
- Freeze the wasabi-coated goat cheese for 15 minutes; meanwhile, preheat the oven to 400°F (204°C).
- Bake for 8-10 minutes until the goat cheese is soft and the peas are a golden brown.
- Use immediately on your favorite salad or crackers.
Notes
Aim for a rough, uneven crush on the peas — some larger pieces give better crunch after baking. The freeze step is essential: cold cheese holds its shape and keeps the crust attached during baking.
- Prep Time: 5 minutes
- Cook Time: 10 minutes
- Category: Appetizer
- Method: Oven-Baking
- Cuisine: Fusion
Nutrition
- Serving Size: 1 piece
- Calories: 100
- Sugar: 1
- Sodium: 100
- Fat: 8
- Saturated Fat: 5
- Unsaturated Fat: 2
- Carbohydrates: 5
- Fiber: 1
- Protein: 3
- Cholesterol: 10
Frequently Asked Questions
Can I use a different cheese instead of goat cheese?
Brie or camembert rounds would work, though the flavor profile changes significantly. Goat cheese holds its shape best when coated and baked at this temperature.
Why do I need to freeze the coated goat cheese before baking?
The freezing step firms the cheese so it softens in the oven without completely melting and losing its round shape. Skipping this step usually results in a flat, spread-out mess.
How fine should I crush the wasabi peas?
Aim for a rough crush with a mix of sizes. Some fine crumbs help the coating stick, while larger pieces give you better crunch after baking.