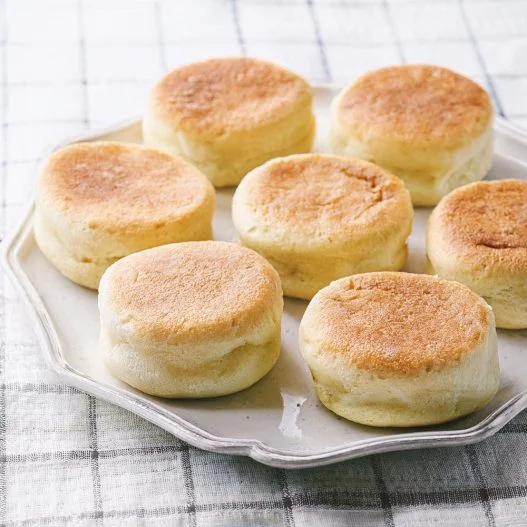

Made with simple ingredients, these English muffins are filled with nooks and crannies. They are cooked on the stovetop and then finished in the oven for the perfect golden crust.
Numerous occasions call for a breakfast sandwich, and most of them probably lean toward convenience. Rushing out the door for work or grabbing a Saturday afternoon hangover cure, the breakfast sandwich has long been the go-to food for those on the move. But if we take a step back and rethink this morning meal for what it truly is—a blank canvas—the possibilities become infinitely more varied, and the experience far more enjoyable.
As with most sandwiches, the magic is in the bread. You can put almost anything between two slices, but if the bread isn’t good (think: soggy, rough, stale!), the magic is lost. We can avoid this carbohydrate conundrum by making the bread ourselves—in this case, English muffins. 
English muffins are one of the most satisfying and easy breads to make. Perfectly sized for burgers, sandwiches, or toast, they’re versatile enough for breakfast, lunch, or dinner. This recipe takes extra steps to ensure the signature nooks and crannies (so coveted in certain brands) are present—just remember to split them with a fork! Make the full batch, and you’ll have muffins to spare. Slather them with butter and jam, poach an egg and whip up hollandaise for eggs Benedict, or do as I do: make a breakfast sandwich piled high with a fried egg, bacon, slices of Granny Smith apple, and a swipe of Dijon mustard.
How to Make English Muffins at Home
1. Heat the Milk and Butter
- In a small saucepan over low heat, combine the milk and butter. Warm until the butter melts, then remove from heat. Let the mixture cool slightly until it’s warm to the touch but not hot, around 105-110°F (40-43°C).
2. Combine Dry Ingredients
- In a large mixing bowl (or the bowl of a stand mixer), sift together the flour, kosher salt, sugar, baking soda, and instant yeast.
3. Mix the Dough
- Add the warm milk-butter mixture and the lightly beaten egg to the dry ingredients.
- Using a stand mixer fitted with a dough hook or by hand, mix until the dough begins to come together. Knead for 5-6 minutes on medium speed (or about 8 minutes by hand) until smooth and slightly sticky. The dough should feel damp and velvety.
4. Roll Out the Dough
- Turn the dough onto a floured surface. Roll it out to about 1-inch (2.5 cm) thickness using a rolling pin.
- Use a round cutter, English muffin ring, or a large canning jar lid to cut out muffin rounds, about 3 inches in diameter. Place each round on a baking sheet dusted with cornmeal.
5. Dust and Rest the Muffins
- Lightly dust the tops of each muffin with additional cornmeal.
- Cover the muffins with a clean kitchen towel and let them rise at room temperature for about 20 minutes. This short rise helps achieve that classic airy texture.
6. Cook the Muffins on the Stovetop
- Heat a large cast-iron skillet or non-stick pan over low heat. You want a low and steady heat to prevent burning.
- Place a few muffins in the skillet, spacing them apart to allow room to expand. Cook for 3-5 minutes on each side until golden brown and slightly crisp on the outside. The muffins should rise slightly during cooking.
7. Finish in the Oven
- Once the muffins are golden brown on both sides, transfer them to a baking sheet.
- Preheat the oven to 325°F (165°C). Bake the muffins for an additional 12-15 minutes to finish cooking the centers.
8. Split and Serve
- Allow the muffins to cool slightly. To open, use a fork to split them in half (this helps keep the nooks and crannies intact).
- Toast and serve warm with butter, jam, or your favorite toppings.
Recipe Notes
- Instant Yeast: Instant yeast can be added directly to dry ingredients without proofing, making the process faster and easier.
- Fork-Splitting: Use a fork rather than a knife to split your muffins for the best texture. This preserves the nooks and crannies.
- Cast-Iron Cooking: Cast iron is ideal for cooking the muffins as it retains heat well, but any heavy skillet will work. Just be sure to keep the heat low.

Homemade English Muffins
- Total Time: 1 hour 15 minutes
- Yield: 12-14 muffins 1x
Description
Made with simple ingredients, these English muffins are filled with nooks and crannies. They are cooked on the stovetop and then finished in the oven for the perfect golden crust.
Ingredients
Instructions
1. Heat the Milk and Butter
- In a small saucepan over low heat, combine the milk and butter. Warm until the butter melts, then remove from heat. Let the mixture cool slightly until it’s warm to the touch but not hot, around 105-110°F (40-43°C).
2. Combine Dry Ingredients
- In a large mixing bowl (or the bowl of a stand mixer), sift together the flour, kosher salt, sugar, baking soda, and instant yeast.
3. Mix the Dough
- Add the warm milk-butter mixture and the lightly beaten egg to the dry ingredients.
- Using a stand mixer fitted with a dough hook or by hand, mix until the dough begins to come together. Knead for 5-6 minutes on medium speed (or about 8 minutes by hand) until smooth and slightly sticky. The dough should feel damp and velvety.
4. Roll Out the Dough
- Turn the dough onto a floured surface. Roll it out to about 1-inch (2.5 cm) thickness using a rolling pin.
- Use a round cutter, English muffin ring, or a large canning jar lid to cut out muffin rounds, about 3 inches in diameter. Place each round on a baking sheet dusted with cornmeal.
5. Dust and Rest the Muffins
- Lightly dust the tops of each muffin with additional cornmeal.
- Cover the muffins with a clean kitchen towel and let them rise at room temperature for about 20 minutes. This short rise helps achieve that classic airy texture.
6. Cook the Muffins on the Stovetop
- Heat a large cast-iron skillet or non-stick pan over low heat. You want a low and steady heat to prevent burning.
- Place a few muffins in the skillet, spacing them apart to allow room to expand. Cook for 3-5 minutes on each side until golden brown and slightly crisp on the outside. The muffins should rise slightly during cooking.
7. Finish in the Oven
- Once the muffins are golden brown on both sides, transfer them to a baking sheet.
- Preheat the oven to 325°F (165°C). Bake the muffins for an additional 12-15 minutes to finish cooking the centers.
8. Split and Serve
- Allow the muffins to cool slightly. To open, use a fork to split them in half (this helps keep the nooks and crannies intact).
- Toast and serve warm with butter, jam, or your favorite toppings.
Notes
Instant Yeast: Instant yeast can be added directly to dry ingredients without proofing, making the process faster and easier.
Fork-Splitting: Use a fork rather than a knife to split your muffins for the best texture. This preserves the nooks and crannies.
Cast-Iron Cooking: Cast iron is ideal for cooking the muffins as it retains heat well, but any heavy skillet will work. Just be sure to keep the heat low.
- Prep Time: 30 min
- Rising Time: 20 min
- Cook Time: 25 min
- Category: Baking
- Method: Baking
- Cuisine: British
Nutrition
- Serving Size: 1 muffin
- Calories: 180
- Sugar: 2g
- Sodium: 270mg
- Fat: 4g
- Saturated Fat: 2g
- Unsaturated Fat: 1g
- Trans Fat: 0g
- Carbohydrates: 31g
- Fiber: 1g
- Protein: 5g
- Cholesterol: 120mg


My whole weekend project was these from scratch, and every one of those nooks and crannies actually showed up, no sad plastic package in sight. I cooked them on the stovetop first and slid them into the oven to finish, and that perfect golden crust was the payoff. The breakfast sandwich I built afterward might be the best I have made in ages. Completely hooked!
Followed the recipe exactly, and they turned out like the ones at my favorite café!
I mean, these are pretty dang close to the store bought version. I have not found a recipe that is closer to be honest.
Was a hit with the kids, I think I did mess it up a little, but it was delicious anyway.
Tried this for the first time, and wow, I’m never going back to packaged muffins!