
These Croissant Buns make for an excellent baking project for a cozy winter weekend. Start by making a homemade laminated dough on Friday evening and they’ll be ready to devour over the weekend.
I’ve had an obsession with buttery, flaky pastries for as long as I can remember. I like to complain that we don’t have a decent bakery here on the island, but really, it’s a blessing in disguise. I would never be able to demonstrate enough self control to live in a place that has homemade pastries available anytime I want.
However, sometimes I really do wish there was a good bakery nearby in order to instantly satisfy my cravings for all things buttery and flaky. Because making them yourself? It’s far from instant. This recipe falls under the “labor of love” category. If you, like me, love buttery, flaky pastries and long, challenging baking projects, then this post is for you. Read on.
Morning buns aren’t super common here on the east coast. They’re much more of a midwestern / west coast thing. They fall into the same category as cinnamon rolls, but morning buns tend to be a little lighter, not as sweet, and usually made with a puff pastry or croissant-like dough. I made this recipe first since it had “best” in the title, but it used more of a brioche dough, and while they certainly weren’t bad, they just weren’t what I was after. That’s why I’ve specified croissant morning buns in the title, because that’s what these are: a glorious mashup between a croissant and a sticky bun.
Croissant dough is what’s known as a laminated dough, like puff pastry or danish. Lamination refers to the process of rolling and folding thin sheets of butter in dough to create puffed layers and crispy flakes once baked. This is perhaps one of the more intimidating baking procedures, and while I’m certainly no stranger to the struggle, it’s a fun and rewarding technique to learn. Don’t get frustrated if yours don’t turn out perfect the first time – it’s normal. Baking, like anything else, is a practice. But unlike most other things, even when the results are less-than-perfect, they’re usually still pretty delicious – and that always counts as a win in my book.
This recipe is a slight adaptation from the famous Tartine morning buns. Tartine is the be-all-end-all of the bread and pastry world. My friend Brieann used to work at their flagship bakery San Francisco and a few years ago she gifted me one of their cookbooks. The Tartine books are all beautiful and intensely detailed for anyone seriously interested in baking, whether as a career or hobby. While I am technically a professional and I did take a baking class in culinary school, I still consider myself to be more of a hobbyist when it comes to baking. I love working with my hands and experimenting with different techniques, but I find it too finicky and frustrating to ever do on a larger scale.
This recipe isn’t quite as labor intensive as it may seem, but it does take a good bit of time, most of it inactive. Your best bet is to start on a Friday evening, work on it all day Saturday, and then have it ready to bake off Sunday morning. As long as you don’t have to leave the house for longer than an hour on Saturday, the process can actually be pretty leisurely, and definitely a lot of fun.
The first step of the recipe is to make a preferment, which adds structure and flavor to the dough. From there, the dough is made and then the lamination happens. This step is the trickiest, but don’t let it scare you. The key, as I’ve learned, is to have the butter at the right consistency. You want it somewhere between firm and soft, cool, but not cold, and definitely not warm. It needs to be malleable enough to spread into an even layer, but not so soft that it’s like icing a cake. The best way to achieve this is by beating cold butter in a stand mixer for a few minutes. Focus on getting this right and you shouldn’t have any problems.
The butter gets spread out onto the dough and then folded again and again. This is what creates all those gorgeous flaky layers. After each fold or “turn”, the dough will need to chill a bit before doing it again. The folding itself is really pretty quick and easy, but it’s the overall process that can seem daunting.
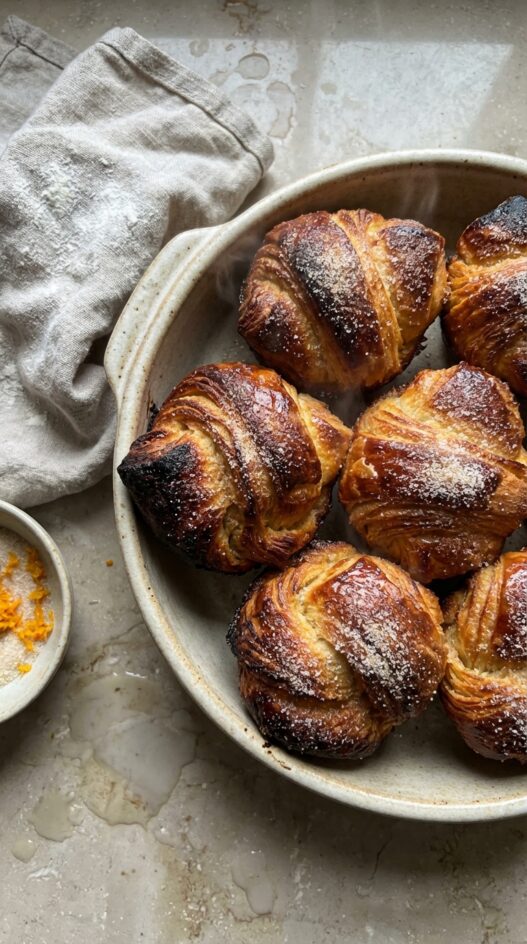
The laminated dough then gets rolled up with a filling of (more) butter, cinnamon, sugar, and orange zest, then gets plopped into a buttered and sugared muffin tin. Once baked, the dough puffs up to become light and crisp, while the butter and sugar caramelize together to create the most incredible flavor and texture. The shattering crunch of the outer layers, the tender inner crumb, the sticky sweet caramel on the bottom, and the little bits of butter that gush out when you bite down. Come. Onnnnnn.
These morning buns are everything you could ever want on a lazy Sunday, and I promise they are most definitely worth the effort.
Click here for the filling recipe.
Print
Homemade Laminated Dough: Croissant Buns
- Total Time: 120 minutes
- Yield: 12 morning buns
- Diet: Omnivore
Description
Flaky, buttery croissant buns, perfect for brunch or a special occasion. Homemade laminated dough elevates this classic treat.
Ingredients
Preferment:
- 6 tbsp (90 ml) whole milk
- 1 1/2 tsp active dry or instant yeast
- 2/3 cup (80g) all-purpose flour
Dough:
- 2 tsp active dry or instant yeast
- 1 1/4 cups (296 ml) whole milk
- 3 cups (360g) all-purpose flour, plus more for dusting
- 3 tbsp (38g) granulated sugar
- 2 tsp kosher salt
- 1/2 tbsp unsalted butter, melted and cooled
Laminating butter:
- 22 tbsp (1 lb / 310g) unsalted butter, cool but pliable
Morning bun filling:
- 1/2 cup (100g) granulated sugar
- 2 tbsp packed light brown sugar
- Zest of 2 large oranges (about 2 tbsp)
- 1 1/2 tsp ground cinnamon
- 1/4 tsp fine salt
- 3 tbsp unsalted butter, melted (for brushing the dough)
For the pan and finishing:
- 1 tbsp unsalted butter, melted (for greasing muffin tin)
- 3 tbsp granulated sugar (for dusting tin and finishing)
Instructions
Make the preferment:
- Heat the 6 tbsp milk in a small saucepan over medium-low heat until warm (80–90°F / 27–32°C). Transfer to a medium bowl and stir in the yeast. Let sit for 1 minute, then mix in the flour until smooth. Cover and let rise until doubled, about 2–3 hours at room temperature or overnight in the refrigerator.
Make the dough:
- Place the preferment in the bowl of a stand mixer fitted with the dough hook. Add the yeast and mix on medium speed for about 4 minutes, scraping down the sides as needed.
- Add half the milk and continue mixing on medium speed until fully incorporated. Add the remaining milk along with the flour, sugar, salt, and melted butter. Mix on low until the dough comes together in a shaggy mass, about 3 minutes. Cover and rest for 20 minutes.
- Return to low speed and mix until the dough is smooth and elastic, about 3–4 more minutes. Cover and let rise until the volume increases by half, about 1–2 hours.
- Dust a work surface with flour. Place the dough on top, press into a rectangle about 2 inches thick, wrap in plastic, and refrigerate for 4–6 hours.
Laminate the dough:
- About 1 hour before laminating, beat the cold laminating butter in the stand mixer with the paddle attachment until smooth and slightly softened. Shape into a flat rectangle on a sheet of plastic wrap. Keep at room temperature if the kitchen is cool, or refrigerate briefly if warm — the butter should be pliable but not soft.
- On a lightly floured surface, roll the dough into a 20 x 10-inch rectangle with the long side facing you. Spread the butter over the left two-thirds of the dough, leaving the right third bare.
- Fold the bare third over the buttered center, then fold the remaining buttered third over that (like a letter). Pinch the seams to encase the butter completely. Turn the dough 90 degrees, then roll out to another 20 x 10-inch rectangle. Fold into thirds again. Wrap loosely in plastic, place on a sheet pan, and refrigerate for 1–2 hours.
- Repeat the roll-and-fold one more time. Rewrap and refrigerate for an additional 1–2 hours, or overnight.
Assemble and bake the morning buns:
- Mix the granulated sugar, brown sugar, orange zest, cinnamon, and salt in a small bowl until well combined.
- Brush the cups of a 12-cup muffin tin generously with the 1 tbsp melted butter, then coat each cup with a sprinkle of granulated sugar. Line a sheet pan with parchment paper.
- On a lightly floured surface, roll the dough out to a 16 x 12-inch rectangle. Brush the surface with the 3 tbsp melted butter, then sprinkle the sugar-cinnamon filling evenly over the top, leaving a small border.
- Starting from the long edge nearest you, roll the dough into a tight log. Pinch the seam to seal. Transfer the log to the parchment-lined sheet pan, cover loosely with plastic wrap, and refrigerate for 30 minutes.
- Using a sharp knife, cut the log into 12 even rounds. Place each round cut-side up in a muffin cup. Cover loosely with plastic wrap and let proof in a warm spot until the buns are puffed and filling the cups, about 1 hour.
- Preheat the oven to 375°F (190°C). Set the muffin tin on a foil-lined sheet pan (to catch any drips) and bake until deep golden brown, 45 minutes to 1 hour.
- Immediately dust the tops generously with granulated sugar as soon as the buns come out of the oven. Let them sit in the tin for 2–3 minutes, then gently remove and cool upside down on a wire rack. Serve warm.
Notes
The butter for laminating must be cold but pliable — like soft modeling clay. Beat cold butter in the stand mixer for a few minutes to reach the right texture. The whole process spans 2–3 days: start the preferment Friday evening, laminate on Saturday, bake Sunday morning. These freeze beautifully — wrap cooled buns tightly in plastic then foil and freeze for up to 3 months. Thaw overnight in the refrigerator.
- Prep Time: 60 minutes
- Cook Time: 60 minutes
- Category: Baking
- Method: Baking
- Cuisine: French-Inspired
Nutrition
- Serving Size: 1 bun
- Calories: 400
- Sugar: 25
- Sodium: 200
- Fat: 25
- Saturated Fat: 15
- Unsaturated Fat: 8
- Carbohydrates: 50
- Fiber: 2
- Protein: 5
- Cholesterol: 50
Frequently Asked Questions
What type of flour should I use for the laminated dough?
Use all-purpose flour for the laminated dough to achieve the right balance of structure and flakiness.
How do I know when the dough has been properly laminated?
The dough is properly laminated when you can see distinct layers of butter and dough after rolling it out, and it should be elastic yet easy to roll.
Can I substitute the butter in the croissant dough?
For the best results, it’s recommended to use high-quality unsalted butter for the layers, as substitutions can affect the texture and flavor.