I have a long, torrid relationship with yeast. I don’t mean that in a sexy way, as if we were star-crossed lovers, destined to forever pass each other by the most improbable of circumstances. I mean that yeast has been the culprit behind most of my major kitchen failures – that challah bread that never rose more than a centimeter despite my coddling and pleading; the brioche au chocolat that seemed to be going well until I realized I made a calculation error and ended up with mostly brioche and minimal chocolat; or the Portuguese sweet bread that looked deceptively delicious but wasn’t worth the effort in the end – the common perpetrator is forever yeast.
Now, I’m no quitter, so I’ve continuously tried my hand at bread baking time and time again, yet the yeast conquers me every time. I’ve tried different brands, new recipes, and varying techniques. I checked out every self-help book in the I Hate Yeast But It Doesn’t Have to Be That Way section of my local library. My efforts have consistently been in vain.
One of the driving factors behind the madness is the insistence of most recipes that you “feel” your way about the dough. Now, I am all for feeling our feelings, but it’s quite impossible to know how something ought to look or feel when you’ve never had success with it, especially when it comes to quantities that are often less than helpful, like an ingredient list that reads “4-6 cups of flour.” There is just entirely too much room for error with a margin like that.
Lately, I’ve become more and more discouraged when it comes to yeast baking. I used to be all bright-eyed and bushy-tailed about it, making notes as I went and trying to figure out what went wrong so I could tweak it for next time. But after multiple flops, I was waving my little white flag of surrender from behind the kitchen island, covered in flour and despair. But this past weekend, I’m not sure what came over me, but I marched into the kitchen with a crazy look in my eye and pulled out my King Arthur Flour Cookbook. I don’t use it very much, and after flipping through it, I’m not sure why because it’s loaded with smart tips and quality recipes, and I turned to the recipe for Honey Oat Bread. My palms were already sweating at the prospect of it; just thinking about twisting the top off the jar of yeast makes my nervous system kick in.
Holding my breath the entire time, I kneaded and mixed and floured and rolled until I had two perfect little almond colored loaves resting on my back porch for their second rise. Feeling incredibly proud already, I re-read the directions for baking and was instantly stumped. It said to put the loaves in a cold oven and heat it to 400 degrees F for 15 minutes. Did that mean 15 minutes after it hits 400 degrees or 15 minutes from the time I put it in the cold oven? Fortunately, the lovely people at King Arthur Flour have a baking hotline for dilemmas like this and they set me on the straight and narrow.
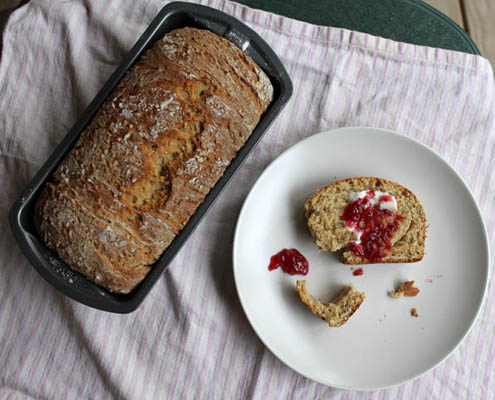
Now I am careful to never proclaim victory over yeast until after I’ve tasted it, after all, I’ve had countless yeasted treats look and feel just perfect, only to pop them in my mouth and immediately want to spit it back out. So I smeared a bit of soft butter and a nudge of raspberry jam onto a slice of the bread after it had cooled a bit, closed my eyes and took a bite. It was dense at first, and I mean that in a very good way, a bit chewy with a tightly woven crumb and little nubbly bits of oats freckled throughout the loaf. The crust isn’t terribly thick, but it’s just craggy enough to require an extra chew. I took another bite, and then cut myself another slice, then another until I realized I’d eaten nearly half the loaf and declared victory.
Print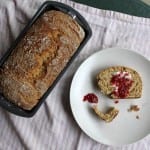
Honey Oat Bread
- Total Time: 3 hours 15 minutes
- Yield: 2 loaves
Description
This Honey Oat Bread is a triumph over yeast, featuring a dense, chewy crumb with oats throughout and a lightly craggy crust.
Ingredients
- 1 1/2 cups (12 oz.) boiling water
- 1 cup (8 oz.) rolled or steel-cut oats
- 1/2 cup (4 oz.) honey
- 4 tbsp unsalted butter
- 1 tbsp kosher salt
- 1 tbsp active dry yeast
- 1/4 cup (2 oz.) warm water (110°F / 45°C)
- 4-6 cups (17-25 oz.) all-purpose flour
- 1/4 cup (2 oz.) dry milk powder
- 1/4 cup (2 oz.) vegetable oil
- 1/4 cup (2 oz.) additional honey
- 1 egg, beaten (for egg wash)
Instructions
- In a large mixing bowl, combine the oats, honey, butter, and salt. Pour the boiling water over the mixture and stir to combine. Set aside to cool to room temperature.
- In a small bowl, dissolve the yeast in warm water and let it sit for about 5 minutes until foamy.
- Once the oat mixture has cooled, add the yeast mixture, 4 cups of flour, dry milk powder, vegetable oil, and additional honey. Stir until a sticky dough forms.
- Turn the dough out onto a floured surface and knead for about 10 minutes, adding more flour as needed, until the dough is smooth and elastic.
- Place the dough in a greased bowl, cover with a damp cloth, and let rise in a warm place until doubled in size, about 1 to 1 1/2 hours.
- Punch down the dough and divide it into two equal pieces. Shape each piece into a loaf and place in greased loaf pans.
- Cover the pans and let the loaves rise again until doubled, about 45 minutes.
- Place the loaves in a cold oven. Set the oven to 400°F and bake for 15 minutes. Reduce the temperature to 350°F and bake for an additional 30 minutes, or until the loaves are golden brown and sound hollow when tapped.
- Remove from the oven and brush the tops with beaten egg for a shiny finish. Let cool on a wire rack before slicing.
Notes
- For best results, ensure your water is at the correct temperature for activating the yeast.
- If you’re unsure about the baking instructions, remember to start with a cold oven.
- This bread is delicious with butter and jam.
- Store in an airtight container for up to 3 days, or freeze for longer storage.
- Prep Time: 2 hours 30 minutes
- Cook Time: 45 minutes
- Category: Baking
- Cuisine: American
Nutrition
- Serving Size: 1 slice
- Calories: 200
- Sugar: 10
- Sodium: 250
- Fat: 5
- Carbohydrates: 35
- Fiber: 2
- Protein: 5
- Cholesterol: 10
If You Liked This Recipe, You’ll Love These
- How to Make Authentic Greek Tzatziki
- Creamy Cauliflower Soup with Garlic Bread
- Mujadara Recipe: Middle Eastern Lentils and Rice
- Boozy French Toast
Frequently Asked Questions
Why does this recipe start the loaves in a cold oven?
The recipe places the loaves in a cold oven, then sets it to 400°F for 15 minutes before reducing to 350°F for 30 more minutes. The author called the King Arthur Flour hotline specifically about this step — it means 15 minutes from the time you put the loaves in the cold oven, not 15 minutes after it reaches 400°F. The gradual heat rise gives the loaves one final oven spring.
Why does the recipe call for such a wide flour range (4-6 cups)?
The article directly addresses this frustration: the exact amount of flour depends on humidity, how the oats absorbed the boiling water, and how sticky your dough feels. Start with 4 cups after mixing the oat-honey-butter base with the yeast, then knead for about 10 minutes, adding flour as needed until the dough is smooth and elastic.
Why does the recipe pour boiling water over the oats before mixing the dough?
Pouring 1½ cups of boiling water over the oats, honey, butter, and salt softens the rolled oats and melts the butter. The mixture must cool completely to room temperature before the yeast is added — hot liquid would kill the yeast.


Please let me know if you’re looking for a article writer for your site. You have some really good posts and I feel I would be a good asset. If you ever want to take some of the load off, I’d absolutely love to write some material for your blog in exchange for a link back to mine. Please send me an e-mail if interested. Thanks!
King Arthur Flour makes a type of flour called White Whole Wheat – it’s a lighter version of whole wheat flour. I found mine at the regular grocery store, so it’s not a specialty item. If you can’t find it, you can substitute regular whole wheat but your bread will be a bit more dense.
Here’s what you’re looking for: http://www.kingarthurflour.com/shop/items/king-arthur-white-whole-wheat-flour-5-lb
white whole wheat flour? does that mean half and half or just plain white flour? can i sub bread flour?