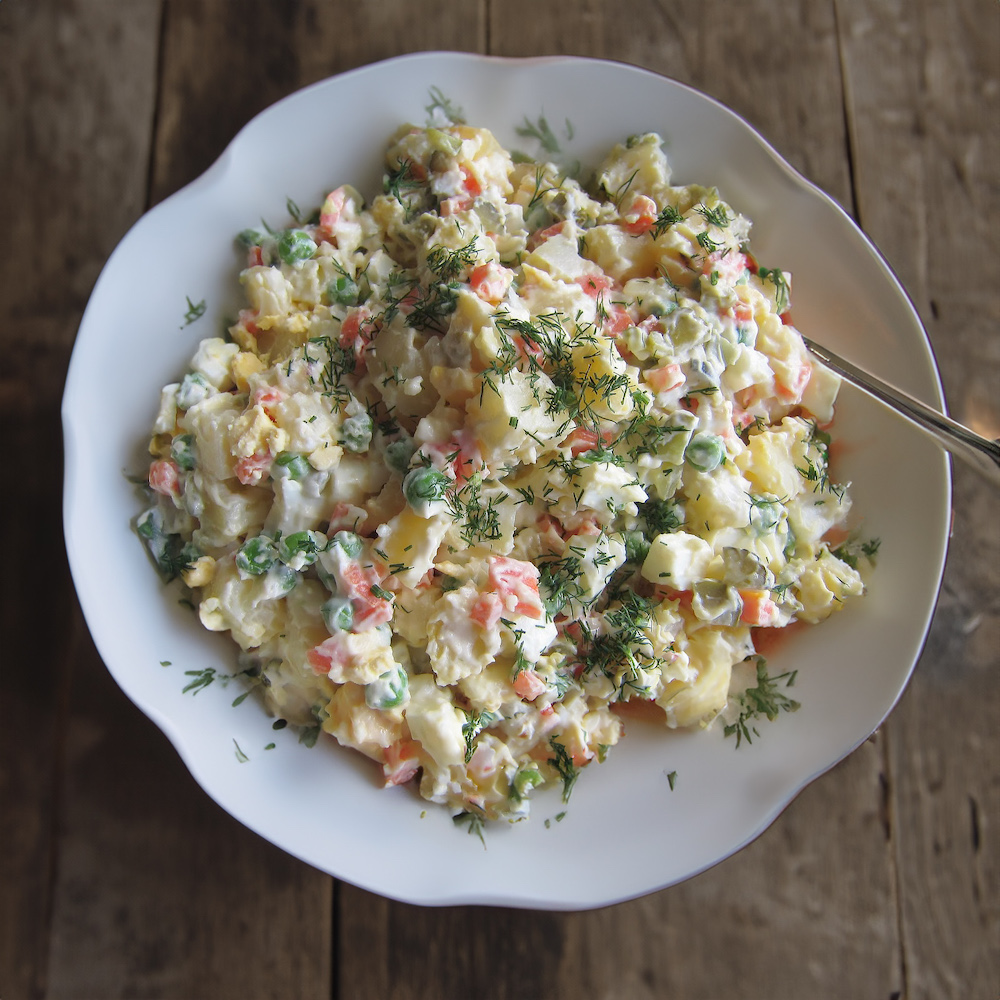
A classic dish, born in Russia in the 1860’s but beloved across the globe to this day, the Olivier Salad is possibly the perfect picnic recipe.
The Olivier Salad, also known as Russian Salad, is a traditional dish that originated in Russia in the 1860s. It was created by Lucien Olivier, a Belgian chef who worked at the famous Hermitage restaurant in Moscow. The original version of the salad was a luxurious and elaborate dish, including ingredients like grouse, veal tongue, caviar, crayfish tails, capers, and smoked duck, all mixed with a secret recipe of Olivier’s special dressing.
Over time, the recipe has evolved significantly, especially during the Soviet era when more accessible and affordable ingredients replaced the exotic ones. The modern version of Olivier Salad typically includes boiled potatoes, carrots, peas, pickles, onions, hard-boiled eggs, and diced chicken or ham. These ingredients are combined with mayonnaise to create a rich and creamy texture. Some variations might include apples or fresh cucumbers for added crunch and freshness.
In different parts of the world, Olivier Salad has been adapted to local tastes and ingredient availability. For instance, in Spain, it is known as “Ensaladilla Rusa” and often includes tuna and olives. In Iran, it might feature cooked chicken and a larger quantity of potatoes. Despite these regional variations, the essence of the salad—a mix of finely diced ingredients bound together by mayonnaise—remains the same.
Olivier Salad is a staple in Russian cuisine, particularly during festive occasions like New Year’s Eve, where it is almost always found on the table. It is beloved for its hearty, comforting qualities and its ability to be prepared in advance, making it convenient for large gatherings – and one of the best picnic dishes ever.
How to Make Olivier Salad – Russian Salad
1. Prepare the Vegetables
- Cook Potatoes and Carrots:
- Steaming Method: Peel the carrots but leave the potatoes unpeeled. Prick the potatoes with a fork. Steam the potatoes for 30 minutes, then add the peeled carrots and steam for an additional 10-15 minutes, or until both are firm but tender when poked.
- Boiling Method: Alternatively, you can boil the potatoes and carrots together until tender.
- Cook the Peas: Follow the package directions for cooking the frozen peas. Once cooked, set them aside to cool.
2. Cool and Dice
- Cool Vegetables: Allow the potatoes and carrots to cool until they can be handled easily.
- Peel Potatoes: Peel the potatoes by gently scraping off the thin layer of skin with your fingers or the back of a knife.
- Dice Vegetables: Dice the potatoes and carrots into 1/2-inch cubes. Place them into a medium serving bowl.
- Dice Eggs: Peel and dice the hardboiled eggs. Add them to the bowl.
- Chop Pickles: Finely chop the dill pickles. Add to the bowl along with the cooled peas.
- Add Ham (Optional): If using, dice the smoked ham and add to the bowl.
3. Mix and Chill
- Combine Ingredients: Gently mix all the ingredients together.
- Add Mayonnaise: Stir in 1 cup of mayonnaise to start with, adding more as needed to bind the salad together.
- Chill: Cover the salad and chill for at least one hour or overnight to allow the flavors to meld.
4. Garnish and Serve
- Garnish: Before serving, garnish the salad with finely chopped dill.
Recipe Notes
- Vegetable Preparation: Make sure the potatoes and carrots are firm but tender. Overcooking can result in a mushy salad.
- Peas: Fresh or frozen peas are recommended over canned peas for better color and flavor.
- Mayonnaise: Adjust the amount of mayonnaise to your preference for binding the salad.
- Dicing Size: Dice the vegetables to your preferred size; traditional recipes often call for fine dicing.
Yield, Prep Time, and Cook Time
- Yield: 6-8 servings
- Prep Time: 20 minutes (plus overnight marinating)
- Cook Time: 40 minutes (including cooling time)
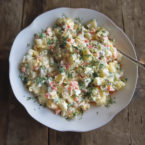
Olivier Salad – Russian Salad
- Total Time: 50 mins
- Yield: 6-8 servings 1x
Description
A classic dish, born in Russia in the 1860’s but beloved across the globe to this day, the Olivier Salad is possibly the perfect picnic recipe.
Ingredients
- 3 golden potatoes (about 1.5 lbs or 680g)
- 3 medium carrots (about 300g)
- 1 cup frozen peas (about 150g)
- 4 hardboiled eggs
- 6 small kosher dill pickles (about 150g)
- 1 to 1 1/2 cups olive oil mayonnaise (240-360ml)
- 3/4 cup diced smoked ham (optional) (about 115g)
- Finely chopped dill, to garnish
Instructions
1. Prepare the Vegetables
- Cook Potatoes and Carrots:
- Steaming Method: Peel the carrots but leave the potatoes unpeeled. Prick the potatoes with a fork. Steam the potatoes for 30 minutes, then add the peeled carrots and steam for an additional 10-15 minutes, or until both are firm but tender when poked.
- Boiling Method: Alternatively, you can boil the potatoes and carrots together until tender.
- Cook the Peas: Follow the package directions for cooking the frozen peas. Once cooked, set them aside to cool.
2. Cool and Dice
- Cool Vegetables: Allow the potatoes and carrots to cool until they can be handled easily.
- Peel Potatoes: Peel the potatoes by gently scraping off the thin layer of skin with your fingers or the back of a knife.
- Dice Vegetables: Dice the potatoes and carrots into 1/2-inch cubes. Place them into a medium serving bowl.
- Dice Eggs: Peel and dice the hardboiled eggs. Add them to the bowl.
- Chop Pickles: Finely chop the dill pickles. Add to the bowl along with the cooled peas.
- Add Ham (Optional): If using, dice the smoked ham and add to the bowl.
3. Mix and Chill
- Combine Ingredients: Gently mix all the ingredients together.
- Add Mayonnaise: Stir in 1 cup of mayonnaise to start with, adding more as needed to bind the salad together.
- Chill: Cover the salad and chill for at least one hour or overnight to allow the flavors to meld.
4. Garnish and Serve
- Garnish: Before serving, garnish the salad with finely chopped dill.
Notes
- Vegetable Preparation: Make sure the potatoes and carrots are firm but tender. Overcooking can result in a mushy salad.
- Peas: Fresh or frozen peas are recommended over canned peas for better color and flavor.
- Mayonnaise: Adjust the amount of mayonnaise to your preference for binding the salad.
- Dicing Size: Dice the vegetables to your preferred size; traditional recipes often call for fine dicing.
- Prep Time: 20 mins
- Cook Time: 30 mins
- Category: Side
- Method: Boiling
- Cuisine: Russian
Nutrition
- Serving Size: 200g
- Calories: 250
- Sugar: 3g
- Sodium: 600mg
- Fat: 15g
- Saturated Fat: 3g
- Unsaturated Fat: 12g
- Trans Fat: 0g
- Carbohydrates: 20g
- Fiber: 4g
- Protein: 7g
- Cholesterol: 100mg



This is a great improvement for the typical potato salad that is so popular in the US. Just as easy to make but so much more delicious. I always experiment with the ingredients, whatever I cook, so I’ve tried adding various spices, relish, celery, parsley, etc. It always tastes great. Instead of any processed meats I usually cut grilled or seared chicken breasts into the salad.
Russian salad is so delicious, thank you for this recipe.
Delicious, yes brought back nostalgia for the old country. I avoided the aspect, bit loved this salad.
As a Russian, this recipe gets my stamp of approval. Tastes just like my grandmother used to make.
I used fresh peas instead of canned, and it was perfect. Thanks for the tip!
Love this salad, perfect for picnics!
Love the classic russian salad!
I have made the famous Russian Salad
And omg it was delicious
My boyfriend had asked me to make it
For him and he loved it ,it bring him memories of when he was growing up back home in Russia.
It’s great
Tasted wonderful …. thank you. Being English, I think you would have given 10/10 for my dicing skills.
Your actually wrong about that. It was originally called Macedon and was one of Alexander the greats favourite salads.
I’m a fan of Russian salad– in fact, I’m making it tonight for our “Russian Christmas” celebration tomorrow (January 7th, which is December 25th on the “old” church calendar. I first had this delight about 28 years ago when a visiting friend from St. Petersburg wanted to prepare this for us as a “thank you” for hosting her. She was taught, and therefore taught me, to begin with the peas– and dice all of the other ingredients to match the size of the peas. In addition to the peas, potatoes, carrots, and pickles, we also use a bit of white onion, then the mayonnaise and salt & pepper. Since tomorrow is a celebration, meat is allowed to be eaten, so I am also dicing ham into the salad.
Hi there- just a quick query: how many people will this recipe serve?
Made it tonight for family and grandchildren’s weekly dinner tomorrow. They like food a bit spicy, maybe a lot spicy so when you said it will keep for a couple of days in the fridge, well making tonight worked better for me. I cooked chicken tenders for me and saved a serve of ‘the salad’ which I have just eaten. It was absolutely delicious. I must say I added jalapeño pickles which i’m sure the teenagers will love. A good way to keep them coming and enjoy good food with interesting conversation. Looking forward to tomorrow’s dinner. Many thanks will keep checking in.
Thank you for the clear and detailed instructions, including what KIND of pickles to use. Looked at 2 other recipes before yours. Each left out what I deemed necessary details. I will try this and let you know.
Thanks but I thought the Olivier salad didnot contain any potato with it ?
Thanks Elizabeth!
You should try to add also celery, more eggs, definitely not frozen peas, corn, parsley’s root and onion :)
Just want to add that there are no Christmas or Easter in Poland without this salad :) it is just obligatory :D
I’ve made this recipe twice now, and it has turned out well both times. I really like Eastern European cuisine in general, and this dish makes a great addition to my repertoire! Also, I like to call this dish Soviet Salad.
i really like this salad, i was on a diet of no sweets but this just tast like candy so i like it.
I had Insalata Russa when I was in Torino, Italy, many years ago. I’ve never found it anywhere. I will try this and hope it will be as good as that one.
I love the presentation of your recipe and the “voice” you use to explain it. The graphic design is also very appealing. Good job!
I had Olivier salad in St. Petersburg a few years ago and loved it. I’ll make your recipe to have tomorrow for my husband’s birthday.