Guanciale (pronounced gwan-CHAH-leh) means pillow in Italian. It also means amazingly-cured pork cheek or jowl.
Guanciale is made from the jowl (the face area) of the pig and is one of the simplest cures for an amateur to make at home. The jowl is relatively thin and thus you are more likely to cure it all the way through to the center. It compares well to pancetta and can either be eaten raw if sliced thinly or cut thick and pan fried to add depth and flavor to many dishes. It is an indispensable tool in the Italian chef’s arsenal of ingredients. It can be used for a flavoring for stews or soups and as a featured ingredient in many pasta preparations such as carbonara.
If you’ve never had this amazing concoction of fatty, porky sweet and salty goodness I encourage you to run—not walk— to your local salumi purveyor and get some now.
Unlike bacon made from the belly, face bacon contains a high ratio of collagen to fat, and this is what makes it so unique. The flavor is incredible. You don’t smoke the bacon, so there is a very earthy porkiness to it. No, this isn’t the kind of bacon you fry up with your eggs. This is the dream bacon you need to make the most incredible Pasta Carbonara you’ve ever had, and I am not exaggerating.
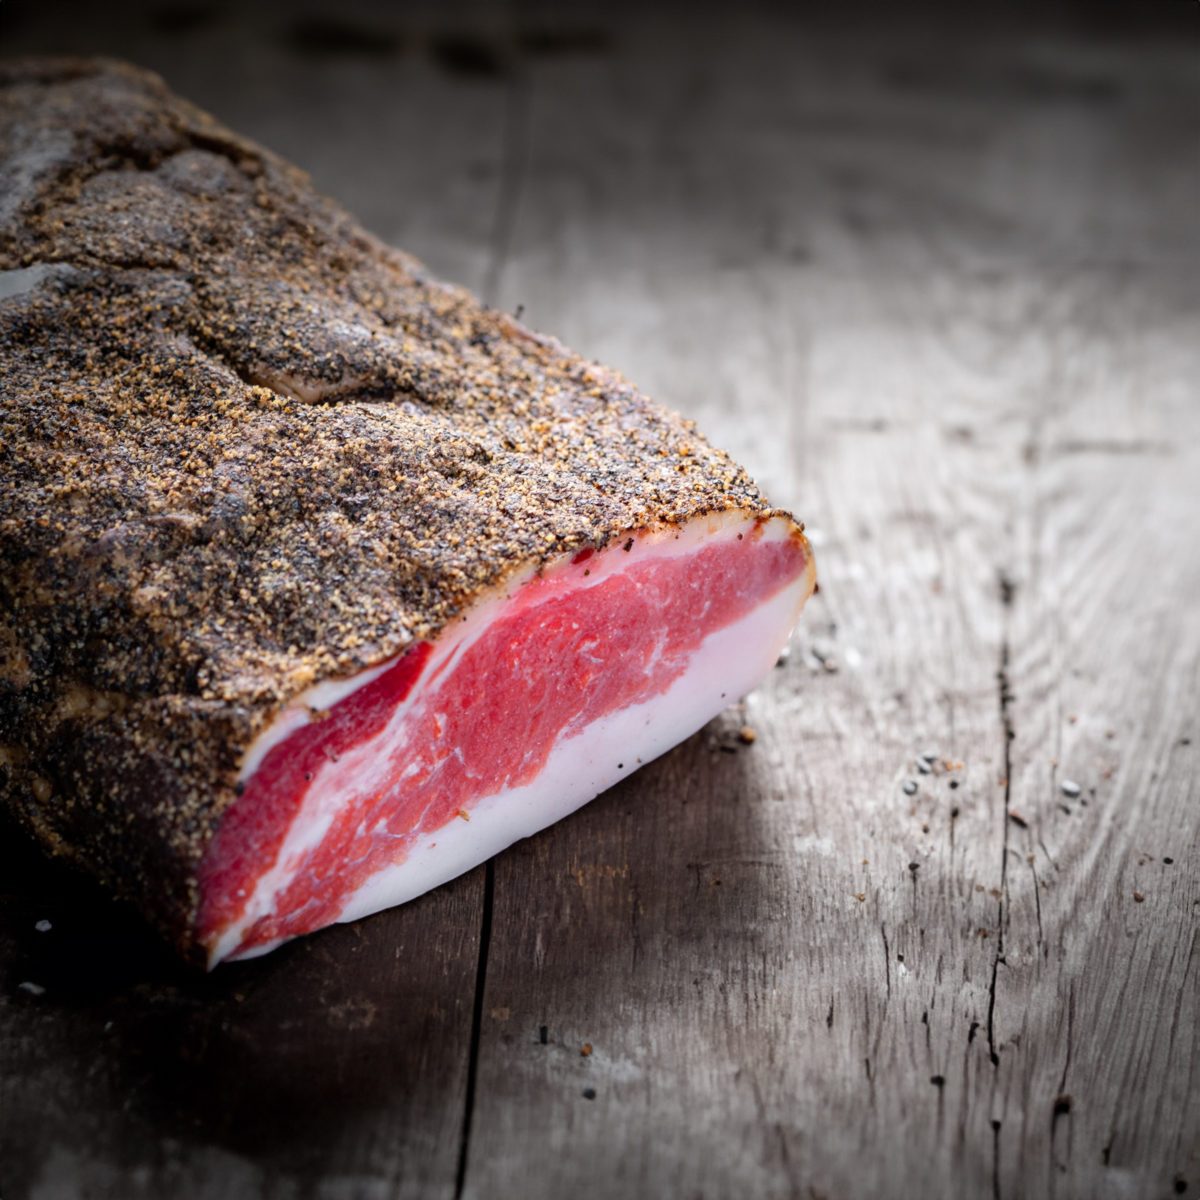
Step by Step Guide to Making Guanciale at Home
Prepare the Spices:
- In a dry pan over medium heat, toast black peppercorns, juniper, red pepper flakes, mustard seeds, star anise, and allspice until fragrant.
- Allow the spices to cool, then grind them using a spice grinder or mortar and pestle until finely ground.
Mix the Curing Rub:
- In a bowl, combine the ground spices with the brown sugar and kosher salt. Mix thoroughly to ensure all components are evenly distributed.
Prepare the Pork Jowl:
- Ensure that all hair is removed from the pork jowl. You can use a sharp razor or a blowtorch for this. Be careful and thorough.
- Rinse the pork jowl under cool water and pat it dry with paper towels.
Apply the Curing Mixture:
- Rub the entire mixture onto the pork jowl, making sure to cover all sides evenly. Use gloves if necessary to ensure the mixture gets into all the nooks.
Wrap and Refrigerate:
- Wrap the pork jowl tightly with cling film, ensuring no air pockets are left.
- Place the wrapped pork jowl in a container to catch any leaks and refrigerate. Cure for 5 to 7 days, turning the jowl over once every day to ensure even curing.
Rinse and Dry:
- After the curing period, remove the pork jowl from the refrigerator and unwrap it.
- Rinse the jowl thoroughly under cool water to remove all the curing spices and salts.
- Pat the jowl dry with paper towels.
Hanging the Guanciale for Drying:
a. Finding the Right Spot:
- Choose a cool, dry, and well-ventilated area for hanging the guanciale. This could be a cellar, a basement, or a special curing chamber. The ideal temperature should be between 50°F and 60°F (10°C to 15°C), with humidity around 60-70%. Avoid areas with direct sunlight or fluctuating temperatures.
b. Preparing for Hanging:
- Before hanging, you can wrap the pork jowl in cheesecloth to protect it from insects and dust. This allows air to circulate while keeping the meat clean. Secure the cheesecloth around the jowl using kitchen twine.
c. Hanging Method:
- Use a strong kitchen twine or butcher’s string to create a loop around the narrower end of the jowl. Ensure the knot is secure so the meat will not fall during the drying process. Leave a long end on the twine to facilitate hanging.
- Suspend the guanciale from a hook or a rod that allows air to circulate freely around the entire piece. You can use meat hooks, an S-hook, or even a wooden dowel placed horizontally in a cool room.
- Make sure the guanciale is not touching any walls, other food items, or surfaces, and that there is enough space around it to ensure good air flow.
d. Monitoring the Drying Process:
- Check on the guanciale regularly, at least once a week, to monitor its drying and ensure there is no mold growth. If you notice any mold, don’t panic; wipe it off gently with a clean cloth dampened with a mixture of vinegar and water.
- The drying process should take about three weeks, but this can vary depending on the size of the jowl and the conditions of your drying area. The guanciale is ready when the meat feels firm throughout, but not hard.
e. Safety Precautions:
-
- Ensure that the area where you hang the guanciale is secure from pets and pests.
- If the climate in your area does not allow for safe drying conditions (too hot, too humid, etc.), consider using a dedicated curing chamber where you can control temperature and humidity.
Slice and Serve:
- Once cured and dried, slice the guanciale as thinly as possible.
- Serve with crusty bread, pickled vegetables, grainy mustard, or use it to season greens like collards or turnip greens.
Recipe Notes:
- Ensure your working area and tools are clean to avoid contamination.
- Adjust the curing time based on the size of your pork jowl; larger pieces may require additional time.
- The drying environment should be cool (around 60°F) and have good air circulation.
- If mold forms on the guanciale while drying, wipe it off with vinegar.
- Always slice guanciale thinly; its rich flavor goes a long way.
How to Make Guanciale at Home
- Total Time: 888 hours 30 minutes
- Yield: 1 guanciale 1x
Description
Learn how to make cured Italian-style pork jowl that can be used in a variety of dishes, including pasta carbonara, to add a delicious depth of flavor.
Ingredients
- 1 pork jowl with skin on (all hair removed)
- 1/2 cup brown sugar
- 1/2 cup kosher salt
- 1 tablespoon black pepper corns
- 1 tablespoon juniper
- 1 tablespoon red pepper flakes
- 1 tablespoon mustard seed
- 1 tablespoon star anise
- 1 tablespoon allspice
Instructions
Prepare the Spices:
- In a dry pan over medium heat, toast black peppercorns, juniper, red pepper flakes, mustard seeds, star anise, and allspice until fragrant.
- Allow the spices to cool, then grind them using a spice grinder or mortar and pestle until finely ground.
Mix the Curing Rub:
- In a bowl, combine the ground spices with the brown sugar and kosher salt. Mix thoroughly to ensure all components are evenly distributed.
Prepare the Pork Jowl:
- Ensure that all hair is removed from the pork jowl. You can use a sharp razor or a blowtorch for this. Be careful and thorough.
- Rinse the pork jowl under cool water and pat it dry with paper towels.
Apply the Curing Mixture:
- Rub the entire mixture onto the pork jowl, making sure to cover all sides evenly. Use gloves if necessary to ensure the mixture gets into all the nooks.
Wrap and Refrigerate:
- Wrap the pork jowl tightly with cling film, ensuring no air pockets are left.
- Place the wrapped pork jowl in a container to catch any leaks and refrigerate. Cure for 5 to 7 days, turning the jowl over once every day to ensure even curing.
Rinse and Dry:
- After the curing period, remove the pork jowl from the refrigerator and unwrap it.
- Rinse the jowl thoroughly under cool water to remove all the curing spices and salts.
- Pat the jowl dry with paper towels.
Hanging the Guanciale for Drying:
a. Finding the Right Spot:
- Choose a cool, dry, and well-ventilated area for hanging the guanciale. This could be a cellar, a basement, or a special curing chamber. The ideal temperature should be between 50°F and 60°F (10°C to 15°C), with humidity around 60-70%. Avoid areas with direct sunlight or fluctuating temperatures.
b. Preparing for Hanging:
- Before hanging, you can wrap the pork jowl in cheesecloth to protect it from insects and dust. This allows air to circulate while keeping the meat clean. Secure the cheesecloth around the jowl using kitchen twine.
c. Hanging Method:
- Use a strong kitchen twine or butcher’s string to create a loop around the narrower end of the jowl. Ensure the knot is secure so the meat will not fall during the drying process. Leave a long end on the twine to facilitate hanging.
- Suspend the guanciale from a hook or a rod that allows air to circulate freely around the entire piece. You can use meat hooks, an S-hook, or even a wooden dowel placed horizontally in a cool room.
- Make sure the guanciale is not touching any walls, other food items, or surfaces, and that there is enough space around it to ensure good air flow.
d. Monitoring the Drying Process:
- Check on the guanciale regularly, at least once a week, to monitor its drying and ensure there is no mold growth. If you notice any mold, don’t panic; wipe it off gently with a clean cloth dampened with a mixture of vinegar and water.
- The drying process should take about three weeks, but this can vary depending on the size of the jowl and the conditions of your drying area. The guanciale is ready when the meat feels firm throughout, but not hard.
e. Safety Precautions:
-
- Ensure that the area where you hang the guanciale is secure from pets and pests.
- If the climate in your area does not allow for safe drying conditions (too hot, too humid, etc.), consider using a dedicated curing chamber where you can control temperature and humidity.
Slice and Serve:
- Once cured and dried, slice the guanciale as thinly as possible.
- Serve with crusty bread, pickled vegetables, grainy mustard, or use it to season greens like collards or turnip greens.
Notes
- Ensure your working area and tools are clean to avoid contamination.
- Adjust the curing time based on the size of your pork jowl; larger pieces may require additional time.
- The drying environment should be cool (around 60°F) and have good air circulation.
- If mold forms on the guanciale while drying, wipe it off with vinegar.
- Always slice guanciale thinly; its rich flavor goes a long way.
- Prep Time: 30 mins
- Drying Time: 30 days
- Cook Time: 7 days
- Category: Charcuterie
- Method: Curing
- Cuisine: Italian
If you liked this, you are going to LOVE these other favorite cooking classes:
Bistecca Fiorentina: How to Make the Famous Florentine Steak
Step by Step Guide to Making Tuscan Pici Pasta
Seafood Masterclass: How to Choose, Handle and Cook Like a Pro
How to Make Hasselback Potatoes
Top Ten Tips For Successful Cookie Baking



Grazie, this is super authentic and absolutely perfect!
Mine was a little hard, but when I cooked it it was still delicious!!
I was so excited to find this recipe, and man it delivers 100% I am stoked, will become a guanciale master now!!!
Ohh, great recipe, love myself some guanciale but didn’t know that it could be made at home!
My carbonaras are better than ever thanks to this recipe, so easy to make, and only the hanging was a little daunting but it worked out so well.
Wow, that’s a great guide, thank you. I made this and it turned out absolutely great.
Love guanciale, and this is the perfect way to make it. Thank you for a fantastic guide
Great recipe and it works. I marinated them in a food saver vacuum bag and then hung them in my root cellar.