Description
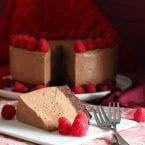
Indulge in this rich Chocolate Mousse Brownie Cake, featuring a dense, chocolatey brownie base topped with a silky, melt-in-your-mouth chocolate mousse.
Ingredients
Units
For the brownie base (half recipe — make this first):
- 115 g (4 oz) dark chocolate (70% cocoa), roughly chopped
- 115 g (4 oz) unsalted butter, cut into pieces
- 3/4 cup (150 g) caster sugar (superfine sugar)
- 2 eggs, lightly beaten
- 1/2 teaspoon vanilla extract
- 1/2 cup (60 g) almond meal (almond flour)
- 2 tablespoons raw cacao or cocoa powder
- 1/4 teaspoon salt
For the mousse:
- 400 g (14.1 oz) dark (70%) chocolate, chopped
- 400 g (14.1 oz) milk chocolate, chopped
- 6 eggs, separated
- 1 titanium-strength gelatin leaf (or 3 gold-strength leaves)
- 900 ml (30.4 fl oz) thickened cream
- 1/2 cup (110 g) caster sugar
To serve:
- 250 g (8.8 oz) raspberries
- 300 ml (10.1 fl oz) softly whipped cream
Instructions
Make the brownie base:
- Preheat oven to 325°F (160°C). Grease and line a 9-inch (23 cm) springform cake pan with baking paper.
- Melt the chocolate and butter together in a heatproof bowl set over a saucepan of barely simmering water, stirring until smooth. Remove from heat and let cool slightly.
- Whisk the sugar into the chocolate mixture, then beat in the eggs and vanilla.
- Fold in the almond meal, cacao powder, and salt until just combined.
- Pour into the prepared pan and level the top. Bake for 40–45 minutes, until just set in the center (a skewer should come out with moist crumbs, not raw batter). Remove from oven and cool completely on a wire rack before continuing. Do not remove from the pan.
Make the mousse:
- Place both chocolates in a heatproof bowl set over simmering water and stir until melted and smooth. Cool slightly, then beat in the egg yolks (it will look thick and curdled — don’t worry). Set aside.
- Soak the gelatin leaf in cold water for 5 minutes to soften. Heat 200 mL of the cream in a small saucepan until just simmering. Squeeze excess water from the gelatin and stir into the hot cream until dissolved. Let cool slightly, then beat into the chocolate mixture.
- Whisk the remaining 700 mL cream to soft peaks. In a stand mixer, whisk the egg whites to soft peaks, then add the sugar 1 tablespoon at a time, beating until dissolved (do not over-beat).
- Fold the whipped cream into the chocolate mixture. Then fold in the egg whites in 2 batches.
Assemble:
- Lightly spray one side of an acetate sheet with cooking oil. Line the inside of the springform pan (around the brownie) with the acetate, oiled side inward, leaving at least 5 cm above the pan rim.
- Pour the mousse over the brownie base and level the top with an offset spatula. Refrigerate overnight until fully set.
To serve:
- Release the springform and carefully peel away the acetate. If the mousse sticks, run a warm, dry offset spatula around the edge.
- Carefully remove the pan base and baking paper and transfer the cake to a serving platter. Decorate the top with some of the raspberries.
- To cut clean slices, dip the knife in warm water and wipe dry between each cut. The cake is easiest served laid on its side.
- Serve with the remaining raspberries and a dollop of softly whipped cream alongside. Refrigerate leftovers — it keeps for a further day.
Notes
This cake is extremely rich — slices should be small. The mousse layer is very tall, so make sure your acetate collar extends well above the pan rim before you pour. Everything can be prepared the day before serving.
- Prep Time: 30 minutes
- Cook Time: 45 minutes
- Category: Dessert
- Cuisine: American
Nutrition
- Serving Size: 1 slice
- Calories: 450
- Sugar: 25
- Sodium: 100
- Fat: 30
- Carbohydrates: 40
- Fiber: 3
- Protein: 6
- Cholesterol: 120