Description
Makes around 1 cup, scalable up to 4x (but note that once you get up to using 3-4 quarts of milk at a time, you’ll likely need to strain in batches) Important notes about milk: The milk you use must be homogenized and cannot be ultra-pasteurized (aka UHT pasteurized). Unfortunately, this means most organic milks cannot be used to make fresh cheeses. It is possible to use 2% instead of whole milk to make this cheese, though you’ll get much less out. The higher quality milk you use here, the better the final product. Local, farm-fresh milk that tastes of grass and sunshine and frolicking cows will produce cheese that makes everyone happy!
Ingredients
Scale
- 1 quart whole milk, or up to 1 cup cream and the rest milk (see important notes about milk, above)
- 4 tsp. white vinegar (or lemon juice, but I find the vinegar produces more and tastier cheese)
- 1 tsp. salt
Instructions
- Heat milk in a pot or saucepan over medium-high. If you have a thermometer, you’re aiming for 180F. If not, you’re aiming for spot right before the milk begins to simmer – it will develop a foamy, bubbly surface and appear sort of steamy and seething, like it’s getting ready to do something exciting. While heating the milk, stir every few minutes, making sure to scrape along the bottom of the pot. It’s easy for the milk to scorch and burn on the bottom, which can add some funky flavors. (That said, I often end up with a slight scorch spot on the bottom of the pan and it certainly doesn’t make the cheese taste burned in any way.)
- Let sit with vinegar and salt When ready, turn off the heat and gently stir in the vinegar. Sprinkle the salt on top and let sit for 15 minutes while the curds form. Meanwhile, set up your draining apparatus. I find that my mesh strainer works quite well, as does cheese cloth or a double layer of paper towels lining a sieve or colander. Loose cheesecloth (like this) should be triple-layered, but fine cheesecloth (like this) works in a single layer, but may in fact be too fine and take longer to drain. After 15 minutes, you should notice that soft curds have formed on top of the pot and separated from a thinner liquid below. As noted above, you can add another teaspoon of vinegar and wait another 5 minutes if it seems like that’s not happening well.
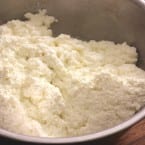
- Drain your cheese Pour your curds and whey into your draining apparatus, scraping the bottom of the pot to get all of the curds. Let the cheese strain until the desired consistency – more liquid will continue to drain off for a long time (over an hour), so you can get it quite dry and firm if you like. Different draining methods will take differing amounts of time, and if you’re using cheesecloth you can gather the edges together and gently squeeze to get even more liquid out. If I’m in a rush I’ll use a rubber spatula to help get more liquid out of the curds in my sieve.
- Making ahead/storage: Finished ricotta will keep in a covered container in the refrigerator for up to 1 week.
- Category: Side