The hara moong masala is one of my favorite dishes. This recipe is from my grand mother who to me, is the world’s finest cook. This dish is very simple to put together. And yet, it tastes like you have spent a long time preparing this. Unlike other north indian curries, this curry does not include Garam masala. Instead, the Pav bhaji masala is used to spice this Dish. This healthy and high protein dish, is definitely a crowd pleasing one. This curry, goes great with either rotis, pooris or rice.
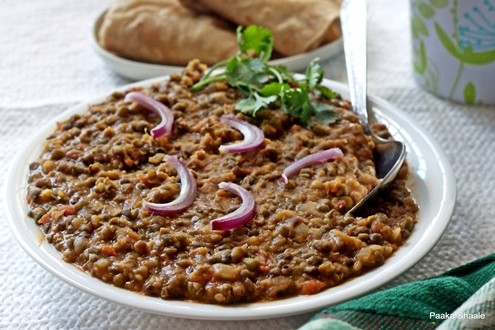


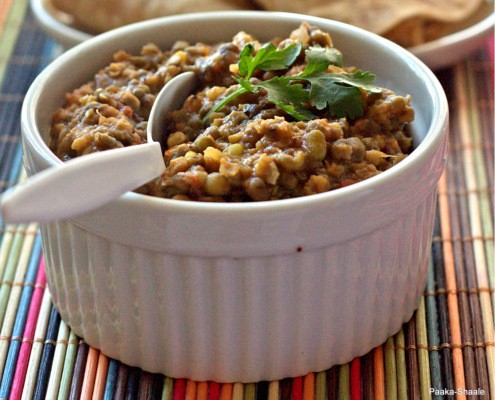
Hara moong masala- Green moong in onion and tomato gravy
- Total Time: 40 minutes
- Yield: 4 servings
Description
Hara Moong Masala is a flavorful and healthy dish featuring green moong beans simmered in a spiced onion and tomato gravy, perfect with rotis, pooris, or rice.
Ingredients
- 1 cup (6 oz / 170 g) green moong beans, washed and soaked overnight
- 1 large onion, chopped fine
- 2 medium-sized tomatoes, chopped fine
- 1 tsp ginger-garlic paste
- 1 green chilli, slit
- 1 tsp cumin seeds
- 1 tbsp (15 ml) pav bhaji masala
- Salt to taste
- 2 tbsp (30 ml) oil
- Fresh coriander leaves, for garnish
Instructions
- Pressure cook the soaked moong beans for 3-4 whistles or until they are tender. Set aside.
- Heat oil in a wok over medium heat. Add the cumin seeds and allow them to pop and turn brown.
- Add the chopped onion and slit green chilli to the wok. Sauté until the onions are soft and translucent.
- Stir in the ginger-garlic paste and cook for another minute until the raw smell disappears.
- Add the chopped tomatoes and cook until they are soft and the oil begins to separate from the mixture.
- Mix in the pav bhaji masala and salt. Cook for 2-3 minutes to allow the spices to blend well.
- Add the cooked moong beans to the wok and mix thoroughly. Simmer for 5-7 minutes, allowing the flavors to meld.
- Garnish with fresh coriander leaves before serving.
Notes
- This dish is a high-protein option that pairs well with rotis, pooris, or rice.
- If you don’t have pav bhaji masala, you can substitute with a mix of common Indian spices like coriander, cumin, and red chili powder.
- Store leftovers in an airtight container in the refrigerator for up to 3 days.
- Prep Time: 20 minutes
- Cook Time: 20 minutes
- Category: Main Course
- Cuisine: Indian
Nutrition
- Serving Size: 1 serving
- Calories: 180
- Sugar: 4
- Sodium: 300
- Fat: 5
- Carbohydrates: 30
- Fiber: 8
- Protein: 10
- Cholesterol: 0
If You Liked This Recipe, You’ll Love These
- Dhingri Matar – Creamy Indian Mushroom and Pea Curry
- Pumpkin Masala Curry
- Indian Inspired Cauliflower Kofta in Tomato Curry
- Weeknight Chana Masala
Frequently Asked Questions
What is pav bhaji masala, and why is it used here instead of garam masala?
The article specifically notes that this curry breaks from most North Indian curries by using pav bhaji masala instead of garam masala. Pav bhaji masala is a blend typically containing coriander, cumin, dried mango powder, and chili that gives a slightly tangier, brighter flavor. The notes say you can substitute it with a mix of coriander, cumin, and red chili powder if you cannot find it.
Why do the moong beans need to be soaked overnight before cooking?
Soaking the 1 cup of green moong beans overnight softens them so they pressure-cook quickly (3–4 whistles) to a tender texture. Unsoaked moong beans would need significantly longer in the pressure cooker and would not absorb the onion-tomato gravy as evenly.
What can I serve with hara moong masala?
The article lists rotis, pooris, and rice as all suitable options — making this a versatile everyday curry. It is also described as high-protein and healthy, so it works equally well as a weeknight main alongside rice or as a side with Indian flatbreads.


Thank you nisha!!
Amazing recipe..thanks
Thank you Nandita for taking care of our stomach. My hara moong masala turned out to be delicious. God bless you.
So happy that you liked the recipe!! Thank you so much for cooking this dish!!
Going to try this for dinner.
Thanks for sharing this
It worked out well for me too ! Though I added garam masala, chat masala, daniya powder and totally skipped out the cumin seeds
Thanks for the awesome recipe. I tried it out tonight- was quick and delicious!!!
Very tasty
Its very nice receipy
i am sorry it didn’t turn out well for you!! Beans when sprouted for a long time can turn bitter. Try making the curry without sprouting the beans. It should turn out well. Let me know if you have any more questions about the same.
It did not work out for me, I had sprouted the beans and it turned out bitter, though the sauce was lovely & suttle to the taste, m not sure why it turned bitter.
I like your receipy
can it be used with garam masala?
Wow!!! Thank you so much for such a wonderful recipe… it was such a delight…..
it is super yummy
yumm !