Description
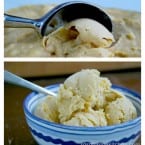
Thai peanut sauce transforms into a spicy, cool dessert. With coconut, chili peppers, and peanut butter, this ice cream will wow the taste buds.
Ingredients
Scale
- 4 Safest Choice Eggs yolks
- 1/2 cup sugar
- 1 cup of whole milk
- 1 cup heavy cream
- 1 cup peanut butter
- ½ cup toasted coconut
- ¼ cayenne pepper
Instructions
- Whisk together eggs and sugar in a 4-quart tempered-glass container. Set aside. Bring milk to a simmer in a non-reactive saucepan over medium heat, or until the edges start to bubble.
- Slowly add hot milk to egg mixture whisking constantly. Patience, grasshopper, or you’ll get scrambled eggs! Pour the mixture back into the saucepan and heat over low stirring constantly for 8-10 minutes. Use a thermometer to check the temperature, it should be between 165-180 degrees. As the mixture thickens, it will start to coat your whisk. When your timer buzzes, pour the custard mix into coverable container (fits perfectly into a 1-1/2 quart ceramic baking oval) and chill completely for a few hours in your fridge.
- If at any time your milk or mixture boils and burns, pitch it and start over. Some people say you can save it with an immersion blender and hope but it never tastes right.
- While you’re waiting, pre-heat your oven to 350 degrees. Spread ½ cup of coconut flakes on a small cookie sheet then bake, stirring occasionally, until they begin to brown. It takes about 10 minutes.
- Once your custard mix is cool, whisk in 1 cup heavy cream then 1 cup peanut butter, ½ cup toasted coconut flakes and ¼ tsp cayenne pepper.
- If you have an ice cream maker, this is time when you would pour and freeze mixture according to manufacturer instructions. If you don’t, roll up your sleeves because we’ve got some work to do.
- Pour the mix into a deep-sided, freezer-safe container. For the next five hours, your job is to stir the mix every 45 minutes. Sure, it sounds like some bicep-building craziness but if you have the time and a few other things on your around the house to-do list, you’re good to go!
- If you don’t want to stir, that’s also okay. You can always eat it as a softer ice cream as soon as it reaches your preferred texture. Custard-based ice cream is an encouraging recipe for beginners because it has a creamy and smooth texture, not icy like a cream-based recipe.
- Category: Dessert
