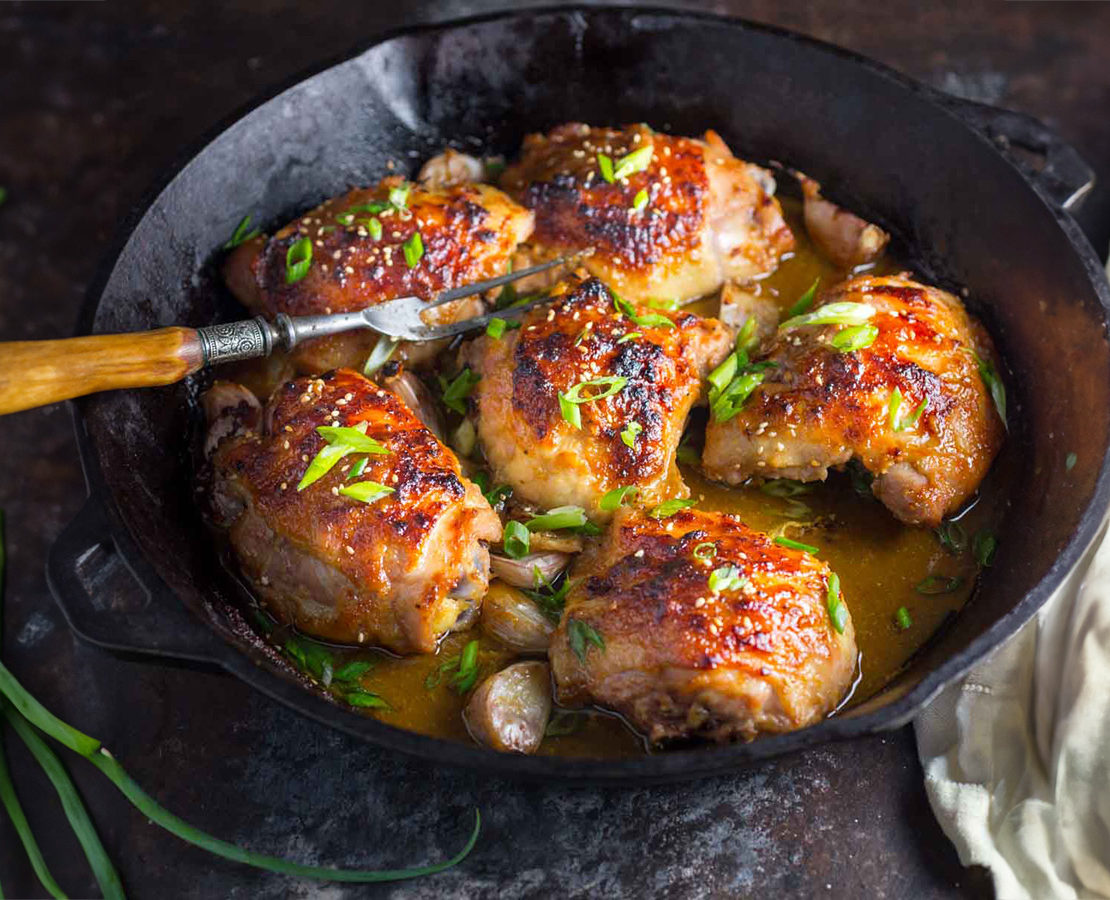
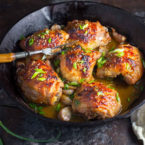
Make a miso butter and you are on your way to a mouth-watering and easy meal of crispy skinned miso butter and garlic chicken.
If you’ve never cooked with miso before, this is the perfect recipe to start with. If you love it and cook with it all the time, this is probably going to end up on your monthly recipe rotation. It definitely has for us.
There’s very little work involved so when you pull it out of the oven and find perfect, crispy bronzed chicken skin, tender meat and a delicious sauce, it almost feels like cheating. “Did I really do that,” you might be tempted to ask yourself. Yes, you did. Now go eat your dinner before any goblins attracted by the glorious smell of chicken, miso and garlic steal it from you.
Miso compound butter is so simple. It’s so simple, but completely genius and it changed the way I cook. I use variations of it on everything. Grilled shrimp, sautéed spinach, charred green beans, baked tofu.
In this version I’ve added some extra flavorings like garlic and ginger. A little sweet and sour from maple syrup and rice vinegar. Once you mix it all together, you want to rub it all over the chicken and also get a little of it under the skin. Be gentle. You don’t want to pull the skin off, just lift up a corner and tuck some under.
If the meat is cooked before the skin is brown enough, place it under the broiler for a minute or two but watch it carefully. The sugar in the marinade can burn easily.

RECIPE NOTES
- Miso Choice: This recipe uses white miso, which is milder in flavor. If you desire a stronger, deeper flavor, you can experiment with red or brown miso. Just be cautious, as these varieties are saltier and more potent.
- Garlic: The garlic cloves become soft and caramelized during roasting. They not only add to the pan sauce but can also be spread on bread or eaten as is for a delicious treat.
- Chicken Skin: Ensuring the skin is dry before applying the miso-butter mix will help achieve a crisper finish. Patting the chicken dry with a paper towel can assist with this.
- Basting: Basting the chicken as it roasts helps to keep it moist and infuses it with even more flavor from the pan drippings.
- Resting: Allow the chicken to rest for about 5 minutes after taking it out from the oven. This lets the juices redistribute, ensuring a moist chicken piece when cut or bitten into.
- Serving Suggestion: This dish pairs beautifully with steamed rice, stir-fried vegetables, or a light salad. The garlic pan sauce can also be drizzled over the accompaniments for added flavor.
- Storage: If you have leftovers, store them in an airtight container in the refrigerator for up to 3 days. Reheat in an oven or on the stovetop to retain the chicken’s crispy skin.
Step by Step Guide to Making Miso Butter and Garlic Chicken
- Preparation: Preheat your oven to 400°F.
-
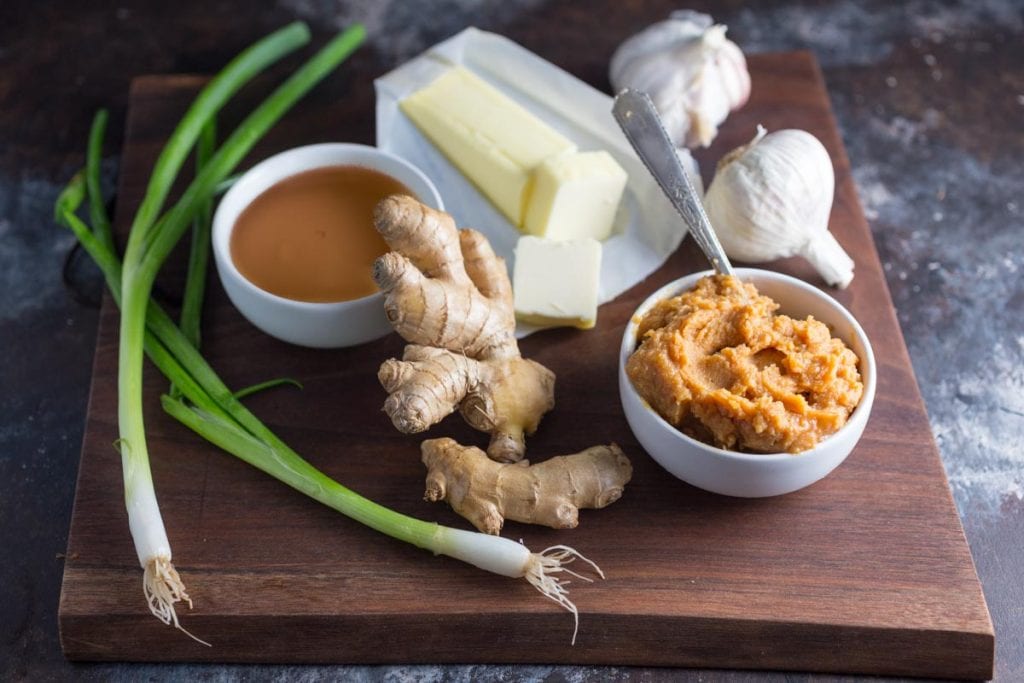
Miso Butter Mixture: In a large mixing bowl, combine the unsalted butter, white miso, maple syrup, rice vinegar, grated ginger, and black pepper. Stir the ingredients until they are thoroughly combined.
-
Marinate the Chicken: Add the chicken thighs to the bowl with the miso-butter mixture. Massage the mixture all over each chicken piece, ensuring an even coating. Carefully lift the skin of each chicken thigh and rub some of the miso-butter mixture underneath the skin for added flavor.
-
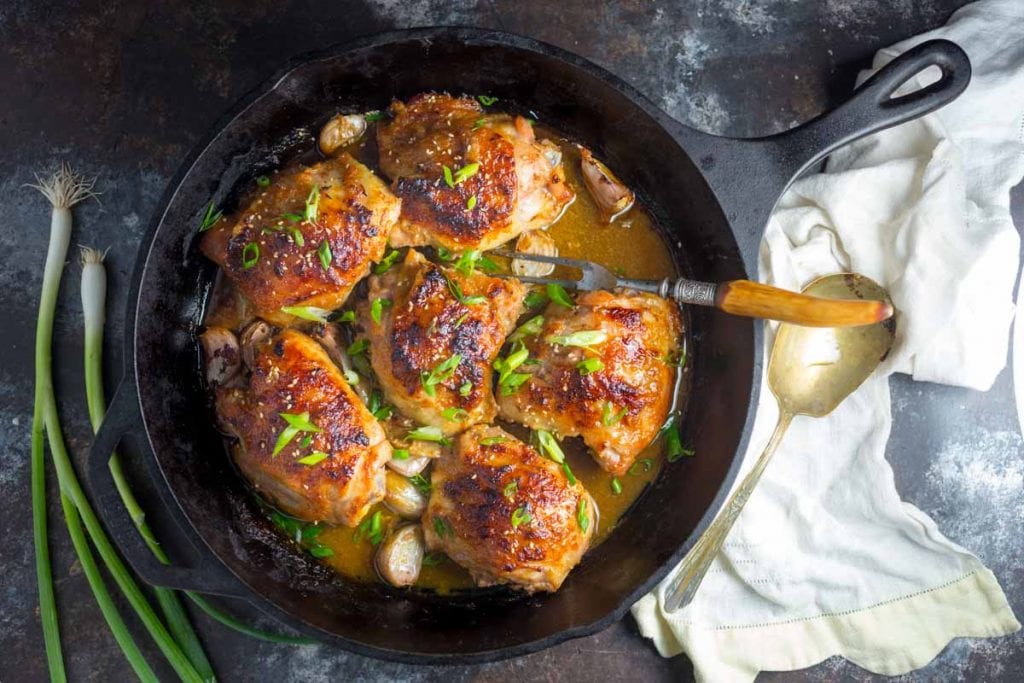
Arrange for Roasting: Place the chicken thighs in a single layer in a roasting pan or heavy oven-proof skillet. Scatter the lightly smashed garlic cloves around the chicken.
-
Roasting: Transfer the skillet or pan to the preheated oven. Roast the chicken for 30 to 40 minutes. Baste the chicken once or twice during this period to ensure it remains juicy and to promote a golden-brown and crispy skin. The chicken is done when its internal temperature reads between 160°F to 165°F.
-
Broiling (Optional): If the chicken skin hasn’t achieved the desired golden-brown color by the end of the roasting time, place the chicken under the broiler for a minute or two. Be vigilant to avoid burning the skin.
-
Prepare the Garlic Sauce: Once roasted, remove the chicken from the oven. Discard the skins from the roasted garlic cloves, then mash the garlic into the pan drippings to create a flavorful sauce.
-
Serving: Place the roasted chicken on a serving dish. Drizzle the garlic pan sauce over the chicken. Garnish with toasted sesame seeds and finely sliced scallions. Serve hot and enjoy!

Miso Butter and Garlic Chicken
- Total Time: 45 minutes
- Yield: 4 to 6 servings 1x
Description
Make a miso butter and you are on your way to a mouth-watering and easy meal of crispy skinned miso butter and garlic chicken.
Ingredients
- 8 skin-on, bone-in chicken thighs (approximately 2 1/2 to 3 pounds)
- 4 tablespoons unsalted butter, softened
- 1/2 cup white miso
- 3 tablespoons maple syrup
- 1-inch piece ginger, grated
- 8 garlic cloves, unpeeled but lightly smashed
- 1 tablespoon rice vinegar
- Black pepper, to taste
- 2 scallions, finely sliced (for garnish)
- 2 teaspoons toasted sesame seeds (for garnish)
Instructions
- Preparation: Preheat your oven to 400°F.
- Miso Butter Mixture: In a large mixing bowl, combine the unsalted butter, white miso, maple syrup, rice vinegar, grated ginger, and black pepper. Stir the ingredients until they are thoroughly combined.
- Marinate the Chicken: Add the chicken thighs to the bowl with the miso-butter mixture. Massage the mixture all over each chicken piece, ensuring an even coating. Carefully lift the skin of each chicken thigh and rub some of the miso-butter mixture underneath the skin for added flavor.
- Arrange for Roasting: Place the chicken thighs in a single layer in a roasting pan or heavy oven-proof skillet. Scatter the lightly smashed garlic cloves around the chicken.
- Roasting: Transfer the skillet or pan to the preheated oven. Roast the chicken for 30 to 40 minutes. Baste the chicken once or twice during this period to ensure it remains juicy and to promote a golden-brown and crispy skin. The chicken is done when its internal temperature reads between 160°F to 165°F.
- Broiling (Optional): If the chicken skin hasn’t achieved the desired golden-brown color by the end of the roasting time, place the chicken under the broiler for a minute or two. Be vigilant to avoid burning the skin.
- Prepare the Garlic Sauce: Once roasted, remove the chicken from the oven. Discard the skins from the roasted garlic cloves, then mash the garlic into the pan drippings to create a flavorful sauce.
- Serving: Place the roasted chicken on a serving dish. Drizzle the garlic pan sauce over the chicken. Garnish with toasted sesame seeds and finely sliced scallions. Serve hot and enjoy!
Notes
- Miso Choice: This recipe uses white miso, which is milder in flavor. If you desire a stronger, deeper flavor, you can experiment with red or brown miso. Just be cautious, as these varieties are saltier and more potent.
- Garlic: The garlic cloves become soft and caramelized during roasting. They not only add to the pan sauce but can also be spread on bread or eaten as is for a delicious treat.
- Chicken Skin: Ensuring the skin is dry before applying the miso-butter mix will help achieve a crisper finish. Patting the chicken dry with a paper towel can assist with this.
- Basting: Basting the chicken as it roasts helps to keep it moist and infuses it with even more flavor from the pan drippings.
- Resting: Allow the chicken to rest for about 5 minutes after taking it out from the oven. This lets the juices redistribute, ensuring a moist chicken piece when cut or bitten into.
- Serving Suggestion: This dish pairs beautifully with steamed rice, stir-fried vegetables, or a light salad. The garlic pan sauce can also be drizzled over the accompaniments for added flavor.
- Storage: If you have leftovers, store them in an airtight container in the refrigerator for up to 3 days. Reheat in an oven or on the stovetop to retain the chicken’s crispy skin.
- Prep Time: 15 minutes
- Cook Time: 30 minutes
- Category: Main
- Method: Braising
- Cuisine: Asian American
Nutrition
- Serving Size: 2 thighs
- Calories: 560
- Sugar: 8g
- Sodium: 980mg
- Fat: 38g
- Saturated Fat: 12g
- Unsaturated Fat: 23g
- Trans Fat: 0g
- Carbohydrates: 20g
- Fiber: 2g
- Protein: 35g
- Cholesterol: 220mg

Delicious chicken. Great way to use up the tub of miso I’ve been keeping in the fridge.