There’s no reason to buy fondant when you’re just a few ingredients and this step by step guide away from cheaper home made fondant of the highest quality.
By Tamara Novacoviç

Have you ever made your own fondant, or bought a cake covered in it? If you’ve seen shows like Cake boss or Ace of cakes, you know what I’m talking about.
Fondant is an icing-like substance used to decorate or sculpt pastries. There are several types (a couple of times I made fondant by melting marshmallows) but the one I will show you here turned out to be the best for sculpting and covering cakes. I am personally not fond of fondant and when I eat a cake covered with it, I discretely remove it and eat the rest of the cake. However, certain types of cakes require sculpting and covering up with fondant, most often wedding, birthday or other celebration cakes. Of course you can decorate these cakes with icing, chocolate etc. but sometimes people ask specifically for a certain shape of cake, figurines on top of it and so forth.
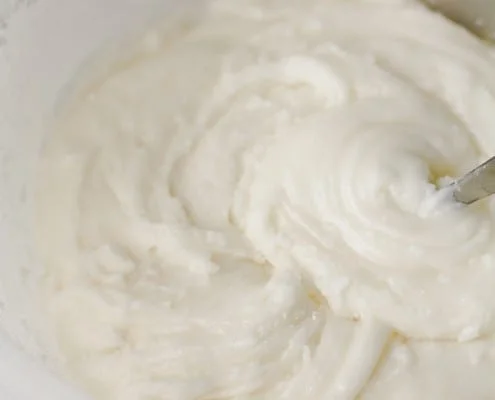
This recipe is actually really simple and anyone can make it at home. There’s no reason to buy fondant when you’re just a few ingredients and steps away from cheaper home made version of high quality (given that you don’t own a bakery or pastry shop and you make fondant occasionally at home in small or medium quantities). This is called rolled fondant and it consists of gelatine (or agar in vegetarian recipes), water, fructose, powdered sugar and food-grade glycerine, which keeps the sugar pliable and creates a dough-like consistency. Where I come from, people often ask me where to find “this glycerin thing”; it’s the most simple thing to buy – in every drug store. Once you’ve made this type of fondant, roll it out like a pie crust and cover a cake with it. You can also let your imagination flow and create different types of figurines that fit the theme of the cake. You color it with food colors. It’s best to use gel colors: apply the color with toothpick into the fondant. Then you knead it like dough to spread the color evenly. If you use liquid colors, add them to the fondant before you add the powdered sugar. Also, before applying rolled out fondant onto the cake, you will need to cover the cake with icing. I like to use a thin layer of regular buttercream. The fondant sticks nicely to it. This recipe is adapted from here, where you can check out a great video on how to make rolled fondant.
There are numerous tutorials about making different shapes from rolled fondant over the internet, so check them out if you’re interested.
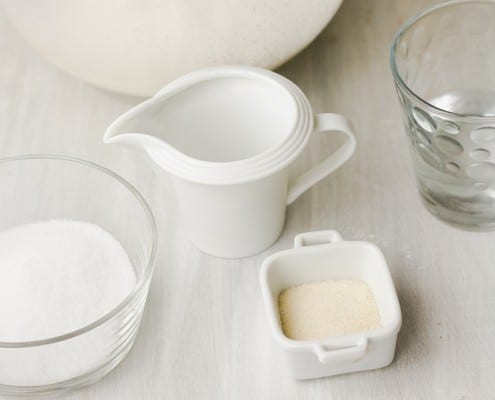
step 1: assemble all the ingredients
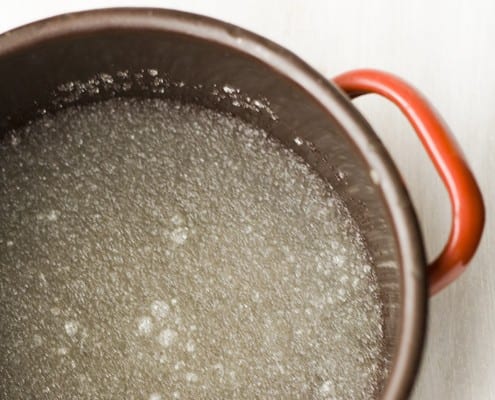
step 2: dissolve gelatine in cold water

step 3: heat fructose with water, add gelatine to it
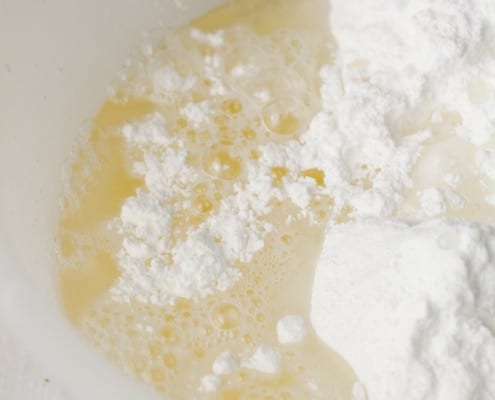
step 4: add the mixture to the powdered sugar
step 5: stir with spoon to combine

step 6: knead on working surface using powdered sugar

How to make your own fondant
Description
It’s actually easy to make your own fondant. If you wish to occasionally decorate birthday cake with it, or if you’re making a wedding cake, rolled fondant is very convenient.
Ingredients
- 0.70 oz (20 g) powdered gelatine + 1/5 cup (50 ml) cold water
- 3.3 oz (100 g) fructose + 1 1/2 tbsp (20 ml) water
- 1 tbsp glycerine
- 30.4 oz (900 g) powdered sugar
Instructions
- Dissolve gelatine in cold water. Let stand for a few minutes.
- Combine fructose with water and heat until it boils, stirring. Let it boil for 30 sec. and remove from heat. Add gelatine and glycerine. Combine.
- Add the mixture to half of the powdered sugar, stir with spoon to combine. Gradually add the rest of the powdered sugar. Turn onto working surface and knead until it comes together.
- Leave on working surface for 30 minutes so that it cools.
- Keep covered in plastic wrap, in an air-tight container on room temperatures. If you don’t use all at once, it might harden, so heat it in microwave for 4 seconds, it will become pliable again. It stores well for 1 month, but it’s best to use in 2-3 days.
Thank you for posting this recipe, Please can you give me a substitute for fructose. There is no fructose where I live
Thank you once again
Gulnefer
fructose is just like corn syrup
you can use corn syrup as well
please what will make my fondant to sweet after icing a cake
please I also need a substitute for fructose. There is no fructose where I live and what will possibly make your fondant to crack
idk I confuzzled!! this is isn’t as easy as 123
Good! I will be able to decorate the royal cakes now- especially for my baby on the way!
Is this really the Duchess?
Thank you so much Tamara for this guide to making my own fondant icing. God bless you
I really appreciate this brief lecture. I can now make foundat on my own .
I really appreci?ate the method you used in explaining,it’s very understandable.Thanks once again & keep up the good works.
fructose can b subtituted with glucose
thanks for this
thaNK YOU FOR THE RECIPE i am in training like im teaching myself to make cakes i really enjoy it to and thank you again.
I really like the steps I will make my fondant later thank you.
Thanks 4 the guideline,wat can I substitute 4 fructose?
Thanks for the explanation, it makes sense and very understandable.
tanks 4 ur guide line. I really apreciate
I want to make my fondant but i dont understand What fructose is
I am allergic to high fructose…or anything made from corn. It causes heart pompultations and has caused me to v fib 6 yrs ago. Would glucose work?and if it would…how much would need to be used as a subsitute. And where would I buy gluclose?
Hi, I believe you could substitute it with glucose, although I’ve never tried it!
Can you use stevia in place of glucose or fructose?
Since stevia is a natural plant sweetener.
I am trying to make my first ever 2 tier bday cake for my daughter. Will this recipe be enough to cover an 8×8 square and a 10×10 round, with additional for circle cut outs and other flat shapes. Also, will the fondant work out right if I use it the same day?
I buy fructose in drug stores, you could try glucose as well. You can try by substituting it with equal amount
Wow! This is mind blowing, what are my waiting for? Let me me try it out. Thanks
This is my first time of hearing the word fructose, where can i get it and what is the meaning of fructose? thank you.
You can buy it at a regular drug store. Fructose is suger, the kind you find in fruits mostly.
Please advise us the proper ingredients ratios of fondant recipe. what is substitute of fructose in which form it is available in the market.
Yep glucose substitution will work with the recipe above and you can add one teaspoon of vanilla essence just to flavour it up a bit.. or any essence.. good luck mate :)
Waoh! This amazing, wat are mine waiting for. Tnk u so so much.
Thanks very much, this was helpful
This is really amazing! Let me try it out. Thanks. But can glucose be a substitute?
This is realy explanatory…I will try it out
Thanks for showing me an easy way of making fondat, i will try it later.
Thanks for this info!Very useful. I’ve been looking for easy guide how to make fondant and this is exactly what I am looking!Thanks!
Good Day!.. tnx for the info. I’ll this for my son’s birthday cake.
Thank you for this fab recipe
I would really like to know the cause of cranks and fondant crumbling after kneadin and at the process of lifting to put on cake.this reciepe is just what I needed,I even followed the steps and made one just now but it still crumbled.
Thanks are we knead d mixture wit sugar.tnk 4 d steps
thanks for the insight, i always thought fondat was very difficult to make.
GOD BLESS YOU!!!!!!!!!!!!!
thanks dear, so informative and educative. will take a bold step today. cheers.
this is zoo easy love it
Pls teach me d quantity to use in makin a fundant.
Thanks for teaching me how to make fondant on my own. Am very grateful God bless you a lot.
Thank you for that woundful reciepe, It is really a teach your self one.
Hi,
I live in India. We won’t get fructose, so can we substitute with Glucose. It is the glucose powder which we get in medical store. I want to do it. It is first time i am decorating on the easter egg.
Please tell me what is White Vegetable shortening.
Tx a lot for this!
Any suggestions on what I can use in place of powdered sugar. I have a bride that is allergic to sugar. She can not use splenda or anything contaning sucrose either. I am at a loss.
Mary, you might be able to use Agave in place of sugar. I’m not sure if it comes in dry powder, though. Perhaps you could use a dry filler with it. Stevia is another possibility but it’s very strong and would also require a filler.
Hello,
I am Muslim and can’t use gelatins so is there any substitute I can use other than gelatins?
Thanks
@ SARA-
Muslims can use beef gelatin.. Foster Clark & many more companies produces beef gelatin.
What makes fondant to crack…especially after decorating d cake with it ?
Hello… May I know whether we store the fondant in what temperature if I would like to use the fondant in 2 days?
Thanks 4 d info.For how long the remaining fondant can stay.where can it be kept?
Hi Tamara,
One query. My 6 year son is a Type 1 diabetic, I need to know that instead of the icing sugar can i use Sugarfree and will that give the same effect as the icing sugar gives.
I have been having issues baking with sugarfree, the cakes don’t turn out as they tend to be while using normal sugar.
Please help
I really enjoy ur steps but I think one of the ingredient is missing which is cmc and adding to frutose to those that ask, I use liquid glucose to substitute for the frutose. Tanx nice knowing steps
if you where to use agar how much would you put and where would you recommend buying it?
it is easy and I love it for my store
CUPCAKES AND CAKES FOR ALL!!!!!!!!
Thnx for the info God bless u
thanks, u very nicely put the steps, how do I avoid the drying and cracks they appear later
Thank you for the useful recipe, and for the funniest comments sections I have read in a long time :)
Thanks 4 d info
please what’s the fructose look like?
Is butter not needed in making fundant
Tnx 4 d info.
T’s awesome, the way u explained ! Thank u very much, I’ll try it soon ????
This is interesting, thanks. I still want know why it breaks when making curves.
I added half a teaspoon of CMC to mine and it came out awesome no cracks and its very pliable too. mwwwaaaah, for the info.
U’re amazing.Thanks a zillion for this piece of information;It’s really helpful..more power to your elbow.God bless you
Hw can i preserve my cake with fondant and it will last three month
What could you use instead of glycerin?
thanks for the way u explained.
thank for the fondant recipe .
Thanks for the info but please why did fondant normaly break when raising ????? up and after placing ????? on the cake pls have seen many people asking same questio but you did not reply pls relply in M?????Y????? box thank you once again
plz reply to all the ABOVE questions asked and I’ll get my answer.
p/s give me the immportans of adding gylene to making fandant
whean you are making fandant can you put it on heat AT 100c` and adding the ingrdans.
Hi! Thx for the amazing recipe. And i want to know what can i use if i can not find fructose or glucose?
hi what can you use instead of glycerin? i can’t find glycerin here.
Thank’s dear,It’s splendd.I still need to know the full meaning of CMC? if am baking two figures cake what quantity of ingredients am i using for fondant decoration? thks
I want to learn how to make fundant
How long can I keep it in the fridge?
Thankyou for your receipe and its working ………thanks ….CMC is also used in Bread and other bakery items.
How can I make the fondant less sticky???
Hi Sunita! There are a couple of reasons your fondant might be sticky. First of all, make sure you’re rolling it out with a dusting of corn starch. Also, fondant will get sticky if you store it in the fridge – so don’t store fondant or a fondant finished cake in the fridge – it will melt just like a lollipop!
Thanks a lot, but please I need to know why fundants cracks
Hey, thanks for this recipe. My fondant comes out ok though I don’t use glycerine. I’d love to use it now but does it have a substitute?
Can u also write something on covering cakes perfectly, avoiding folds and rough finishes.
Thanks
Thanks,i use 1/2 teaspoon glycerine and vegetable shortening to make it not crack.if it is dry,touch ur hands with water and knead very well until very plieable.cmc make it to stretch well.
Wonderful submit. I used to be reviewing continually the following site that i’m satisfied! Invaluable information in particular the best sections :) I actually maintain such information considerably. I was searching for this specific specified details for a number of years. Thank you in addition to all the best.
thanks for the infor
thnks
can you add food coloring to make it colored fondant? thanks!
nevermind, i just re-read the thread. :) thanks for the information
Your teaching is wonderful but there was no measurement given. Also, I put a little CMC.
what is the subtitute for fructose and corn syrup
how long will it take to keep fondats
is the powdered sugar the same as the icing sugar? and isn’t there a simpler way to put the measurement for the recipe. Instead of gram put it in ounces. And the amount of water seems to be more than what is in the ingredient.
Thank u for the recipe, as I was always looking for one.
please reply to my box
thanks a lot! now i can try making homemade fondant cupcakes for my sisters’ birthday.
Hi, thank you so much on your explanation. With your help my student able to make their own animals fondant on their cupcake during my teaching lesson plan animals.
Pls can u tell me steps to use in improvising for shape cutter as a starter.
Yes, it’s me. My baby’s name is Kate! Learn more on my Facebook page.
Wat cn b d substitute for glycerine?
fnks so much but i still want to knw y u didnt put cmc powder and d measurement
What’s CMC?
Tanx alot. Dis guide have really helped me.
Ts great! Hv been finding a way of doing fondant icing,ur teaching s wel understandable n easy.Thanks so much.
I dont have gelatine for my fondant wat can i use to subtitude
where can i buy fructose and glycerine?
Thanks.ur recipe was fantastic and self explanatory
thnx alot for this amazing recipe….
For how long can fondant stay without getin spoilt and what can make fondant not to break or crack
Thanks so much i did my fondant and it come out neat
Plz, is it right to eat d cake together wit the fondant icing? Some people said it is not good to eat, that it is advisable to remove it. What do you hav to say?? Thnks.
Thnk you for the easy step. Thnks for that great work:)
thank u,i have try it ,but my fondant is cracking, what can i do?what is d meaning of c m c?
thank you now my cakes and cupcakes can look smooth not full of cracks lol thanks.
cmc is d known name and nothing more.it is common and available in all cake shops,though tylose is a subtitude 4 it.as 4 me glucose can be used instead of fructose and it work perfectly. Add cmc and glicerin 2 prevent cracking
Hi Can you please tell me what I can us instead of glycerine,as the only one I can buy is use for people that have ruff dry lips,not for cooking,or is this the same thingfor both?
Thanks.Julianne
Hey, how can I substitute fructose and glycerine? Thanx for the recipe!
Will CMC be added to the podered sugar or d mixture of frutose n gelatine?
Pls ansa d above question . Tanx 4 d receipe,itz rily explanatory
Thanks for the receipe. Pls what are the tools needed for fondant (to cut out different shapes)?
I really appreciate ur post. Its really helpful. Thank u so much
After making the fondant, can’t I use it immediate?
And what kind of icing should I use for decorating, like writing?
I have a cake design to make for my baby, her birthday is this Saturday, (7 Sept).
where can I buy/get the powdered gelatin and the corn syrup. I’m from South Africa, all South African please help me where to find those ingredients. Please help
I like you recipes
Specify choco vanilla ice cream cake n strawberry yogurt cake . I need lemon cake recipe too pls
Tanzs so much 4 This method. Can i use egg white too on fondant icing? Pls can u help me, any time i decorate cake with fondant icing it use to melt instead of drying pls y?
Waw it very okay 4 me,i really understand d step.so simple.
Fantastic Guide Tamara!
i like this,and i hope it will also work for my boy’s birthday in november.
hmmmmm….
really love d teaching n comments. but is d sugar d same as icing sugar? ild try d stepa as soon as i get my ingredients ready.
thanx.
You really ensure it is seem to be easy together with your presentation however I discover this condition to be really something I do believe I’d personally under no circumstances comprehend. It sort of feels also complicated and extremely substantial personally. We’re having a look onward on your own following publish, I’ll try and get the adhere from it!
it is very nice tank u so much for the shared knowledge
I am most grateful for ur receipe. Covering my cake wud not be a problem anymore. U saved my day. Thk u.
PEggwhite cn b used 4 fondant. Welldone 4d job
Thanks for the recipe. I want to know the quantity of cmc dat should be added to the fondant mixture.
Tanx 4 it bt am stil confuse
Thanks for your info.but please my fondant remain soft after about 5days of decorating the cake i mean is not drying.
You have really done justics to this…. I know it will work for my birtday in november. Thanks
Really nice,good work nd wonderfull ans but what’s d measurement 4 cmc
CMC means carbon methyl carbon. Keep ur fondant for abt 8hrs. It makes it mor pliable and reduces cracks.
When wil I add the CMC
Very nice thanks
Hello Gem
I love dis guidelines, but u didn’t give us accurate measurement. U ar too much.
Am i surpose to dissove d glucose in hot water
Carbon methyl cellulose i meant(cmc). Add it 2ur flour. Abt a teaspoon
Can i add any food coloring the change the color? or will it affect the texture?
Hi Bruce, you can, I suggest using gel food coloring. f you use liquid colors, it may affect the structure, but if it becomes “mushy”, just add more powdered sugar.
Cheers!
Is there a non animal-origin substance like agar agar to replace gelatin in this fondant recipe? Thanks!
It’s a nice tutorial. Is it gum paste. My g.p. has got a cracking problem. Thanx a lot.
Thanks 4 de recipe, can we use liquide glucose in place of fucose
This is great, can’t wait to try it! Thanks dear
Pls,my fondants appears 2 stick 2 my cake but once ot try 2 cut d cake,d cake separates immediately from d cake,den I notice it doesn’t s
tick like my butter icing does.so I saw it here that I can use butter cream for my first coating before placing my fondant on the cake,please wat is a butter cream,is it d normal butter used in baking or what? pls I need a reply as soon as possible. thanks
I mean d cake separates immediately from the fondant once I try to cut the cake,it doesn’t stick 2d cake like my butter icing does
This is really nice. Infact am blesd and i cant wait to make this for my sister’s birthday.
Hey what is the substitute for glycerine or where can I get one
Thanks, l will try it for my choir anniverssary cake
Please help give full details on how 2 prepare d fondant icing n is d powered sugar dsame as d icing sugar,please inbox me d answer on my email tanks. Great job n weldon
Very simple to follow fondant steps, Making a fondant is a science, making a tasty nice fondant is an art!
Hi, I love your fondant recipe as it seems easy to prepare than normal fondant. But I have some questions?
Where can I buy Fructose and food grade glycerine?
I’m in New Zealand, I searched those in super markets,but I never found it.
So can buy those online? If it’s possible please provide me links that I can buy them online…
Hi. U can use glucose gel instead of fructose. All u just need are gelatine, glucose gel, water, icing sugar and tylose. with tylose u hv to careful so dat it doesnt become chewing gum! add tylose bit by bit till its stretchy enuf. it also prevents cracking. gud luck!
thanks so much, ur teaching is so understandable. nd pls reply to all d question above. bye
You said fructose, some said corn syrup, some say glucose…what is it? Is this a dry ingredient or a syrup and where does one buy it? Why can’t one just use sugar?
i love det
I am new here BT pls I will like to no all d ingredient of fondant so I can make a cake for my little brother
Thank you, Tamara! Very easy guidance. Will practice this week.
What’s d substitute for glycerine? Are fructose. Glucose and gelatin liquid? And what is marshmallows?
Tamara, may God bless u and keep longer.
Tanks a lot dis is wonderful
plz ansa those questions
Thank u for d easy step, but want to confirm if gelatine is necessary, or Wats d possible substitute for gelatine. Thank you counting on ur reply, decorating a cake for my hubbys bufday n our 5th wedding anniversary on d 25 of July
Why will my fondant not get dry after pasting
I
I REALY LOVE THE STEPS U USED IN EX
PLAINING FONDANT ICING BUT THERE IS A QUESTION I HAVE.WHAT IS TYLOSE N WHERE CAN I FIND IT? IN AFRICA
please how can i remedy cracked fondant?
I am 13 years of age and I would like to grow up and be a baker. I bake all the time at my house. My sisters 16th birthday is about to come up and I would like to thank you for explaining how to make fondant. My sister will love her cake now!
I love your work
thank you so much, will forever be grateful
God bless u i..can make my own foundant now
what will i do to keep my fundant icing strong and not easy to melt
Hi Tamara
I am a cake decorator by profession and use lots of fondant but when I delivered my last cake, the people at the party said that it tasted like Plastic! I was really confused and found that it was because of the fondant which I bought from the market.
But now with the help of your post I will make it at home! Thanks a lot ^_^
Thanks a lot
Hi Tamara, I have been having problem with my fondant, but with this your receipt and step by step guide I’m sure my problem is solved. I will be forever
greatful. Thanks and God bless you.
THANKS SO MUCH TAMARA
How can i make icing at home,please it’s needed now
What is glycerine? and is there a subsitutite?
Nice one
Thank you very much
Thanks dear
Thanks a lot for dis steps.can corn flour used be in place frocutose?
Thank u ma,love u
Thanks for sharing the fondant recipe. But I have a query. How long can I preserve the above fondant if I keep in airtight container in a cool and dry place?
Thanks for the good work.
what can I use in place of glycerin?
I really appreciate this much,it is workable and easy.God bless
How do you make corn syrup
hi Tamara,
i love your idea. it’s a nice one you’ve got there. it’s well explained and easy to make. my advise for you is to make the measurements easy as well for many people who won’t understand. cheers!
Can I have all d ingredient of fondant and subtitute for any1 in my mail? You’ve done a great job here.
hi. thanks, i love the way you explained the fondant making, my problem is my is always breaking when i left it up to place on my cake and pls do answer all the guestion above thanks
Pls ma,my fondant usually break whenever i want to lift it up to cover my cake,this are my steps(1)disolve gelatine with warm water, pour it into my icing sugar, add C.M.C until its gumy ,add liquid glucose if desire,add little gyceline when kneadling it i use corn flour to stop it sticking on my working table..but after all this it stil harder and cracks,but i wil try this new step, but i wil love it if you give me some corrections .tanx u are God sent to we bakes
Really good recipes, nice a simple to follow! Great texture and taste my son said it taste as good as shop bought and I’d agree
Thanks a bunch for posting the steps for making my fundant icing. I ve learnt alot.
sounds great.
Hi,
With te above fondant recipe can I also make Human Figures. If yes can I make in advance.
U have done a great job keep it up. God bless u
fructose is no where to be found
Honey fructose is a dried form of sweetener that can be bought in any whole or natural food store. Because honey is all natural, it is the best sweetener as there are no highs and lows from ingesting it, which is super great when you have young Kids.
tank u very much for this
Pls in step 2 fructose with cold water am I to add d gelatine I dissolve or wat pls
Really easy steps and affordable too. Am going to try it, but you didn’t add the glycerin.?
Can you use this fondant to cover a cake? Can you use on top of rice crispy treats?
wow..am really interested in learning…tnx for d piece.
This was to hard because I don’t know what half of the ingredients are
How do you substitute agar for gelatin?
Your Comment. what is fructose
pleae tell me about fructose
Wondering if I can use colored gelatin, yellow as that would be the color I would need.
Thank you for the tutorial.
Wow thanks I really do appreciate, its been a great help here
where do you find fructose
Hi can u tell me what is fructose?i have light corn syrup…it can be used instead fructose
Good recipe’s ever
If wanting to substitute agar for the gelatin how much would one use?
Does look very easy – would it be possible to use granulated sugar (in place of the powdered sugar) to produce a form of fondant which could be presented to honey bees in their hive during the Winter?
Well I am looking for away to make fondant with sugar milk and water can you try that?
Sounds good
Put the ingredients first so we can all know what you need first but otherwise this is an amazing website!
can u cover cake with royal icing?
Good, simple
.7 oz is nowhere near the same as 20g!
Thank u, let me see how it goes
Thanks for the recipe. It looks so yummm….!!!
I am really fond of fondant icing and would love to make it but I am scared that I will ruin the whole cake trying to cover it with the icing but this recipe does sound pretty fool proof. I think I will be trying it soon. Thank you for making this available.
What oil or melted butter
so hw will I get d fructose and what do u mean by powdered sugar am confused do u mean icing sugar pls I really need dis answer
Yes its look simple but I need video to learn with it can we please send me thank you
This recipe is just amazing, I used lemon extract instead of vanilla extract and it worked just as well thank you so much!!!!
My family ate them up in one day! They are so easy and so yummy